Friday, December 18, 2015

Cocoa Packet Card

Here is a very quick card to put together for a last minute little gift!
  • Cut the card base at 5-1/2 x 8-1/2 inches, score and fold at 4-1/4 inches. Finished card size is 4-1/4 x 5-1/2 inches.
  •  Place the top front of the card in your trimmer at the 2-1/4 inch mark and cut down diagonally to the 2-1/4 inch mark on the right hand side to form the pocket edge. 
  • Place sticky strip or score tape along the 2-1/4 inch side on the right and across the bottom of the folded card. Now you have your finished pocket. 
  • To make sure the pocket stays together, punch a small hole towards the top of the right hand side of the pocket and thread through some baker’s twine and tie a bow.  
  • Decorate the front of the card as you wish using your favorite DSP. I used the Merry Moments 6x6 inch DSP stack. Colors used are crumb cake, old olive and cherry cobbler.
  • For the stamped images, I used the July Paper Pumpkin Kit “Thanks a Latte.” I cut out the cup after stamping it on patterned paper. I adhered the cup to a punched out 2-inch circle, then layered it on a 2-3/8 scallop circle and then onto a 2-1/2 inch punched circle. That was then added to the card front with dimensionals.
  • The cup of cheer stamped image is punched with a 1-3/8 inch circle punch, then layered on 1-1/2 and 1-3/4 inch punched circles.  
  • Add a packet of cocoa and a small candy cane and it’s done! You could also use this card design to hold a gift card instead of a cocoa packet and turn it into a gift card for a coffee shop!

This will be my last post until after the New Year. I will return in January with new creations! Merry Christmas and Happy New Year!


Thursday, December 10, 2015

Punch Art Christmas Gift Tags


I've been going crazy with punch art! It's addicting! Following are individual pictures with the punches I used to create each tag. It's magic when the punched pieces come together!

Elf Tag:
Head is punched with a 2 inch circle punch and layered over a 2-3/8 scallop circle punch cut in half to form the collar. Hat is a hand-cut triangle with the top of the hat folded over. I added a 1/4 inch strip of white for the brim of the hat and a 1/2 inch punched out circle for the top of the hat. Eyes are wiggly eyes. Nose is cut with a 1/4 inch circle punch and popped up with a glue dot. Give the cheeks some "blush" with soft pink ink and add part of a circle punch for the smile. Punch a hole in the top to attach the ribbon.


Santa Tag:
Santa is made very similar to the elf. The face is punched with a 2-inch circle punch. Beard is a 2-3/8 scallop circle punch with about a third of it cut off. Hat is hand-cut again in a triangle shape, folded down, and a 1/2 inch circle punch added to the top of the hat. I used the scallop border punch to make the trim of the hat. Nose is punched in red with a 1/2 inch circle punch. Again, eyes are small wiggly eyes. Punch a hole in the top to attach the twine or ribbon.


Reindeer Tag:
Reindeer head is cut from a 2-inch circle. Tuft of hair in the middle is a 1-1/4 scallop circle cut in half. Antlers are cut from the Tree Builder punch. Eyes are small wiggly eyes. Nose is punched with a 1/2 inch circle punch and mouth is hand drawn. I cut the top of the circle off for the head so I could attach the hair tuft and antlers easier. Punch a hole in the top for the cording or ribbon.


Snowman Tag:
Again, I used a 2-inch circle punch for the head, 1/2 inch circle punch for the eyes, the decorative label punch for the hat, and hand-cut a piece of black for the rim of the hat. The nose is hand-cut and the smile is hand drawn. Bow tie is cut using a 1-1/4 inch circle punch and cutting pieces out of two sides. Use the remaining center for the bow tie. I then added a 1/4 inch circle punch for the center of the bow tie. I cut a small strip of red glimmer paper for the hat. Punch a hole in the top for ribbon or cording.


Santa Suit Tag:
This is just a tag punched with the scallop tag topper punch. I added a strip of white down the center and added a piece of white cut with the scalloped edge punch for the bottom of the suit. the belt is a strip of black cardstock with a square cut for the belt buckle. I used a retired small 1/4 inch square punch to cut out the center of the buckle. Buttons are 1/4 inch circles punched out of black. Attach cording or ribbon to top.


Penguin Tag:
This tag is a little more intricate. The tag is cut with a stitched circle tag from Lawn Fawn. I love the stitched effect around the edges. Penguin body is a circle punched with the 1-1/2 inch circle punch. Head is punched with the 1-3/8 inch circle punch. White front of body is cut with the small oval punch. Arms are also cut with the oval punch but shaped by hand-cutting. White part of face is punched with a 1 inch heart punch (Martha Stewart). Stocking cap is punched with the 1-3/8 circle punch and cut in half to form the hat. Earmuffs are 1/2 inch circles. Scarf is made with the word window punch and feet are made with the retired modern label punch. Add some ribbon for hanging or attaching to package.

Thursday, December 3, 2015

Punch Art Santa Card

This fun Santa card is made using punches, with the exception of the body and a few hand cut pieces. I cut a 2-1/2 inch wide by 3-3/4 inch high triangle with my Cricut and added all the other body parts as follows:

  • 1-2 inch white circle punch for top of hat.
  • 1/4 inch strip of white cardstock cut for hat rim (hand cut)
  • Head/beard - 1-3/4 inch scallop circle punch. Ink edges of scallop circle in black, Add some rosy cheeks with a sponge dauber,
  • Eyebrows - 1/2 inch circle punch cut in half and edges inked in black
  • Eyes - 1/4 inch circles punched in black. Highlights added to eyes with white gel pen.
  • Mustache - 1 inch circle punch cut in half and inked around edges in black
  • Nose - 1/4 inch circle punched using red glimmer paper.
  • Arms - word window punch for each arm.
  • Hands - 1/2 inch circle punch cut in half
  • Bottom of Santa's coat -  1/4 inch strip of white paper cut to fit. 
  • Legs - word window punch in black
  • Boots - 1/2 inch circle punch cut in half.

Polka dot DSP is from the Merry Moments paper stack. I used real red and old olive cardstock for bard base. Layers were punched with scallop edge punch (no longer available from Stampin' Up). Enamel dots are Home for Christmas Enamel Dots. Overall finished size of card is 4-1/4  x 5-1/2 inches. "ho, ho, ho" is stamped on 1 inch circles stamped with individual letters, then layered on top of red and olive green 1 inch circles.

Ho, Ho, Ho, Merry Christmas!!!

Friday, November 27, 2015

Poinsettia Punch Art Tag


This poinsettia punch art tag was made using a 2 inch circle punch and the 1-3/4 inch circle punch! Similar to the post a few weeks ago where I made apples and leaves with the circle punch, this is made the same way. Click here to see that post. First punch your circle. Then insert the circle back into the punch from the top until you see a leaf or petal shape, then punch. (See picture below) Turn the circle around and punch another petal from the other side of the circle. Repeat until you have enough petals to form a full poinsettia. I used the 2 inch punch for the outside flower petals and the 1-3/4 inch punch for the inner petals. Repeat the process for the green leaves behind. Hint: If you have trouble inserting or positioning the circle into your punch, attach a thin strip of paper to hold onto it so you can insert it into your punch.


To make the veins in the petals, I used a spider web embossing folder and arranged the leaves on the folder before running through the Big Shot. You could use any embossing folder with some shape that resembles veins in the petals. For the green leaves, I just put the leaves on my score board and scored down the enter of each leaf. Use your bone folder to curl the petals and leaves a little bit for more dimension.  For the center of the poinsettia, I punched a yellow flower with the petite petals punch and added a rhinestone in the center. Each petal and leaf were inked around the edges with coordinating red or garden green inks.

The rest of the tag is made with banners cut from the Merry Moments DSP stack and red card stock, adding some white doilies behind. The sentiment is from the Lots of Joy stamp set. I added silver cording trim tied to the top of the bag.


Thursday, November 19, 2015

Christmas Envelope/Wallet


CHRISTMAS ENVELOPE/WALLET

With Christmas shopping about to get into full swing, I wanted a place to keep my Christmas list, sizes, gift ideas and receipts. I made this envelope/wallet for that purpose. It is a redo of a similar one I did back in August (click here to see that post). All the measurements and directions are in that post. You take a 6 x 9 mailing envelope, cut a thin slice off the sealed end, fold the envelope in half, and start applying pieces of patterned paper, pockets, etc. It is a super fun project to make and I think it will also come in handy for my Christmas shopping! I used the Merry Moments DSP stack from Stampin’ Up and some other leftover Christmas products from prior years. This is a good project to use up some of that leftover Christmas stuff! I used Velcro dots to close the flap. Stamp set used is Lots of Joy from the Stampin’ Up main catalog. Enamel dots are the Merry Moments candy dots from the holiday catalog. I hope you will give this one a try!


Thanksgiving Table Favors


If you are looking for an easy favor for your Thanksgiving table, give these a try. I cut strips of cardstock into 2 x 8-1/2 inch strips and cut each end with the tag topper punch. Then I scored each tag at 3-5/8" and 4-/5/8", folded on the score lines, and attached the two tag ends together with glue dots. One side will stand straighter and one side will be a little bit slanted. The slanted side is the one you want to attach your greeting to. I punched 2-1/2 inch circles from the Into the Woods DSP, inked the edges, added some die cut leaves, added a label punched with the label bracket punch, and then added a die cut greeting. If you don't have a die cut greeting, you could stamp an image of your choice. I added a gold sequin and tied the top with some fall colored thick baker's twine. Inside I slipped a Russell Stover caramel candy. They are approximately 1-1/4 x 2-1/2 inches, so any candy that approximate size would work. I didn't glue mine in because they fit snuggly enough, but you could attach the candy with glue dots. I had 10 done in about an hour, done in assembly line fashion, so a pretty quick project. The part that took the longest was the die cutting, so if you skipped that and just did stamping, they would be even quicker! Finished standing height of favor is 3-3/4 inches, so they won't take up a lot of room on your table. (Note: Die cut leaves are from Simon Says Stamp and "grateful" is from Taylored Expressions. All other products used are Stampin' Up. With the exception of the baker's twine, all colors and items are current Stampin' Up product.)

Monday, November 16, 2015

Christmas Gift Tags


This was my project this past weekend. I made my own Christmas tags using the Oh, What Fun stamp set from Stampin' Up! I think these tags will be great additions to my packages this year! There is also a tag kit you can get to make the tags, but I just used scraps I already had. It's a great way to use up your Christmas stash! http://www.stampinup.com/ECWeb/SearchResults.aspx

Sunday, November 15, 2015

Make a December Daily with Project Life from Stampin' Up!


Want to make an album documenting the holiday season? Project Life has the solution! The Kraft 6"x8" album is only $10.00 and the Hello December 2015 Project Life Card Collection is also $10.00. You can add from there as you like. There is a Hello December Accessory Pack, Hello December stamp set, and of course the photo pocket pages. Such a fun way to create memories this holiday season, from tree trimming to cookie baking, school programs, etc. Capture it all in one fun album! You can save 15% when you purchase the stamp set, card collection, acesssory pack and stamp set as a bundle. 
Supply List:

Built for Free Using: My Stampin Blog

Thursday, November 12, 2015

Christmas Wreath Card


Today's card is similar to the fall card I made a few weeks ago. To see how that card was made, go to the post dated 9-25-15 (Fall Series - Card #3 - Wreath of Leaves). Instead of the punched leaves, I formed this wreath using the petite petals punch in real red. The leaves behind are punched from 1 inch circles. (See the Apple Punch Art Card posted on 10-29-15). After the wreath was all put together, I adhered it to the card using dimensionals. I added rhinestones and a bow tied with the silver cording trim. Sentiment is from the Lots of Joy stamp set and is punched from the large oval punch and layered over real red and garden green pieces punched with the decorative label punch. I used DSP from the Merry Moments DSP stack, along with whisper white, real red and garden green. Finished card is 4-1/4 x 5-1/2 inches with red layer and DSP layers each being cut 1/4 inch smaller than size of card. This wasn't a difficult card to make, just a little time consuming. Save this card for someone special!

My supply list:

Built for Free Using: My Stampin Blog

Thursday, November 5, 2015

Christmas Cards (Bohemian DSP)


These Christmas cards were made using the Bohemian Designer Series Paper with Rich Razzleberry, Hello Honey and Very Vanilla cardstock, not your usual "Christmas colors." I love this DSP and wanted to incorporate it into some Christmas cards. The Very Vanilla cardstock on the first card is embossed with the Boho Chic embossing folder. Edge of vanilla cardstock is inked with Rich Razzleberry ink. The stamped ornament tops and Merry Christmas greeting are from the Lots of Joy stamp set. The greeting was punched out with the extra large oval punch.  I used gold cording trim to “hang” the ornaments and scattered gold sequins around the cards.

You might notice that the ornament tops are different on the second card. I punched a piece of gold foil with the word window  punch and then punched a hole in that to resemble an ornament top. Greeting on second card is from Teeny Tiny Wishes and was punched out with the word window punch. 

The ornaments are just 1-3/8th circles cut from the DSP and popped up with dimensionals. I taped the gold cording to the back of the circles before adhering to the card with the dimensionals and then tied the gold bows separately and attached them with glue dots. Finished card is 4-1/4 x 5-1/2 inches with layers each being cut ¼ inch smaller.

My next post will be back to the traditional Christmas colors.  I just wanted to give this look a try. What do you think?

My Supply List:


Built for Free Using: My Stampin Blog

Thursday, October 29, 2015

Apple Punch Art Card


This was such a FUN card to make! I watched a video by Dee Slater showing how to make apple punch art and I was hooked! (Here is a link to the video) I used to collect everything apple so this brought it all back to me. Once you start making apples, you won't be able to stop!

Apples and Leaves:
You just cut a circle with the 1-3/4 inch circle punch, then cut "bites" out of the top and bottom of the circle to form the apple. She also shows how to punch leaves using a circle punch. I made some with the 1-3/4 inch punch and some with the 1-1/2 inch punch. Just insert your circle back into your punch far enough so it looks like a leave inside the circle, then punch. Turn the circle and do the same thing again. You can get two leaves from each circle. From the paper left surrounding a brown punched out area of a circle, use your circle punch to make the stem. I had a whole pile of leaves and apples when I was done, so I decided to make a bushel basket of apples!


Basket:
For the basket, I cut a 3-1/2 x 3-1/2 inch square out of crumb cake cardstock and embossed it with a Sissix striped embossing folder. From that square, I made angle cuts on each side to form the shape of a basket and rounded the bottom corners by hand. For the rim of the basket I cut a 4 x 1 inch piece of crumb cake, rounded the corners with a corner rounder punch, and attached it to the basket with dimensionals. For added dimension, I inked the edges of the basket and rim piece before attaching the apples. I also inked the edges of the apples and leaves. I tied some linen thread around the basket, made a bow, and added several more leaves. I attached the basket to the card with dimensionals. I placed two of the apples behind the rim of the basket and one in front. I added some enamel dots for decoration.

Card Base & Greeting:
My card base is a little bit bigger than A2 to accomodate the apples and basket. You could make your apples smaller by using a smaller circle punch and then making the basket smaller, but I went with the larger apples and just made by card a bit bigger. Finished size is 4-1/2 x 5-1/2 inches. The stamped greeting is from Endless Thanks. I cut it out with the small oval punch and then attached that to a scalloped oval cut out in real red. It is also attached with dimensionals. Cardstock for card and apples is real red and leaves are garden green. Basket and several leaves are crumb cake. DSP used is from the Merry Moments DSP stack.

All supplies are listed below. Try this card and check out Dee's video! She makes a really cute K-cup box that she decorates with the apples. Once you start making these apples, the possibilities are endless!

Thanks for stopping by today!

Here is my supply list:
Built for Free Using: My Stampin Blog

Thursday, October 22, 2015

Halloween Treat Bags (Using One Sheet of Paper and No Die!)

Halloween Treat Bags
 Do you need some last minute Halloween treat bags but don't have a die or "thinlet" to make them? I have the answer! All you need is a piece of printed paper 5-1/2 x 7-1/2 inches and a way to score your paper (on a trimmer or scoreboard). Use any Halloween themed papers you choose. I used an older Paper Studio Card Stack.See picture below for cutting instructions:
Score at 2-3/8 and 5-3/4 inches on long side, turn and score at 5 inches
Finished bag size is 3-3/8 x 5 inches. It's large enough to hold some treat size candy pieces or several snack size Hershey bars. Cut the paper as shown, trimming off the bottom two pieces on the sides, leaving a center flap. Round the corners of this flap. Fold the sides in, then the bottom up and adhere with a strong adhesive. I used a pinking shears to cut a small strip off the top of the bag for decoration. You could use any kind of decorative scissors or leave it straight. It's up to you! Decorate as you wish and you've only used ONE PIECE OF PAPER! I have used this over and over again for many occasions and wanted to share it with you!

Thursday, October 15, 2015

Owl Witch Card

Owl Witch Card
Halloween is one of my favorite holidays. Even though my kids and most of my grandkids are too old for trick or treating, they are never too old to get a Halloween card! This is one I made using the Cricut Wild Card Cartridge. This cartridge was one of the first ones I purchased when I got my Cricut but is probably one of the fewest used. I decided to dig it out and find a card to use for Halloween.

The owl card can be found on p. 72 of the booklet from the Wild Card Cartridge. I cut the card out at 5 inches and then cut it again in blackout at 5 inches to form the inside layer of the card. I cut the blackout layer in half and only used it on the lefthand side of the card to provide the back layer for the owl - eyes, nose, and underside of feathers. I wasn't crazy about the eyes as cut out, so I used my 1/2 inch circle punch and 1-1/4 inch scallop punch to make the outer part of the eyes. Cut a 1/2 inch circle in the same color cardstock. Then cut around that 1/2 inch circle with the 1-1/4 inch scallop punch, sponge around the edge of the scallop circle, and attach to the eyes. This leaves the black layer exposed for the centers of the eyes. I used a chalk marker to make highlights in the eyes. The card is made with calypso coral cardstock from Stampin' Up and I sponged all around the outside of the card with the same color ink. Lift up the triangular "feathers" with your fingers to expose the black cardstock underneath and sponge the "feathers" too.

For the hat, I cut a 1-1/4 inch circle from some black glimmer paper from Stampin' Up (#139605), then cut a ring around it with a 2-1/2 inch circle punch. Fold this ring in half. Coming in from the bottom, add a piece of glimmer paper cut in a triangular shape and use glue dots to attach it to the folded circle to form the hat. Add a bow and attach hat to the top portion of  the front of card with glue dots. Stamp a greeting and attach from side of hat. Since I LOVE owls as much as Halloween, this card seemed like a perfect pairing! Hope you like it! Thank you so much for coming by!

Friday, October 9, 2015

Trick or Treat Witch

This is a tale of two witches! The first is a card using the popular "witch's hat" made with the Stampin' Up tree punch and circle punches. The tutorial is for the hat to be attached to a clothespin and then attached to a treat bag, but I just used it flat as a hat on a card! (Link to tutorial below.)
Trick or Treat Witch Card
 This card just kind of came together unexpectedly. When I was looking for papers to use I found a stack of paper in my stash from Paper Studio that had the "body" of the witch and the legs and shoes all in one strip on the pattern. I cut these out and attached them to a coordinating piece of paper from the pack and had the body of my witch. Next I made the witch's hat using the tree punch and circle punches, added a bow made with the Stampin' Up  bow builder punch, and added it as the head of the witch. Next I used the word window punch to make the arms. I had an old trick or treat bag stamp so used that for her to hold in one hand and added a cut out piece of candy from another coordinating paper in the stack for her other hand. I stamped and cut out a small pumpkin, added some candy dots, and my card was complete. The finished card is 4-1/4 x 5-1/2 inches. The striped paper is matted to a piece of black, and then onto the pumpkin pie cardstock to form the card. That's the story of the first witch! Then......I wanted to make another one.

Trick or Treat Witch Jar

I found this "Mason" jar at Dollar Tree. I cut out pieces of patterned paper from my scraps to form the body of the witch and legs. I didn't know what to do about the shoes, so I started playing with the Decorative Label punch! I cut one out of a corner of the punch, liked it, so traced and cut another one from the same punched out label, inverted it, and had two witches shoes! This time I decided to make her dress a little different, so I cut out a portion of a spider web cut with the Cricut and added it on top of her body to make it look like a cape. I used the Pretty Pennants Art Cartridge, but Stampin' Up makes some very cute black spider web doilies that I'm sure would work just as well and be less time consuming! I just didn't have them when I made this version. I made the same witch's hat, added the same arms, the treat bag and a stamped piece of corn candy to her hands. I used glue dots to attach the witch pieces to the jar, filled it with candy corn, added a piece of black and white gingham ribbon, and here is my witch's treat jar! (The video of how to make the witch's hats can be seen on You Tube - Dawn's Stamping Thoughts - Clothespin Witches. Witch's Hat Video Tutorial ) You'll love this video. There are several versions of the hat, so make sure you watch the entire video. A bonus is that the tree punch can also be turned into a Santa hat!!!

I hope you enjoy my projects for this week! I had a blast making them. I might also add that the lid of the jar I bought at Dollar Tree is black so you could write on it if you wanted to.

To make it easier for you, here is a list of the punches used for these projects:
2-1/2 inch circle punch #120906
1-1/4 inch circle punch #119861
Word Window Punch #119857
Tree Punch #135859
Bow Builder Punch #137414
Decorative Label Punch #120907


Thursday, October 1, 2015

Fall Series - Card #4 - Pumpkin

This is Card #4 in my fall series that I cased from Pinterest. It is a very easy card to reproduce. I used Pumpkin Pie Cardstock cut at 4-1/4 x 11 inches and then folded it in half to make a 4-1/4 x 5-1/4 inch card that opens from the bottom, and rounded the top corners. I dry embossed the front using a striped Sissix embossing folder, but really you could use any one you like. Edges were sponged with Pumpkin Pie ink. Cut a strip of burlap ribbon, fold it in half to form the stem, and secure it to the front of the card using glue dots. Add a coordinating button and linen thread and some punched or die cut autumn leaves. I originally was going to use an acorn attached to the stem, but since I featured an acorn on one of my other fall cards, I opted for a sentiment I liked from a Sale-a-Bration set this year called "You Brighten My Day" and stamped it in Chocolate Chip and Pumpkin Pie inks. You can use any sentiment you choose. There are also several stamps in the new Holiday Catalog that would also work well. Just make it your own. I think it is a very simple but effective card, with or without a sentiment!

My Supply List:
Built for Free Using: My Stampin Blog

Friday, September 25, 2015

Fall Series - Card #3 - Wreath of Leaves


This card was fun to make, a little time consuming, but definitely not hard. I made a cardstock ring as a base to glue my leaves onto (pictures below) and then just started layering them on until I had the wreath full. I used the “Small Stitched Leaves” from Lawn Fawn (love these dies! - link below) using various scraps of fall colored cardstock. If you form the wreath using the ring as a backing, you then have a separate wreath you can add to the card and pop it up using dimensionals, which gives it a more 3-D effect. The bow is tied with a double strand of linen thread.

I used the new “Into the Woods” DSP from Stampin’ Up, sponged it with Mossy Meadow ink, and then layered it onto Old Olive and Mossy Meadow cardstock for a finished 4-1/4 x 5-1/2 inch card. Layers were each cut ¼ inch smaller – Old Olive at 4 x 5-1/4 and DSP 3-3/4 x 5. The sentiment is from Teeny Tiny Wishes, punched with the Word Window Punch, sponged with Pumpkin Pie ink, and then layered on a Small Oval Punch and then onto a Scalloped Oval Punch in the same Old Olive and Mossy Meadow colors. I really like these two colors together! Supply list follows along with pictures of how to make the ring base for the wreath.

Pictures of how to punch ring base for wreath:
Punch a 2 inch circle

Around that hole punch again with the 2-1/2 inch circle punch

You are left with a ring for the base of the wreath. 


Supply List:

Built for Free Using: My Stampin Blog

The "Small Stitched Leaves" dies are from Lawn Fawn.

I hope you enjoy making this card for fall! I have a lot of birthdays this fall, so this may turn into a birthday card instead of a Thanksgiving card, but either way I think it will work! Thanks for stopping by! 


Tuesday, September 22, 2015

Holiday Catalog - Handmade for the Holidays


If you haven't received a copy of the Holiday Catalog and would like a PDF, here is a link to download one from my Stampin' Up store! If you have any questions about anything, please just let me know! Enjoy browsing! Download PDF of Holiday Catalog here.

Friday, September 18, 2015

Fall Series - Card #2 - Non-traditional Fall Colors


I was looking through a fall issue of a home magazine the other day and they featured a turquoise painted pumpkin. I absolutely loved it so had to recreate it in card form! Here is my version. I used Bermuda Bay, Calypso Coral, Basic Black and Very Vanilla Cardstock from Stampin’ Up, along with the same colors of inks. I added some die cut  leaves from Lawn Fawn and a greeting from Endless Thanks (Stampin’ Up). Card is embossed with a leaf pattern folder by the Paper Studio (Hobby Lobby). Who says fall cards have to be “traditional” fall colors!
Supply List:
Bermuda Bay Cardstock – Stampin’ Up
Calypso Coral Cardstock – Stampin’ Up
Momento Tuxedo Black Ink
Bermuda Bay marker
Calypso Coral marker
Oval punches – scallop oval and large oval
Paper Studio embossing folder
Pumpkins stamped using Fall Whimsy (2006) – one of my favorite stamp sets!
Leaves cut using Lawn Fawn “Small Stitched Leaves” dies


Friday, September 11, 2015

Fall Series - Card #1 - Pumpkin


Today I'm starting my Fall Series of cards. Fall is absolutely my favorite time of year so I couldn't wait to get started on some fall cards! Here is the first card in the series. This isn't a new concept, but if you haven't seen it done before, here are a few photos and instructions:

Start with a 5 x 10 inch piece of cardstock and fold in half to leave a 5 x 5 inch card. Burnish the crease well with a bone folder. Place a 4-1/2 inch size round die on top of the card, leaving the top part exposed as in the photo. Run it through your Big Shot or Cuttlebug. You will be left with a round card that opens from the top. Next I ran the part of the card that will be the front through the Cuttlebug or Big Shot using any leaf or fall themed embossing folder. (Mine was a Sissix but I have had it for awhile and don't know the name.) Cut an approximate 1/4 inch slit in the top fold of the card large enough to insert a piece of burlap or other ribbon through the slot to form the stem of the pumpkin and glue down.
On the inside of card I added two smaller circles in a lighter colored cardstock. The one on the bottom is for your greeting, and I found that adding one to the top helps stabilize the card so it will stand properly for display purposes.

On the front of the card, I just added some punched out and inked leaves and a small acorn cut from my Cricut (Create a Critter, p.32). (Leaf punch is a Recollections punch from Michael's). Add a button and linen thread to the bottom of the stem and stamp and attach a greeting of your choice! Hope you give it a try! Thanks for stopping by again this week!

Additional Notes: I also have been using some Lawn Fawn dies called "Small Stitched Leaves" that is a great set and has a small leaf very similar to the one I used on this card. I will be featuring these leaves on my next two cards in the series. Click here for website. Also, Stampin' Up has a very cute acorn punch in the new Holiday Catalog. I cut the acorn on my Cricut at 2 inches and the top at 1-1/4 inches and ended up with about a 1-1/2 inch acorn.

UPDATE: The embossing folder I used is called "Christmas Elegance" by Rachael Bright (Sissix). Here is the link at Amazon. It comes in a 2-pack. I have used the other folder on pumpkins too. They are definitely not just Christmas folders!

Thursday, September 3, 2015

Coffee Cup Card

Coffee Cup Card Using "Thanks a Latte"
I LOVE my morning coffee and I love coffee decor for my kitchen. It only seemed natural then that I make a coffee themed card! I used the coffee/teacup stamp from the July "Thanks a Latte" Paper Pumpkin Kit. The card measures 4-1/4 x 5-1/2 in Early Espresso from Stampin' Up. It is layered with white and then a layer of Early Espresso DSP. The cup is stamped in Early Espresso. I colored in the handle and then stamped another cup on the designer paper (not Stampin' Up, just a scrap I had), and I cut it out and then pieced the cup portion on top of the stamped image. I added some small brown flowers and tiny rhinestones.

The center piece is layered in Early Espresso, white and then a turquoise blue DSP (Colorbok Photo Mats stack purchased from Walmart). I rounded the corners with a corner punch and then wrapped the entire piece with linen thread before adhering to the card base. I also added a larger punched flower and rhinestone to the left side. The birthday greeting is from Teeny Tiny Wishes and is layered using the Word Window Punch and the retired Modern Label Punch. Now, go have a cup of coffee!! I am!

Thursday, August 27, 2015

Flower Medallion Punch to Make Poinsettias

I used the flower medallion punch from Stampin' Up to make these "poinsettias" on my first Christmas cards of the season. I had to try some prototypes early. I always change my mind on what I want to make by the time the season actually gets here, but wanted to try this idea of using the flower medallion punch. The flower on the left was stamped in Real Red on white cardstock, punched, and layered on a stamped  Garden Green and punched flower for the leaves. I clustered some small yellow flowers in the center. The flower on the right was stamped and punched in layers on Real Red cardstock with green as the bottom layer for the leaves. I used gold glitter paper to punch a small circle for the center.

Cardstock is Garden Green and Real Red with Real Red DSP from the Brights Collection for the card on the left and Real Red and Old Olive DSP for the card on the right. Left card has ribbon as the accent and card on the right has an embossed strip of white cardstock. Greetings are both from SU - Endless Wishes (2014) and Teeny Tiny Wishes.

Give it a try and see which version you like better. I love this diagonal striped DSP! I think it gives the cards a modern look, but still using traditional green and red colors. Both cards are standard 4-1/4 x 5-1/2 inches, with layers each cut 1/4 inch smaller.

Thursday, August 20, 2015

Paper Pumpkin Stamp Storage

Paper Pumpkin Stamp Storage

I have been in a quandary for a long time about how to store my Paper Pumpkin stamps. I didn't like the boxes all stacked up and would lose track of them. Out of mind, out of sight kind of thing. I also tried the clear stamp cases, but when you only have a few stamps in each set, it's kind of a waste of space, and I didn't like combining the stamps from different kits into one plastic case. I recently saw a video where Jennifer McGuire put her clear stamps in cellophane sleeves, added white cardstock inserts, and then labeled the stamp sets. I decided to adapt this idea to my Perpetual Calendar Box in an earlier post. This is the result. I made the box the same way, just increased the depth to 2-1/2 inches to accommodate more stamp sets. (You could make the box a little narrower but I just left it the same as the Perpetual Calendar box.)
BOX DIMENSIONS FOR THIS BOX:
2 PIECES OF CARDSTOCK - ONE IS 11 X 7 INCHES AND ONE IS 7 X 6 INCHES.
ON THE 11 X 7 PIECE, SCORE ON 11 INCH SIDE AT 1/2, 3, 8 AND 10-1/2 INCHES
ON THE 7 X 6 PIECE, SCORE ON 7 INCH SIDE AT 1/2 AND 3 INCHES, TURN 90 DEGREES AND SCORE ON 6 INCH SIDE AT 1/2 AND 5-1/2 INCHES.
REST OF CONSTRUCTION OF BOX IS THE SAME AS PERPETUAL CALENDAR BOX IN POST BELOW.

Right now I have enough room in the box that I can add a few cards leftover from the kits. I used 4x6 cellophane bags and all the stamps fit in this size. although one was kind of a tight fit. So far I'm finding this is a great way to grab a stamp set and make a really quick card! It fits on my workbench and they are not out of sight. I took some of the Paper Pumpkin advertising from the kits and decorated my box with them. The colors I used were Tempting Turquoise and Calypso Coral.

If you've been wondering how to store your Paper Pumpkin stamps, maybe this would work for you too!

Thursday, August 13, 2015

Minion Birthday Cards


While “Minion” cards are certainly not new, I have been seeing some on Pinterest and wanted to make a few of my own. They are so much fun to make and turn out really cute. I just love their little faces! I’ve included a picture of the products and punches I used to create my Minions, along with directions below. The sentiment is from Endless Birthday Wishes #140273. The written instructions are for the one-eyed Minion.  My Minion with the goggles (two-eyes) was my first one and I thought was a little “chubby” so I changed the dimensions for the one-eyed Minion.  Have fun creating your own Minions! Idea - I made a sentiment on my computer for the inside of card that said: "Hope your day is just like you - "one in a minion!"


Instructions:
Card base is 4-1/4 x 5-1/2 inches
Basic Black layer is 4 x 5-1/4 inches
Daffodil Delight layer is 3-3/4 x 5 inches
Blue layer (Paper Studio) is 3-1/2 x 4-3/4 inches (embossed with SU Decorate Dots embossing folder)

Punches:
2 inch circle punch
1 inch circle punch
½ inch circle punch
¼ inch circle punch
7/8 inch scallop punch
Word Window punch

Minion Pieces:
·        1-7/8 x 2-1/2 inch yellow piece – Stick each end into your 2-inch circle punch from the inside and cut rounded ends.

·        1-1/2 x 1-1/4 inch blue piece for overalls, plus two ¼ inch wide strips for straps (cut longer than needed, attach to front bib of overalls, and fold extra around to back),  ½ inch square for pocket. Add faux stitching on overalls with a white gel pen. I added a tiny 4-petal flower to overalls pocket. After blue piece is attached to yellow minion, trim to match the bottom of yellow piece.

·        2-1/2 x 5/8 inch strip for goggles strap (fold extra around to back)

·        Eyes: 1 inch circle in gray, ½ inch circle in white, ¼ inch circle in black.

·        Arms and feet:  Arms are created with the word window punch. I created the hands and feet by cutting out of scallops punched with the 7/8 scallop punch.

·        Add small thin black strips for hair. 

Friday, August 7, 2015

Envelope Card or Mini-Album


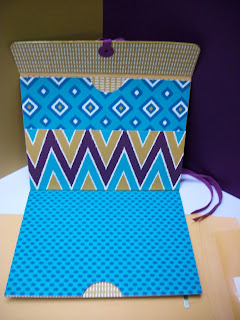
This fun project is made from a 6 x 9 inch clasp envelope! You just fold it in half, cut off the closed end, and decorate with pieces of coordinating patterned paper. It's a great way to use up scraps! The possibilities are endless. You could add gift cards, photos, note cards, or use it as a receipt holder in your purse! I got the idea from "roxyfur" on You Tube (Dollar Tree Envelope to Adorable Card Holder). Mine, however, is a little bit different. 

Here are the written instructions for my version:

Envelope Card
Supplies Needed:
1 6 x 9 inch Kraft clasp-close envelope
4 pieces designer paper cut 4-3/8 x 6 inches (for panels)
2 pieces designer paper cut 2 x 5-7/8ths inches (for inside pockets)
1 piece of designer paper cut at 1-1/2 x 6 inches (for outside flap)
1 piece designer paper cut at 1-3/8 x 6 inches (for inside flap)
1 piece of designer paper cut at 2-1/2 x 6 inches (for inside pocket)
Various width 6 inch strips (for decoration)

Instructions:
1.    Cut 1/8th inch off the closed end of the clasp envelope.
2.    Fold down the flap on top but do not close shut.
3.    Fold envelope in half making a 4-1/2 x 6 inch “wallet.”
4.    Attach the 4 panel pieces to the inside and outside of wallet. This is a good way to use coordinating papers, mix and match.  Tip: When attaching the inside top piece be sure you don’t glue it too close to the top and glue the opening shut. There is a slight taper of the envelope here, but rather than cut the paper to fit, just don’t glue it too close to the top.
5.    Using a 1-1/4 circle punch or similar cut a half circle in the tops of both inside pockets. (This will make it easier to access the pockets.)
6.    Attach the 2 inch x 5-7/8th inch strips to the inside of each pocket. (If you don’t mind the kraft envelope showing you can skip this step.)
7.    Attach the 2-1/2 x 6 inch piece of paper to the inside right pocket in the center, making sure to only adhere the edges. This will make an additional small pocket on the inside of the wallet.
8.    Attach the flap pieces to the flap of the envelope on each side. Rather than cutting the strips to match the taper of the flap, just glue each side on and then use a corner rounder to round the corners. Punch a hole in the center of the flap, adding hole reinforcers if desired, and string ribbon through the hole to tie the wallet closed. (Alternatively you could use Velcro or magnets.)
9.    Decorate the outside of your envelope/wallet anyway you desire. Add coordinating strips of cardstock, stamped images, etc. 

More Pictures: