Friday, March 25, 2016

Bunny Chick Card

Bunny Chick Card

Happy Easter! I thought this was a funny little card made using the Cricut Create a Critter 2 cartridge. Patterned paper is from the Have a Cuppa DSP stack from Stampin' Up. Greeting is a retired stamp from SU. Flower is punched with the Petite Petals Punch from SU. Cuts from the Create a Critter 2 cartridge are as follows:

Chick - p. 41 - Create a Critter 2, cut at 3 inches (2 layers)
Bunny Ears - p. 41 - Create a Critter 2 - cut at 3 inches (2 layers)
Basket - p. 40 - Create a Critter 2 - cut at 2 inches and embossed with a zig-zag embossing folder (Paper Studio) and inked for dimension
Eggs - small egg punch (brand unknown)
"Stitched" piece of cardstock at bottom of card - Bundle of Stitched Shapes by Simon Says Stamp
Green "grass" and orange border below greeting - p. 41 - Create a Critter 2 - layer on shift (egg)

Finished card is 4-1/4 x 5-1/2 inches.

I hope you like this fun take on an Easter bunny/chick! Have a wonderful Easter!


Friday, March 18, 2016

Easter Bunny Mini-Treat Bags

Hippity Hoppity!


Easter Bunny Mini-Treat Bags

These cute little bunny treat bags were cased from Erica Cerwin of Pink Buckaroo Designs. I will link her video below so you can see how it is made. I changed mine up a little bit, but I loved the green color and the grass she created with fringed scissors. I didn’t have the bunny stamp she used so I created my own bunny by using punches. I added some pink shading for the inside of the ears and cheeks, added some googly eyes, a punched out heart for the nose, and some frayed white yarn for the whiskers. I also used a little egg punch to make the eggs hiding in the grass. I also wanted to make a couple little girl bunnies, so I added small glittered pink bows with a rhinestone to the girl bunnies.

I cut a 3-3/4 inch piece of patterned paper for the bottom of the bag and wrapped some baker’s twine around the bag and tied it, added a flag stamped with an Easter greeting, another colored flag behind it, and a colored button with a Baker’s twine bow.

I did stamp a polka dot background on the right upper side of the bag for a little interest, but this is totally optional. I just love polka dots so I thought this added some interest. I also thought about stamping some small flowers in that area, but opted for the polka dots. The stamp I used is a retired stamp from Stampin' Up. 

I used the Mini-Treat Bag Thinlet from Stampin’ Up to create most of the bags, but you can make almost the identical bag by cutting, scoring and folding a half sheet of cardstock to make a very similar mini-treat bag. Now that I have done it both ways, I actually prefer making my own to using the thinlet, but each person has their own preferences. 

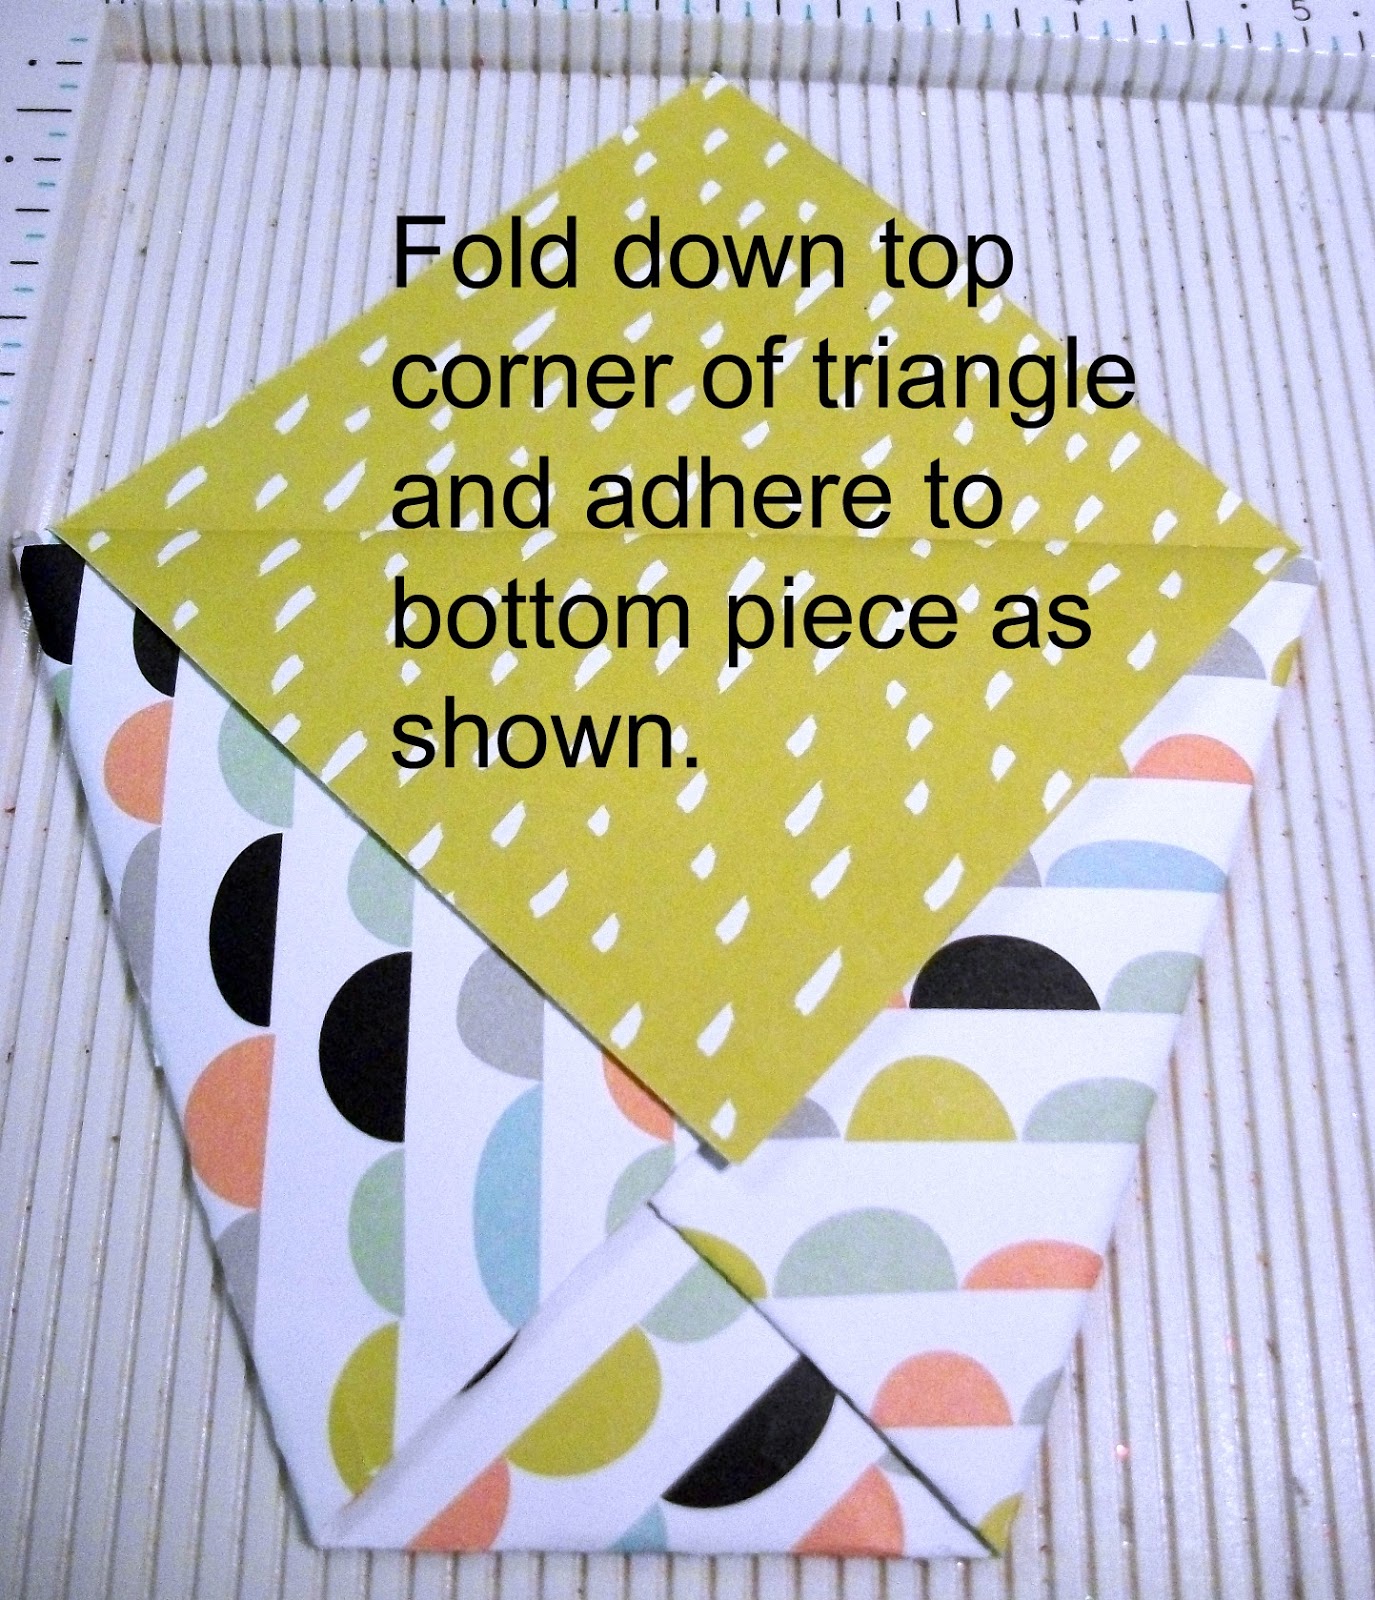
To make your own bag, cut a piece of cardstock 8 x 5-1/2 inches. Score it on the long side at 3-3/4” and 7-1/2”. Turn the cardstock and score on the short side at ½ inch. (See the diagram below). Fold on the score lines and adhere together with sticky strip or another strong adhesive. If you like the look of the pinked edge, use pinking shears or other decorative scissors to cut a strip off the top of the bag. You won’t have a two level look like the mini-treat bag thinlet, but it is very similar otherwise. 

The finished bags will each hold one of the Easter Kit-Kat bars, which is what Erica shows in her video and is what I am putting in mine, as well as any other flat type candy bar. You could even add a little cellophane grass if you wanted to.

I really liked the way these turned out and wanted to share my version of the treat bags with you. Whichever version you decide to make, have fun with it! My 3-year-old granddaughter accidentally saw them on my craft table before I had them hidden away and really liked them!

Supplies:                                                                                 
8-1/2 x 11 green cardstock (I used Recollection)                   
Pink ink and dauber                                        
Cardstock scraps for nose and banners                                   
Patterned paper for eggs and bottom strip (Cherry on Top DSP from Stampin' Up)                           
Googly eyes, button and baker's twine                                                                                   
White yarn for whiskers                                                                            
Easter Greeting (mine is from And Many More by Stampin’ Up)
Background stamp (optional)

Tools:
1-3/4 inch circle punch
Small oval punch
Small heart punch
Small egg-shaped punch
Fringe scissors
Mini-Treat Bag Thinlet (Stampin' Up)  (optional)

Link to video by Erica Cerwin: Click here

If you would like to make your own mini-treat bags, here are the cutting directions:

Cut Cardstock at 8 x 5-1/2”


Score bottom at ½ inch
Score at 3-3/4” and 7-1/2”
A
D
H
E
S
I
V
E

Cut this section away
Fold this section up to form bottom of bag and adhere.
Cut away
*Not to scale
Fold large sections together and add adhesive to the ½ inch strip on the right hand side. Fold up bottom ½ inch to form bottom of bag. You may want to trim a sliver off each side of the bottom flap at an angle for a more finished look. Hint: When cutting away the sections, cut slightly above the score line so the bag bottom will fold together and close with no problem. 

Hippity Hoppity! Easter's on its way! 

Saturday, March 12, 2016

Card Inspiration


I find inspiration for cards everywhere! Of course I love Pinterest and follow a lot of cardmaking blogs and videos, but I also find inspiration in everyday places, from signs to product packaging to clothing. The inspiration for this card came from a wooden Easter decoration I have had for years. I don't even remember where I got it. I didn't get it out the last couple of years, so I guess when I saw it this year it was with slightly "new eyes." One day while I was looking at it, I thought, "Hey, you need to make a card like that!"


Original Inspiration for Card

I didn't follow my inspiration exactly. I never do. I always change things up a little bit, either by choice or necessity. The card is larger than I normally make. Finished size is 5x7 inches. Since I wanted to cut the letters out big enough to decorate them, I needed a larger area to spread them out. I used the Cricut Type Candy Font cartridge to cut the letters. using the Better Than Chocolate Shadow setting, cut at 2 inches. The bunny ears for the letters were cut from the Create a Critter 2 cartridge, accessory setting, p. 41. The little carrot is from the original Create a Critter cartridge, p. 26. The scalloped border is from the Elegant Edges cartridge, p. 48. The little hearts, eggs and flowers were punched with various punches from my stash. I added little candy dots from Stampin' Up to the centers of the flowers.

I am sharing this card today just to inspire you to look around you and find inspiration for your cards. Whenever I draw a blank at creating I just look around me and more often than not find inspiration to get me going again! Good luck and I hope you get inspired to make your own creations!


Saturday, March 5, 2016

Tea Cup Get Well Card with Pouch for Tea Bags


Today's card is a Get Well Card, but could easily be changed to a Mother's Day or Birthday Card. I used the "diaper fold" which has been around for awhile, but I have included pictures of how to do the folds if you want to see how it is done. The tea cup is cut using the Tags, Bags, Boxes & More 2 Cricut cartridge, cut at 2-1/4 inches on the tag setting, p. 29. The "steam" heart is cut using the Type Candy Font Cricut Cartridge, p. 66, Better with Chocolate Shadow setting. I added a paper lace doily to the inside of the pouch and put two foil wrapped tea bags in the pouch. I added a die cut heart to the top corner of the pouch. For the teabag tag on the front, I just used a small punched out white tag and attached it with some crochet thread to the back of the teacup, which is popped up from the pouch with dimensional dots. Following is a list of supplies used for this cute little card:

Supplies Used:
Birthday Bouquet DSP from Stampin' Up
Blushing Bride cardstock from Stampin' Up
Have a Cuppa Embellishments (lemon slice) from Stampin Up
Embossing Folder for teacup - Cuttlebug A2 Birds & Swirls
Die Cut Heart - Hot Cocoa Cups Steel Dies from Die-namics (My Favorite Things)
Stamped image - Teeny Tiny Wishes from Stampin' Up
Ink - Blushing Bride and Rose Red from Stampin' Up
Paper Lace Doily - Stampin' Up
Cricut Cartridges - Tags, Bags, Boxes & More 2 and Type Candy Font
Punched Flower - EK Success Punch
FYI - Bigelow Teabags are nicely foil wrapped. Pouch holds 2 very comfortably.

Here are some photos of the process for folding the pouch, known as the "diaper fold."


I hope you will give this one a go! It goes together really quickly with only a glue dot to keep the front flap down. The rest of the card just stays together on its own. You will have fun with this one!

Thanks for stopping by this week. I will be back next week with a new card for you, back to Easter cards!

Saturday, February 27, 2016

Mama Chick Easter Card


Since Easter is only four weeks away I thought I would start on my Easter cards! Last year I made a Mama Chick Easter Basket using the Cricut Create a Critter 2 Cartridge. If you missed it, click here for Mama Chick Basket post


She is such a little cutie that I thought I would use the same chick from Create a Critter 2 and make a card. For the card, I cut the chick and coordinating layers at 2-1/2 inches, cut from Blushing Bride cardstock (Stampin' Up). The hat is cut from Mint Macaron, and the band and wing are from a retired patterned paper stack (polka dot in Pink Pirouette, also Stampin' Up).

The patterned paper is from the Birthday Bouquet DSP (SU), Since both sides of the paper are so pretty, I decided to turn down the righthand corner to give a peek at it and added some punched out small flowers (punch is EK Success). I just used a black marker to make the dots in the middle of the flowers.

The "happy easter" greeting is from a retired Stampin' Up set called Delightful Dozen." It was and still is one of my favorite and most versatile greeting stamp sets. The greeting is punched out with an oval punch. I used pink ink to ink around the edge of the oval and then added some rhinestones.

Finished card size is 4-1/4 x 5-1/2 inches. Card base is Mint Macaron. Layers are in white and the then the patterned DSP, each cut 1/8 inch smaller than the previous layer. I used dimensionals to lift up the little chick from the card to give her more "life."

I will have more Easter cards and projects coming in the following weeks so I hope you still stop by again next week! Thanks for looking today and I hope it gives you some inspiration to make your own Easter cards.


Saturday, February 20, 2016

Love You a Latte Card


If you are a coffee or tea fan, this card is a fun one! I made this card for my Mom's birthday. The cup is cut from pink cardstock and then run through a dotted embossing folder. The cup is from the Cricut Cartridge "Tags, Bags, Boxes & More 2", cut at 2-1./2 inches (tag). The spoon is cut from shiny silver cardstock and is from the "Love You a Latte" Cricut cartridge, cut at 2-1/2 inches (cup 3 layer).

The finished card is 5-1/2 x 4-1/4 inches. Cardstock is Bermuda Bay from Stampin' Up. Patterned papers are also from Stampin' Up. I punched an oval to layer under the "a Latte" stamped image and inked the edges with coordinating Melon Mambo ink. The "a Latte" is from the July 15 Paper Pumpkin kit (Thanks a Latte). "Love You"  is from the Crazy About You stamp set. Use any sentiments you like. I added some punched out hearts in coordinating colors, added a few rhinestones, placed a white doily behind the cup, and tied a little bow in Melon Mambo ribbon (also SU).

I have some more cup cards spinning around in my head so you will probably see a few more of these soon!


Friday, February 12, 2016

Valentine Cards for Teenagers


When I saw a Valentine treat box made by Brenda Morgott (a member of Stampin Friends, a Facebook group I am in) where she used the definition of "Valentine" on a tag, I knew I had to make some cards using the Valentine definition! At the time I saw her post I was at a loss as to what kind of Valentines to make for my teenage grandsons. I tell them every year that they are never too old to get a Valentine from "Nana," but I didn't want them to be too babyish or "cutish." These are what I came up with. I just grabbed the definition of Valentine off Google (the Merriam-Webster version), printed it on cardstock, and cut it into the tag shape. I backed it with a larger tag (from the Dollar Spot at Target) and then layered it onto a white card base (4-1/4 x 5-1/2 inches). I added some red and white baker's twine, some Valentine patterned paper from last year's Stampin' Up pack, some punched out hearts, and a stamped image (retired stamp from Stampin' Up) and they were done! Really fast cards to make.


I want to thank Brenda again for her clever idea!  Happy Valentine's Day!

Saturday, February 6, 2016

Valentine Jar of Hearts

Card #4 in my Valentine Series

Mason jars seem to be very popular right now. I've seen several jar stamps lately and I remembered I had one in my collection so I started looking and found this Stampin' Up jar stamp from 2004 ( from the set All Wrapped Up).

I stamped the jar image on the white cardstock piece, then stamped it again on clear window sheet paper. I cut out around the stamped image on the window sheet paper, glued some punched out hearts onto the white cardstock inside the stamped jar image, then glued the cut out window sheet image on top, gluing just around the edges and jar lid. I used a silver glitter pen to color the jar lid. I added a few more punched out hearts around the image, matted the white cardstock onto black, then onto an arrow print piece of paper, then onto red, then onto the 4-1/4 x 5-1/2 inch black card base. I punched hearts in a row out of a strip of black cardstock and attached it to the red layer. I tied a little bow knot onto the edge of the red and black layer and that's the card! It's kind of a faux shaker card!

Sometimes seeing new stamps will remind you of what you already have and make it new again! A lot of stamps eventually come back around in popularity if you hang onto them long enough!

Note: Cardstock and papers are from Stampin' Up. Greeting is from Teeny Tiny Wishes. Jar stamp is retired as is the arrow patterned paper. Colors are Whisper White, Real Red and Basic Black. Stampin' Up also sells the window sheets in 12 x 12, but mine are Judikins Embossable Window Plastic Sheets in 4-1/4 x 5-1/2. You can get a 20-pk for $7.09 from Amazon (sold by Supermart). 

Friday, January 29, 2016

Basket of Hearts - You're So Sweet

This is Card #3 in my Valentine's Day card series. This is a blast from the past. While cleaning out my craft area earlier this month, I came across this 4x6 Fresh Prints DSP stack from 2014. It uses Real Red, Crumb Cake and Coastal Cabana colors. Coastal Cabana was one of my favorite colors and I was very sad to see it leave the Stampin' Up color lineup, so I am bringing it back for my Valentine Card! I love the color red with it!

This card is similar to the basket of apples card I posted last year. (See it here.) This time, instead of cutting the basket freehand, I found that if I cut a cupcake bottom using my Cricut Create a Critter 2 cartridge (p. 33, cut at 7-3/4 inches), I could use it for a basket. I inked the edges to give it a little dimension and popped it up on the card using dimensional dots. I added some strips of paper to the bottom of the basket to resemble the band of a basket, and then just started punching and embossing hearts to put in the basket. (If you don't have heart punches, there are also heart shapes on the Create a Critter and Create a Critter 2 cartridges.) With the basket popped up from the card, I was able to add my hearts behind the basket edge and build from there. The pretty heart shaped doily is from a pack I got at the Dollar Spot at Target (LOVE that place!)

Here is a more closeup view of the hearts in the basket:

I masked off the parts of the You're So Sweet stamp that I didn't want inked (from the You're So Sweet  stamp set), then stamped in on white cardstock, and cut it out with a 1-3/4 inch punch. I layered it on a pink circle cut with the 2 inch circle punch, and then layered that onto a red 2-3/8 inch scalloped circle. I added a cute little red ribbon and 2 more punched out hearts.

Card base is A2 size (4-1/4 x 5-1/2 inches) in crumb cake, layered with red and then a piece of DSP from the Fresh Prints DSP stack I mentioned previously.

Note: There is also a cupcake on p. 36 of the #1 Create a Critter cartridge but it doesn't have the scalloped top.

Saturday, January 23, 2016

Valentine Wagon and Card


First I made the little red wagon Valentine card. It's an A2 sized card in red, layered with white and black cardstock. The polka dot paper is from the neutrals DSP stack from Stampin' Up. The wagon is from the Create a Critter cartridge. The rest of the card is decorated with punched out hearts and a banner greeting. Greeting is from Teeny Tiny Wishes, also Stampin' Up.


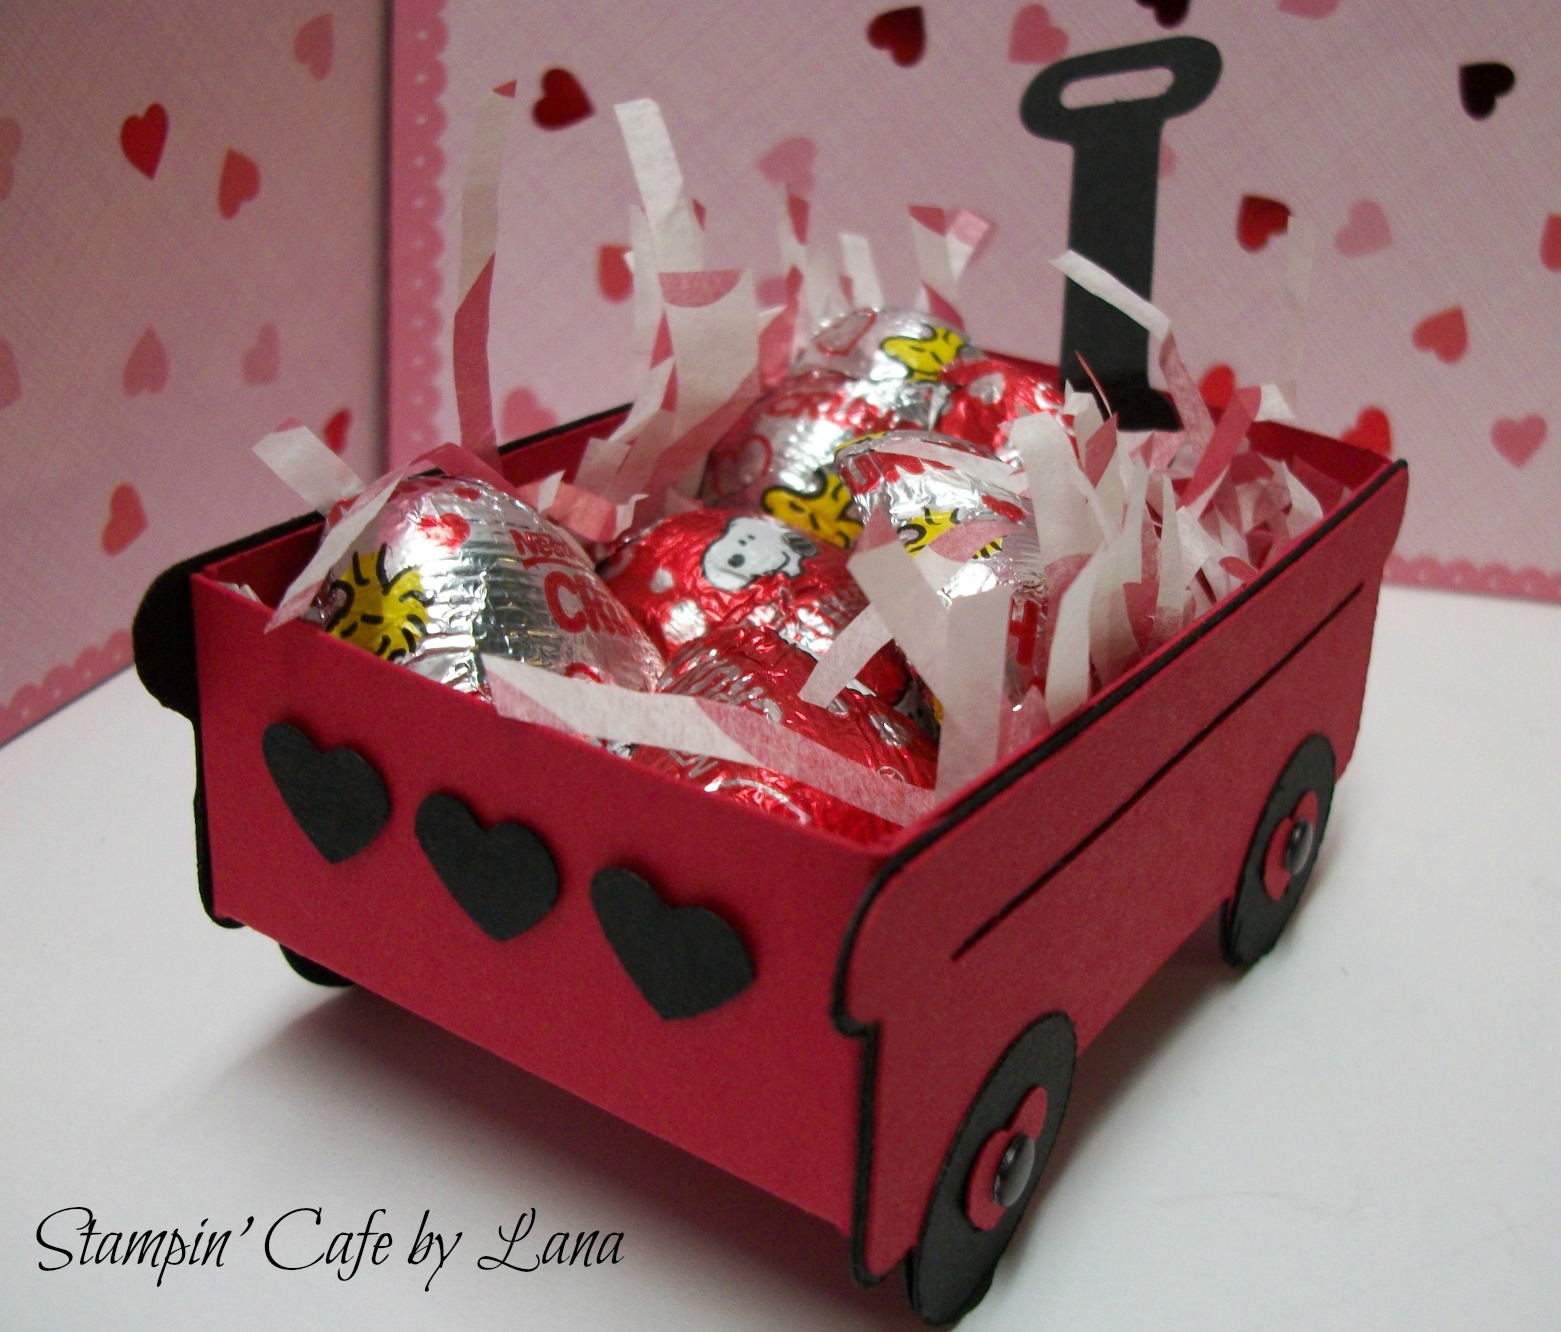
Then I decided to make a 3D version of the wagon. Here is the result!


Box Base for Wagon (See Helpful Hints Below)

Page 73, Cricut Create a Critter Cartridge. Cut at 1-1/2 inches

The wagon is found on page 73 of the Create a Critter Cricut cartridge. I have gotten more mileage out of this cartridge than any other I have. I just LOVE it! I cut the wagon pieces out twice for both sides of the wagon and made a box base to attach them to. (See photo above with cutting and scoring directions for box of wagon.) The Cricut wagon (all pieces) are cut at 1-1/2 inches. That is the height of the wagon sides. I did cut a third wagon shadow in black at 1-3/4 inches because I wanted a little larger handle to attach to the wagon.

After cutting the wagon shadow out of black, trim off the handles. The rest of the assembly of the wagon is just layering the pieces. First, the black shadow layer, then the red wagon layer, then the black wheels. I used punched out hearts for the wheel centers and then added black brads or "candy dots" in the center of each wheel. After the side pieces are assembled, assemble the box and attach the wagon pieces to the box base, making sure the sides of the wagon are level with the top of the box so the wheels will be below the box base. This makes the wagon free standing.

Helpful Hint: If you don't want the tabs on the box to show inside your wagon, just attach the tabs on the outside of the box base rather than on the inside like you would normally do for box assembly. 

I attached the black handle (cut from the black shadow layer) to the front of the wagon on the inside with a small red brad and hid the prongs on the inside of the wagon with a punched out black heart. To make the handle look more life like, I used a small punch to cut out the inside of the handle (a retired punch from Stampin' Up). I then slightly bent the handle forward over the top of the wagon edge.  I  attached three black hearts to the back of the wagon. I think it would also be cute to write a child's name on the side of the wagon or use cut out letters, stickers, etc. Finished wagon size is 2 x 3-3/4 inches and stands 1-1/2 inches high.

I shredded and scrunched up some valentine tissue paper to add to the inside of the wagon and added some valentine candy. It will hold 6 Nestle Crunch hearts very nicely. It would also be cute with the little colored conversation hearts!

Have fun with this little red wagon!

Saturday, January 16, 2016

Love You a Bunch Card


This is Card #1 in my series of Valentine's Day cards. This one is a simple A2 sized card (4-1/4 x 5-1/2 inches when folded). I cut a layer 4 x 5-1/.4 inches and dry embossed it with a dotted embossing folder. I inked the edges lightly with red ink. The image is from the Sprinkles of Life stamp set from Stampin' Up. It is stamped on white, cut with a 1-3/4 inch circle punch, then layered on a piece of real red cardstock punched with a 2 inch circle punch, and then that is layered on a piece of pink cardstock cut with a 2-3/8 inch scalloped circle punch. The hearts are punched with a small heart punch in pink and red and then layered together and glued above the stamped image. I used a piece of the red cardstock that I cut the hearts out of and layered it behind the stamped and layered image. I stamped "love you" with the Crazy About You stamp set from Stampin' Up and the "a bunch" from the Sprinkles of Life stamp set. Both sentiments are then cut in a banner shape before attaching to the card with glue dots. The layered image is attached to the card with dimensional dots.

I hope you like this simple card and will come back in the following weeks for more Valentine card ideas! There is one I am particularly excited about and can't wait to share it with you! Thanks for stopping by today and happy cardmaking!

Sunday, January 10, 2016

Chalkboard Clipboard/Card Holder


Do you like to display your most recent cards or holiday cards? Here is a very inexpensive way to do it! I found a 6 x 8 chalkboard at Dollar Tree and attached it to a 5 x 7 plastic frame, also from Dollar Tree. I bought a set of 3 large clips (Dollar Tree) and used the black one as the clipboard clip. Total cost for the entire project - $3.00! Now that's a bargain! I attached a ribbon to the clip to dress it up a bit. Since I was too impatient to wait for my hot glue gun to warm up, I simply attached the board to the picture frame with red strip sticky strip and it is holding up well.

Of course you can use it as a chalkboard too, but I also found another use - I can take the sheets from my perpetual birthday calendar and attach them to the board! I love that it is a stand alone board. Check your Dollar Tree and see if they have these chalkboards. The frames are always available, but I just stumbled upon the chalkboards. (Note: The Perpetual Calendar sheets are in an earlier post from July 31, 2015.) 

Here are photos of the back of the board and one with the perpetual calendar sheet attached.


Thanks for stopping by today! Let me know if you try this project!

Tuesday, January 5, 2016

Sale-A-Bration 2016


Starting today, January 5th, until March 31, 2016, for every $50.00 of product purchased from either the 2015-2016 Annual Catalog or the 2016 Occasions Catalog, you can choose one item in the Sale-A-Bration brochure for FREE! If you would like a PDF of the Sale-A-Bration brochure click the link above. I would love to be your demonstrator. If you have any questions, please leave a comment below or contact me via Facebook using the link in the column on the right.  Now is a great time to get those things on your wish list! Thanks for stopping by today! 

Saturday, January 2, 2016

Birthday Tower

Happy New Year!!

Yesterday was my grandson's 15th birthday. He was a New Year's baby in 2001. I made this birthday tower for him as a gift. I have seen similar can cakes and candy cakes on Pinterest, but I combined the two into one "cake." It actually turned out more like a tower than a cake.

I started with a 10-12 inch round platter I purchased from Dollar Tree. It needs to be sturdy and not flimsy. I attached six short cans of root bear to the platter with duct tape underneath the cans. I inserted a can of Pringles in the center to have a base to attach the other elements to. Around the Pringles can, I added four boxes of theater style candy boxes, one on each side. I used an extra large rubber band to hold the boxes to the Pringles can. From there I started inserting candy bars and small packages of cookies until the rubber band was tight. On top of the Pringles can I attached a tub of miniature cookies. Again, I used rolled up duct tape. I added curled ribbon (purchased from Dollar Tree) to the sides and attached a birthday hat also purchased at Dollar Tree to the top of the cookie tub using glue dots. I cut numbers with my Cricut and attached those to the hat. I then started inserting folded up dollar bills around the tower. Since my grandson is 15 I used 15 one dollar bills. I also inserted a gift card and attached a baby picture of him with a small clothespin. I tied a wide ribbon around the center to hide the rubber band and added a few miniature Reese's peanut butter cups around the bottom of the platter to fill in between the cans.

This really went together a lot faster than I anticipated. I had it finished in about 30 minutes. I think the longest process was collecting all the items for the tower. You can certainly customize yours with whatever candy, soda and cookies you would like. He liked it, so if he is any indication, I think it would be a great gift for a teenager.

Here are some other close-up photos:


My supply list:

10-12 inch sturdy platter
6-pack soda cans
1 can Pringles
1 tub miniature cookies
4 boxes theater style candy
8 or more full size candy bars
4-6 packages cookies
handful miniature Reese's cups or similar small candies
curling ribbon
party hat
money and/or gift card
duct tape
glue dots