Thursday, May 9, 2019

Tea Cup Mother's Day Card


This is a tea cup card I made for Mother's Day. I was inspired to make this card by a tea bag holder I made several years ago. See that post here. I still had the same paper and supplies so I decided to recreate it in card form.

Supplies Used:
Birthday Boquet DSP from Stampin' Up (retired), but any floral patterned paper would work
Cuttlebug D-vine Swirl Embossing Folder
Cricut Lite "Love You a Latte" cartridge
Card Base - Stampin' Up Blushing Bride Cardstock
Stamped Greeting - Teeny Tiny Wishes (Stampin' Up) (retired)
White paper doily and small flower punches with pearl bead accents
Tiny white tag attached to white baker's twine
Lemon charm from Stampin' Up (retired)

While a lot of the items I used in this card are now retired, you could still use any pretty floral paper and any mother's day greeting.

Happy Mother's Day!

Friday, April 26, 2019

"Happy Day" Masculine Cards


When I have several cards to make, I've started making the same design for at least two of the cards. It speeds up the process and I don't have to "think" as much! I needed a couple masculine cards and these are what I came up with, a very simple design, layering different papers, and then also layering my stamped image onto a "stitched" circle.

I made the eyeglasses card using Stampin' Up's True Gentleman DSP from the 2018 Occasions Catalog. The stamp is from a retired Stampin' Up set called Perfectly Wrapped.

The colorful bottles card was made using Stampin' Up's Bubbles & Fizz DSP from last year's Sale-a-Bration catalog. I've had both papers in my stash and never used them, so I brought them out for these cards. I may just keep going while I'm on a roll!


Friday, April 12, 2019

Baby Girl Card


I always love using baby animals for baby cards. This card was made using the giraffe from the Cricut Create a Critter cartridge. The card is the standard A2 size card using various shades of pink for both the card and the layers of the giraffe. I used a Cuttlebug circle dot embossing folder for the white layer. The "welcome baby" is stamped with the And Many More stamp set from Stampin' Up. The "girl" stamp was part of an older Stampin' Up stamp (1996). Sorry but I don't have the name of it! I added two little enamel dots at the bottom and a die cut bow and rhinestone to the little giraffe's neck. The dark pink layer on the card was die cut using a stitched framelit.

Friday, April 5, 2019

Bunny Banner Wreath


Simple but cute little cut-out bunnies made into a banner! I used the shadow chocolate bunny cut from the Cricut Create a Critter 2 cartridge, cut at 4 inches. I inked the edges of the bunnies with white ink and glued on some cotton balls for tails. I glued the bunnies to some pink ribbon to create the banner. Very quick and easy project! Polka dot paper for the bunnies is from Stampin' Up! 

Tuesday, March 12, 2019

Leprechaun Gift Bag w/ Handle


I made this cute little leprechaun gift bag for a "lucky" little lass! The bag is very easy to make, using an 8 x 11 piece of heavweight cardstock. Finished bag is 4" wide by 4-1/2" high without handle, and approximately 8 inches high with the handle. See instructions below.

I added some small holiday themed items from Dollar Tree inside along with some gold foil wrapped candies and that's it!

Instructions for Bag:
1. Cut a piece of heavyweight green cardstock to 8 x 11 inches.
2. On the 11 inch side, score at 4-1/2" and 6-1/2".
3. Turn cardstock to the 8 inch side and score at 2 inches on both sides.
4. Fold on score lines and cut up on the score lines on the 2 middle sections. 
5. Attach adhesive tape or glue to sides and fold up, making the bag.
6. Cut a 1-1/4 x 11 inch handle from green cardstock. Curl slightly with a bone folder. 
7. Punch holes on both ends of the handle piece and on each side of the box.
8. Attach handle with gold colored brads.
9. For the belt, cut a 1 inch wide piece of black cardstock and fit around front and sides of bag. Glue in place. It's easiest to cut a long piece, dry fit, and then trim before gluing in place. 
10. Cut a faux buckle from a label punch. I punched out a 1" square from gold cardstock and then punched around that with the label punch. Attach to belt.
11. Add a thin strip of green cardstock down the middle for a shirt effect and then add punched out small circles in gold cardstock for the buttons. 
12. Decorate the bag as desired! Tie on a tag or do whatever you like! I made the clover using 3 punched out hearts and then hand cut the stem. 

Happy St. Patrick's Day!

Thursday, February 21, 2019

Petals + Blooms Heart Cards

The Petals + Blooms paper pad by Paper Studio has fast become my favorite paper pad! It is a very high quality paper, thick and almost has the texture of wallpaper. I love every single sheet in the pad! I used this pad for my 2019 calendar in a previous post. I have made scrapbook pages using it, and even a tissue box cover.

I actually made the first card as a Valentine's card, but I don't think it has to be just for Valentine's Day. I liked the way it turned out, so I created the second card as a birthday card.


Both cards are 4-1/4" x 5-1/2". I used a die cut from Catherine Pooler to create the "doily effect" in the light pink layer. I then added the paper from Petals + Blooms, along with some die cut hearts and a greeting. For the "I heart you" card, I used the And Many More stamp set from Stampin' Up and the birthday greeting is from a past Paper Pumpkin kit.  I cut the greeting into a banner for the second card and used a word window punch for the first greeting.


Sunday, February 10, 2019

Red, Black & White Valentine Cards


I made my Valentine Cards this year in a Red, Black & White color combination. The "Bee Mine" card was created using black and white striped background paper. The bee and words are from the Cricut Create a Critter 2 cartridge.


The mailbox card is actually a throwback to several years ago, but I still loved the theme so decided to recreate it! I used black and white background papers and cut the mailbox using the Cricut Doddlecharms cartridge.


For this card, I used a black cardbase and added black and white wood patterned paper. I die cut two red hearts, along with the gold letters and a string of white outline hearts.


This was the easiest card of all. I used a white cardbase and added black and white striped paper, and then a die cut foil heart. The sentiment is from Teeny Tiny Wishes by Stampin' Up.

I have always loved this color combination. It never seems to go out of style!

Wednesday, January 16, 2019

Petals and Blooms Calendar for the New Year


It's a new year and time for a new calendar! I was recently in Hobby Lobby and saw that they had a "Petals + Blooms" calendar by Paper Studio to match their other paper collections of the same name. I already had the Petals + Blooms paper pad and a blank calendar, so I decided to make my own.  December was the only month I didn't use the Petals + Blooms paper pad. I also used a Petals + Blooms sticker pack and just some scraps I had in my stash. It was like scrapbooking, so it was a fun project to do!


Thursday, December 20, 2018

Christmas Word Banners


I watched a video by Tina Zinck, Serene Stamper, who made a cute "Be Merry" banner using Stampin' Up products. I didn't have the banner punch or the letter dies she used, so I created mine using my Cricut. I cut the banners using the Pretty Pennants cartridge and I cut the letters using the Plaintin Schoolbook cartridge, cutting the letters with the Tall Ball Font. If you would like to watch Tina's video, here is the link https://www.youtube.com/watch?v=Jtl7ru1foTE

A word of warning! Once you make one banner, you will want to make more! After I made the "Be Merry" banner, I made this "Believe" banner:


And then this "Joy" banner. I used a paper crimper to get the corrugated look.


I am running out of time this year, but next year I plan to make more word banners for my Christmas trees!

Sunday, August 26, 2018

Updated Perpetual Calendar and Box


Back in 2015, when I was a Stampin' Up Demonstrator, Stampin' Up sold a perpetual calendar stamp set. I created perpetual calendar sheets with stamping and cutting instructions, as well as instructions on constructing a box to contain the calendar sheets as well as any cards you wanted to add to the box. See that blog post here  I still use that box to this day. I updated the box a little bit by adding different papers, but I am still using it and it has held up well.

I am still getting requests for the PDF for the perpetual calendar. Since Stampin' Up doesn't sell the stamp set any longer and you may not want to purchase a separate stamp set, I decided to update the calendar sheets to include the months already printed on the sheets. I also updated the cutting instructions somewhat to allow for the new format.

If you are interested in purchasing this new PDF, I have added it to my Etsy shop. This is easier than having you contact me on Facebook and having to wait for a reply and to receive the PDF. This way you can download it instantly for a nominal charge. It is not a money making project, just a convenience for both of us. Here is the link to the Perpetual Calendar in my Etsy Shop.

This has really proven to be a handy tool in my craft room for remembering birthdays! I think you will find it useful as well!


Friday, November 10, 2017

Advent Wreath With Tiny Milk Cartons


I wanted to make an advent calendar for my granddaughter this year. After I made the little milk carton for Halloween, I decided to see if I could make an even smaller version and this is what I came up with! They are tiny little milk cartons that measure 1 inch wide by 2 inches high. My granddaughter loves things in miniature, so I think this will be a hit! I am putting small candies and trinkets inside. They will also hold coins, folded up notes with activities to do, etc.


Here they are all finished and lined up. I printed out the numbers on my computer, then punched them out. I layered them with a slightly larger scalloped circle and then another circle, coordinating the circles with the colors of the papers. The papers I used are from Stampin' Up (2013). It's a good way to use up your scraps.


Directions for Mini-Milk Cartons:
  • Cut a piece of patterned paper to 3 x 4-1/4 inches
  • On long side, score at 1,2,3, and 4 inches
  • On short side, score at 1,2 and 2-3/4 inches
  • Cut away small squares on top and bottom, right side
  • Cut up vertical score lines on bottom up to first horizontal score line
  • Fold on all score lines
  • Apply adhesive tape to the tab and fold box together
  • Fold up bottom tabs and adhere
  • Pinch top closed
  • Insert goodie or note and close with mini clothespin
  • Clip to a wreath or small tree or just put in a basket
After you make a few cartons they go faster and really don't take that long to make. Besides it's fun! Instead of putting them on a little tree, I decided to use a wreath that I can hang on her door! 


Friday, November 3, 2017

Christmas Planner


I wanted to share my Christmas Planner with you. I actually made this Christmas Planner last year and really liked it, so I updated it this year using sheets I purchased from Polka Dot Posie Prints on Etsy (see link below). I wanted to share it with you in case you are looking for a simple and cute way to make a Christmas Planner.

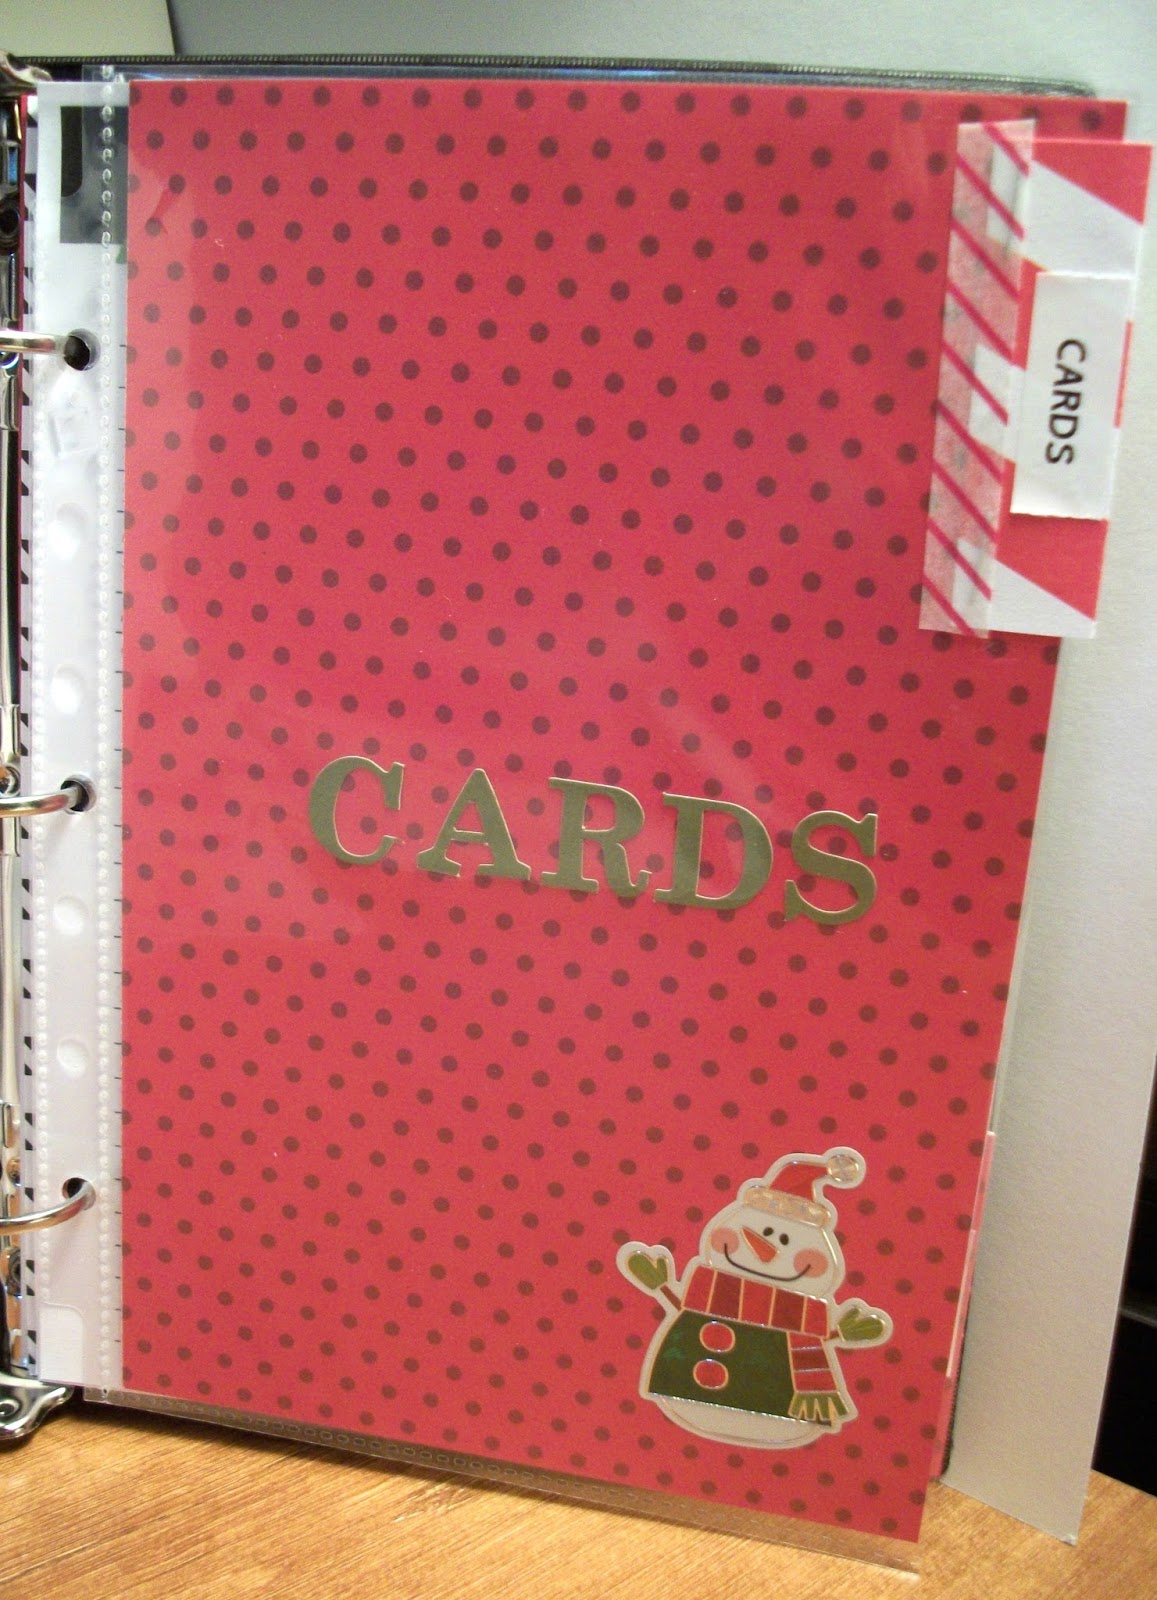
I removed my sheets from last year and added a section in the back of the planner for prior years. This way I can always look back and see what I did the previous year. The rest of my planner is the same as last year with the same dividers I made using Christmas scrapbook paper cut to size and adding handmade tabs. (I decorated both sides of the divider pages.)

This is my planner open. There is a pocket inside the binder cover for a post-it-note pad, lists, etc. I decorated the inside cover page using scrapbook paper, die cuts, stickers, and stamps.


The first section I added was a To-Do List (a printable from the Etsy Shop):

I took an undated Avery calender insert and added the dates for December and inserted it into my planner behind the To-Do List, adding a tab so I can flip to it easily.

 Next comes the Gift List section. I decorated the divider with washi tape and stickers.

This is one of the printable lists from Etsy:

My next section is for on-line orders. I do a lot of on-line ordering and want to keep track of the orders, the recipient, when they are expected to arrive, date of arrival, etc.

There is a printable for this section as well:

The next section is my Christmas Card List:
And again, another printable:

There is also a menu section:
 and another cute printable:

Finally, I used a premade Avery pocket that I decorated to keep all my receipts in:

Products Used:
The Avery Binder (7 x 9 inches), pockets and accessories can be purchased almost anywhere, including Walmart. I purchased the printable inserts from Polka Dot Posie Print Etsy Shop and I absolutely LOVE them! They come in X-Small, Small and Large (8-1/2 x 11). I purchased the Small which prints 2 pages on an 8-1/2 x 11 sheet of paper and fits my Avery notebook perfectly. The categories also fit in perfectly with what I had already set up last year, but in a much cuter presentation!

I'm ready for the season! Now back to card making and projects!

Note: I also made a personal planner using another Avery notebook in the same way. Click here to see that planner.


Friday, October 27, 2017

Coffee Treat Holders for Halloween


Want to make some cute little treat holders for the grown-ups in your life? Here are a few coffee treat holders I made this year.


This little Witches Brew K-cup holder is just a 2 x 2 inch square box covered in DSP and wrapped in orange, black and white twine. I used paper and stamps from Stampin' Up, added some black crinkle paper, and a K-cup! (To make a 2 x 2 inch box, cut a piece of cardstock to 6 x 6 inches and score at 2 inches on all 4 sides, cut on score lines and assemble.)


This treat holder is a small milk carton made with directions from Pootles.co.uk (click here). I made the carton using orange cardstock and covered it with panels of  Halloween Night DSP from Stampin Up (2016). I mixed a couple stamp sets to get the stamped "Everything pumpkin", die cut it out using a stitched oval shape, then hand cut and added a little pumpkin from the same DSP. I tied some black twine around the carton. This little carton will also hold a K-cup or some small pumpkin candies, tea light candles, etc. The carton is held closed with a gold library clip.


I made this small treat bag using orange and white polka dot paper. You can use a die to create the bag or make your own. (To make your own, start with a piece of paper cut to 7-1/2 x 5-3/4 inches, scoring at 1-3/4" and 5-1/4 inches on the long side, then turning the paper and scoring at 1/2 inch on the side that will be the bottom, which is important if it's directional paper. Fold on score lines, trimming away all but the middle section on the bottom. Adhere the bag together. You can use decorative scissors to cut a small strip from the top of the bag.)

I added a tag cut from a calendar page (see my post dated October 6, 2018 where I turned calendar pages into cards and projects), added some twine, a stamped and cut out image of a coffee cup, a witch's hat, and a greeting from the same Stampin' Up stamp set. I attached the tag to the bag using a heart shaped black paper clip. Inside the treat bag is a packet of mocha latte coffee.


Here is another idea. You may have seen these cute little coffee cup candles at Dollar Tree. I removed the label it came with, traced out a new one in kraft cardstock, and attached it instead. Then I added the greeting, cup and witch's hat. Very little effort for a cute effect!

Halloween doesn't have to just be for kids you know!

Supplies Used:
Pumpkin Pie Cardstock from Stampin' Up
Kraft Cardstock from Hobby Lobby
Polka Dot paper from Stampin' Up (retired)
Spooky Night DSP from Stampin' Up (for witch's hats)
Halloween Night DSP (Stampin' Up - 2016)
Merry Cafe Stamp Set from Stampin' Up
Celebrate Everything Stamp Set from Paper Pumpkin (April 2016)
Stitched Shapes Framelits from Stampin' Up (oval)