Friday, March 25, 2016

Bunny Chick Card

Bunny Chick Card

Happy Easter! I thought this was a funny little card made using the Cricut Create a Critter 2 cartridge. Patterned paper is from the Have a Cuppa DSP stack from Stampin' Up. Greeting is a retired stamp from SU. Flower is punched with the Petite Petals Punch from SU. Cuts from the Create a Critter 2 cartridge are as follows:

Chick - p. 41 - Create a Critter 2, cut at 3 inches (2 layers)
Bunny Ears - p. 41 - Create a Critter 2 - cut at 3 inches (2 layers)
Basket - p. 40 - Create a Critter 2 - cut at 2 inches and embossed with a zig-zag embossing folder (Paper Studio) and inked for dimension
Eggs - small egg punch (brand unknown)
"Stitched" piece of cardstock at bottom of card - Bundle of Stitched Shapes by Simon Says Stamp
Green "grass" and orange border below greeting - p. 41 - Create a Critter 2 - layer on shift (egg)

Finished card is 4-1/4 x 5-1/2 inches.

I hope you like this fun take on an Easter bunny/chick! Have a wonderful Easter!


Friday, March 18, 2016

Easter Bunny Mini-Treat Bags

Hippity Hoppity!


Easter Bunny Mini-Treat Bags

These cute little bunny treat bags were cased from Erica Cerwin of Pink Buckaroo Designs. I will link her video below so you can see how it is made. I changed mine up a little bit, but I loved the green color and the grass she created with fringed scissors. I didn’t have the bunny stamp she used so I created my own bunny by using punches. I added some pink shading for the inside of the ears and cheeks, added some googly eyes, a punched out heart for the nose, and some frayed white yarn for the whiskers. I also used a little egg punch to make the eggs hiding in the grass. I also wanted to make a couple little girl bunnies, so I added small glittered pink bows with a rhinestone to the girl bunnies.

I cut a 3-3/4 inch piece of patterned paper for the bottom of the bag and wrapped some baker’s twine around the bag and tied it, added a flag stamped with an Easter greeting, another colored flag behind it, and a colored button with a Baker’s twine bow.

I did stamp a polka dot background on the right upper side of the bag for a little interest, but this is totally optional. I just love polka dots so I thought this added some interest. I also thought about stamping some small flowers in that area, but opted for the polka dots. The stamp I used is a retired stamp from Stampin' Up. 

I used the Mini-Treat Bag Thinlet from Stampin’ Up to create most of the bags, but you can make almost the identical bag by cutting, scoring and folding a half sheet of cardstock to make a very similar mini-treat bag. Now that I have done it both ways, I actually prefer making my own to using the thinlet, but each person has their own preferences. 

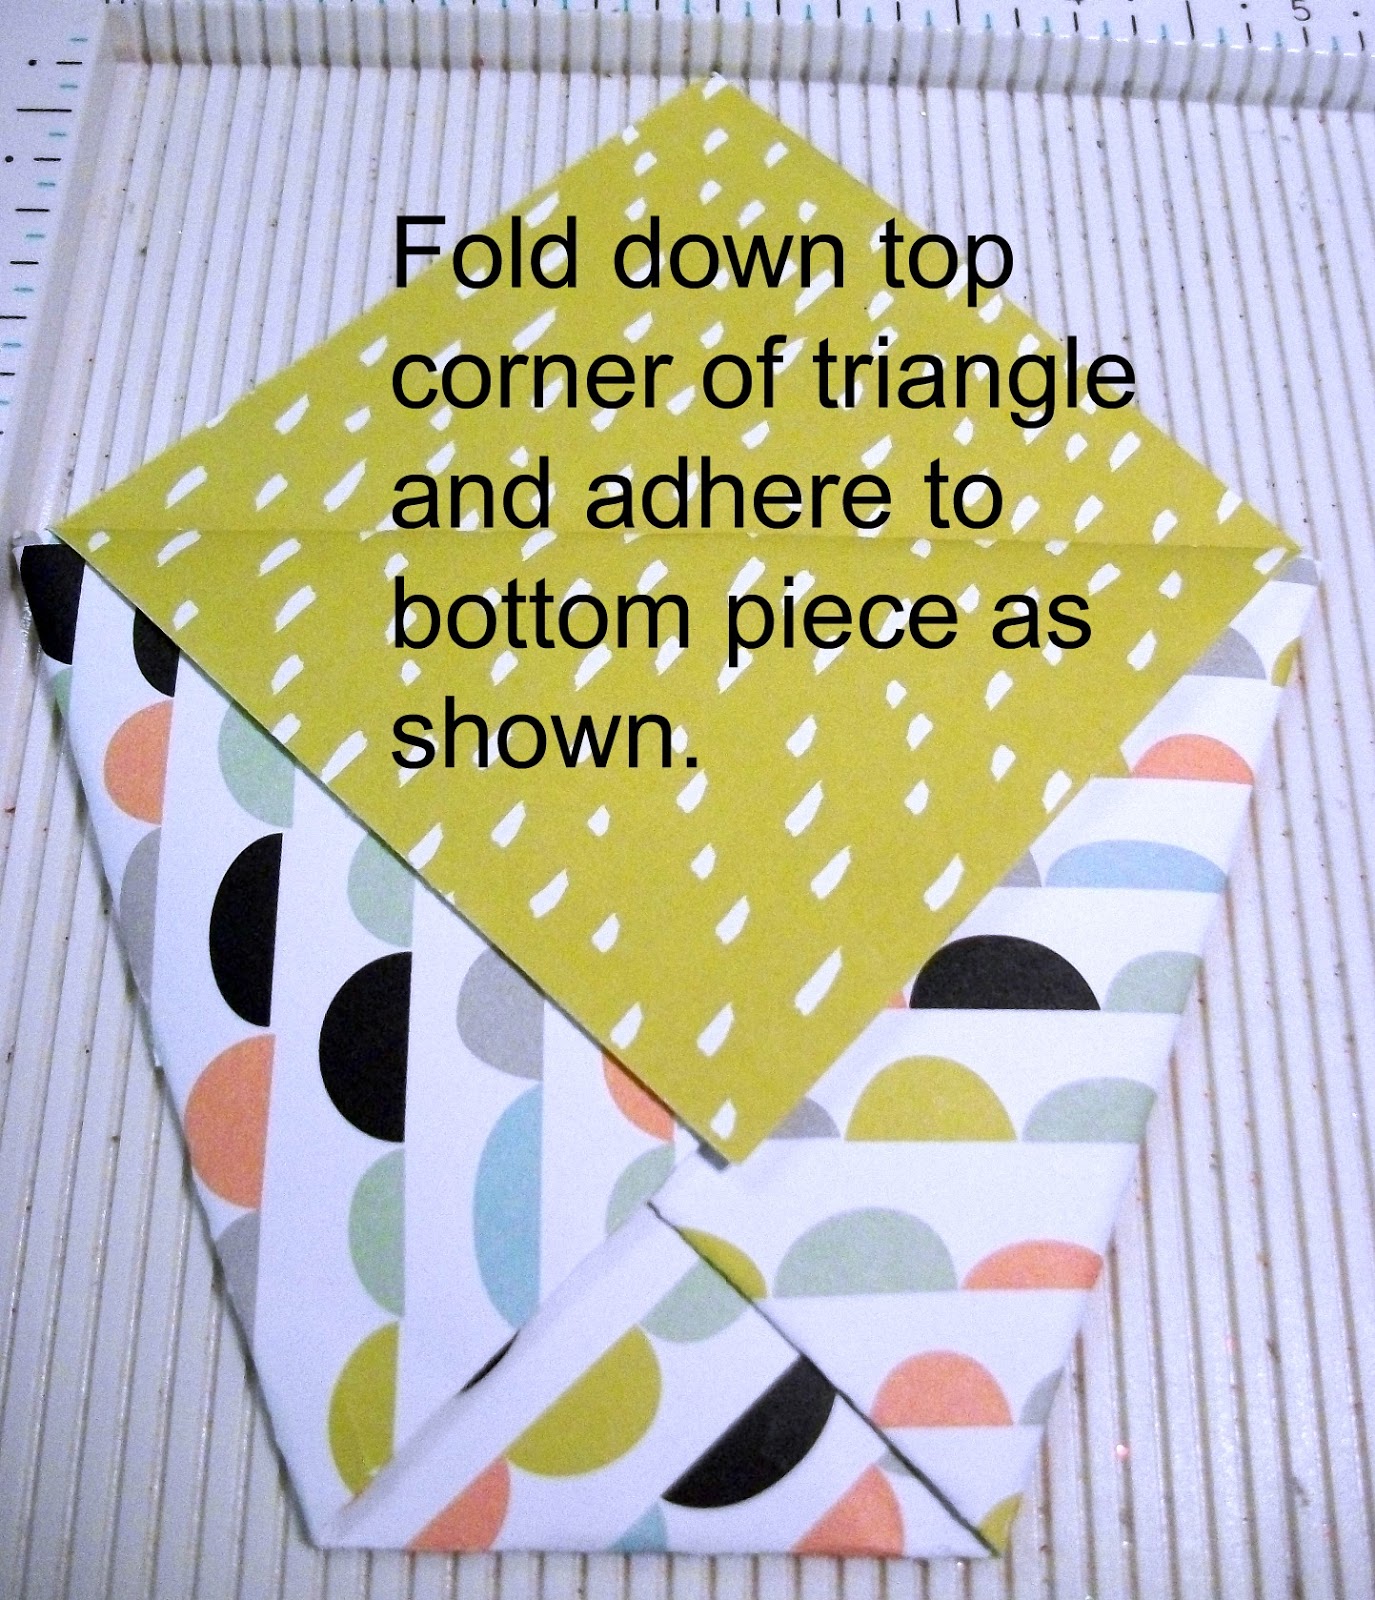
To make your own bag, cut a piece of cardstock 8 x 5-1/2 inches. Score it on the long side at 3-3/4” and 7-1/2”. Turn the cardstock and score on the short side at ½ inch. (See the diagram below). Fold on the score lines and adhere together with sticky strip or another strong adhesive. If you like the look of the pinked edge, use pinking shears or other decorative scissors to cut a strip off the top of the bag. You won’t have a two level look like the mini-treat bag thinlet, but it is very similar otherwise. 

The finished bags will each hold one of the Easter Kit-Kat bars, which is what Erica shows in her video and is what I am putting in mine, as well as any other flat type candy bar. You could even add a little cellophane grass if you wanted to.

I really liked the way these turned out and wanted to share my version of the treat bags with you. Whichever version you decide to make, have fun with it! My 3-year-old granddaughter accidentally saw them on my craft table before I had them hidden away and really liked them!

Supplies:                                                                                 
8-1/2 x 11 green cardstock (I used Recollection)                   
Pink ink and dauber                                        
Cardstock scraps for nose and banners                                   
Patterned paper for eggs and bottom strip (Cherry on Top DSP from Stampin' Up)                           
Googly eyes, button and baker's twine                                                                                   
White yarn for whiskers                                                                            
Easter Greeting (mine is from And Many More by Stampin’ Up)
Background stamp (optional)

Tools:
1-3/4 inch circle punch
Small oval punch
Small heart punch
Small egg-shaped punch
Fringe scissors
Mini-Treat Bag Thinlet (Stampin' Up)  (optional)

Link to video by Erica CerwinClick here

If you would like to make your own mini-treat bags, here are the cutting directions:

Cut Cardstock at 8 x 5-1/2”


Score bottom at ½ inch
Score at 3-3/4” and 7-1/2”
A
D
H
E
S
I
V
E

Cut this section away
Fold this section up to form bottom of bag and adhere.
Cut away
*Not to scale
Fold large sections together and add adhesive to the ½ inch strip on the right hand side. Fold up bottom ½ inch to form bottom of bag. You may want to trim a sliver off each side of the bottom flap at an angle for a more finished look. Hint: When cutting away the sections, cut slightly above the score line so the bag bottom will fold together and close with no problem. 

Hippity Hoppity! Easter's on its way! 

Saturday, March 12, 2016

Card Inspiration


I find inspiration for cards everywhere! Of course I love Pinterest and follow a lot of cardmaking blogs and videos, but I also find inspiration in everyday places, from signs to product packaging to clothing. The inspiration for this card came from a wooden Easter decoration I have had for years. I don't even remember where I got it. I didn't get it out the last couple of years, so I guess when I saw it this year it was with slightly "new eyes." One day while I was looking at it, I thought, "Hey, you need to make a card like that!"


Original Inspiration for Card

I didn't follow my inspiration exactly. I never do. I always change things up a little bit, either by choice or necessity. The card is larger than I normally make. Finished size is 5x7 inches. Since I wanted to cut the letters out big enough to decorate them, I needed a larger area to spread them out. I used the Cricut Type Candy Font cartridge to cut the letters. using the Better Than Chocolate Shadow setting, cut at 2 inches. The bunny ears for the letters were cut from the Create a Critter 2 cartridge, accessory setting, p. 41. The little carrot is from the original Create a Critter cartridge, p. 26. The scalloped border is from the Elegant Edges cartridge, p. 48. The little hearts, eggs and flowers were punched with various punches from my stash. I added little candy dots from Stampin' Up to the centers of the flowers.

I am sharing this card today just to inspire you to look around you and find inspiration for your cards. Whenever I draw a blank at creating I just look around me and more often than not find inspiration to get me going again! Good luck and I hope you get inspired to make your own creations!


Saturday, March 5, 2016

Tea Cup Get Well Card with Pouch for Tea Bags


Today's card is a Get Well Card, but could easily be changed to a Mother's Day or Birthday Card. I used the "diaper fold" which has been around for awhile, but I have included pictures of how to do the folds if you want to see how it is done. The tea cup is cut using the Tags, Bags, Boxes & More 2 Cricut cartridge, cut at 2-1/4 inches on the tag setting, p. 29. The "steam" heart is cut using the Type Candy Font Cricut Cartridge, p. 66, Better with Chocolate Shadow setting. I added a paper lace doily to the inside of the pouch and put two foil wrapped tea bags in the pouch. I added a die cut heart to the top corner of the pouch. For the teabag tag on the front, I just used a small punched out white tag and attached it with some crochet thread to the back of the teacup, which is popped up from the pouch with dimensional dots. Following is a list of supplies used for this cute little card:

Supplies Used:
Birthday Bouquet DSP from Stampin' Up
Blushing Bride cardstock from Stampin' Up
Have a Cuppa Embellishments (lemon slice) from Stampin Up
Embossing Folder for teacup - Cuttlebug A2 Birds & Swirls
Die Cut Heart - Hot Cocoa Cups Steel Dies from Die-namics (My Favorite Things)
Stamped image - Teeny Tiny Wishes from Stampin' Up
Ink - Blushing Bride and Rose Red from Stampin' Up
Paper Lace Doily - Stampin' Up
Cricut Cartridges - Tags, Bags, Boxes & More 2 and Type Candy Font
Punched Flower - EK Success Punch
FYI - Bigelow Teabags are nicely foil wrapped. Pouch holds 2 very comfortably.

Here are some photos of the process for folding the pouch, known as the "diaper fold."


I hope you will give this one a go! It goes together really quickly with only a glue dot to keep the front flap down. The rest of the card just stays together on its own. You will have fun with this one!

Thanks for stopping by this week. I will be back next week with a new card for you, back to Easter cards!