Friday, June 10, 2016

Pink Flamingo Card


I am loving all the cute flamingo stamps and card ideas floating around these days!  I thought I would share a card I made this week for someone's birthday. The card base is from a pack of note cards from the dollar bin at Target! They are really nice quality and not flimsy at all. The flamingo stamp is from the dollar bin at Michaels. I colored the flamingo with Bic markers and cut it out with some oval dies. I added a few little punched out pink flowers and a sentiment from the Remembering Your Birthday stamp set from Stampin' Up.

I lined a plain white envelope with some black and white striped paper (Heidi Swapp paper pack by American Crafts). I think lining the envelope dresses up the presentation of a card, especially for a birthday or special ocasion. All you have to do is measure your envelope, including the flap, and cut the paper slightly smaller. I rounded the top corners, inserted the paper into the envelope, then attached just the top part to the flap below the glued edge. I folded the flap down to crease it and it was done!

Have a great week and look out for those pink flamingos!

Friday, June 3, 2016

Father's Day/Masculine Cards


Need a masculine card for a birthday or Father's Day? Raid your husband's calendar! I saw a video on You Tube about turning calendars into pages for flip books and thought, "Why can't I do that with a card?" I used last year's calendar so I didn't mess up this year's, but  I'm thinking about buying one just to have on hand for these kind of cards!

You need a piece of clear plastic to place over the calendar page to decide where you want to cut the piece from, and then just trace and cut. You don't need to use the entire photo. You can crop it down. My card is A2 size, which is 4-1/4 x 5-1/2 inches, so I cut the calendar page down to 12 x 5-1/4 and then cut it into thirds for each panel of the card to be 4 inches wide. If your calendar isn't that big, just make a two panel card instead of three, or maybe even just one panel for the front of the card. I liked the continuous flow of one end of the car to the other, so I used both the  front and inside of the card and let the car image(s) be the focal point of the entire card. I wrote my message and signed it on the back of the card using a white chalk marker or gel pen (since my card base was black). If your calendar panels are a little smaller than mine, you can just mat them. 

I have found that it is hard to stamp on the calendar paper unless you use Staz-On ink, or you can write on it with a Sharpie marker. I stamped my greetings separately and then attached them to the card, but you can do it either way. It kind of depends on the blank space in the picture and where you can place the greeting. (My greetings are all from Stampin' Up but the only current greeting is from Teeny Tiny Wishes.)

I first made one of these cards as a birthday card for my son, then my brother, and now I'm making Father's Day cards! I think it's a great idea for the guys in your life. 


Friday, May 27, 2016

Fry Box Gift Card Holder


I love the fry box but if you aren't using it as a party favor or 3D project, what can you use it for? Well, you can keep it flat and turn it into a gift card holder! It's great for the french fry or fast food fan in your life. I made two different sizes using the Cricut Tags, Bags, Boxes & More 2 cartridge. I used the flat version of the fry box on p. 69 and not the box cut in sections.

The box/card in the picture on the left below is cut at 4 inches and the larger one on the right is cut at 4-3/4 inches. If you make the 4 inch version it will fit in a standard A2 size card envelope. The 4-3/4 inch version will need a larger A7 envelope.The gift card is inserted behind the "fries" in the "box".


Here are the pieces cut with measurements:


The yellow band acts as a cover-up for the fold lines on the box piece. I did add a top piece to the fries to cover the bottom portion and make it look more finished. This piece measured 2-1/2 x 3-4 inches. To make the fries, just cut 1/2 inch strips of an ivory or light tan cardstock and run it through your crimper or diagonal stripe embossing folder. If you don't have a diagonal stripe folder but have a straight stripe one, just put the strips in at an angle, or make lines on your scoring tool. I inked around the edges of the fry pieces to give them a little more dimension and life.

If you want to change your box up and not have french fries, here are a couple other versions I made using die cut balloons:


The balloons are attached to a piece of cardstock just like I did with the fries and also pulls out of the box. You can slip the gift card inside the box or attach it with a clip to the pull-out piece.

I find myself giving money or gift cards a lot more these days, especially since the kids in my life are all getting older and like to pick out their own gifts. I think these gift card holders make giving a gift card or money a little bit more special.  If you don't have the Cricut cartridge, try one of the many fry box die cuts out there. Depending on your die cut, you may have to do a little trimming to make the sides of the card flush with each other.

Supplies Used:
Cricut Tags, Bags, Boxes & More 2 cartridge
Stampin' Up cardstock in Real Red, Daffodil Delight (french fry boxes)
Stampin' Up cardstock in Calypso Coral and Mint Macaron (variations of box)
Stampin' Up Build a Birthday stamp set (fry box #1)
Stampin' Up Tin of Cards" stamp set (mint macaron card)
The other stamp sets on the boxes are from retired SU sets (Happiest Birthday Wishes and Four You)
Cuttlebug balloon die
Paper Smooches balloons dies
Sissix Thinlets by Rachael Bright (banner on mint macaron card)
Stampin' Up Birthday Bouquet DSP on balloon cards
Miscellaneous rhinestones and baker's twine

Friday, May 20, 2016

Graduation Gift Card Holder

If you are still needing a card for graduation, here is one with a pocket for a gift card or cash. It starts with a piece of 5-1/2 x 12 inch cardstock in order to create the inside pocket to hold your gift. The patterned papers used in this card can actually be found at Walmart. It is by Colorbok called "Hopscotch" and comes in a pad of 50 double-sided papers. I really like this pack for teenage cards and scrapbook pages especially. The stamps are from Paper Pumpkin and the star die cut is from Stampin' Up. Finished card is 4 x 5-1/2 inches. (Directions follow below)


Here are the directions for making this card: (See picture below)

1. Cut a piece of card stock to 5-1/2 x 12 inches.
2. Score on the long side at 4 inches and 8 inches. This will give you 3 sections. On the section farthest to the right, make a diagonal slice from the score line down to about 2-1/2 inches.
3. Cut about 1/8 inch off the right side before folding it onto the middle section. This will allow the card to close better when the panels are folded together and the card is shut.
4. If you would like to line the inside of the pocket like I did, cut a piece of patterned paper to approximately 3-3/4 x 5 inches and attach it to the second panel before adhering the third panel over it.
5. Adhere the bottom and short side of this folded over piece to the middle section using sticky strip or tear and tape. This becomes the pocket for your card to insert a gift card or cash.
6. Since I used black card stock, I attached a piece of white card stock to the left inside of my card for a place to write. This measures 3-3/4 x 5-1/4 inches.
7. To decorate the front of my card, I cut 3 banners in different patterned papers and adhered them to the center front of the card. I then cut 2 circles and layered them onto the banner strips.
8. Die cut a 2-1/2 inch star strip or punch stars from a strip of black card stock.
9. Stamp a greeting and cut a banner approximately 3-3/4 inches to attach over the bottom portion of the circles. Slide strip of stars underneath before attaching.
10. Stamp the inside as desired, add a diagonal strip of patterned paper to the edge as shown, a strip across the bottom, and add your gift!


This is a masculine card and by changing the greeting, you could also use it for a Father's Day card or masculine birthday card.

Thanks for stopping by today!

Friday, May 13, 2016

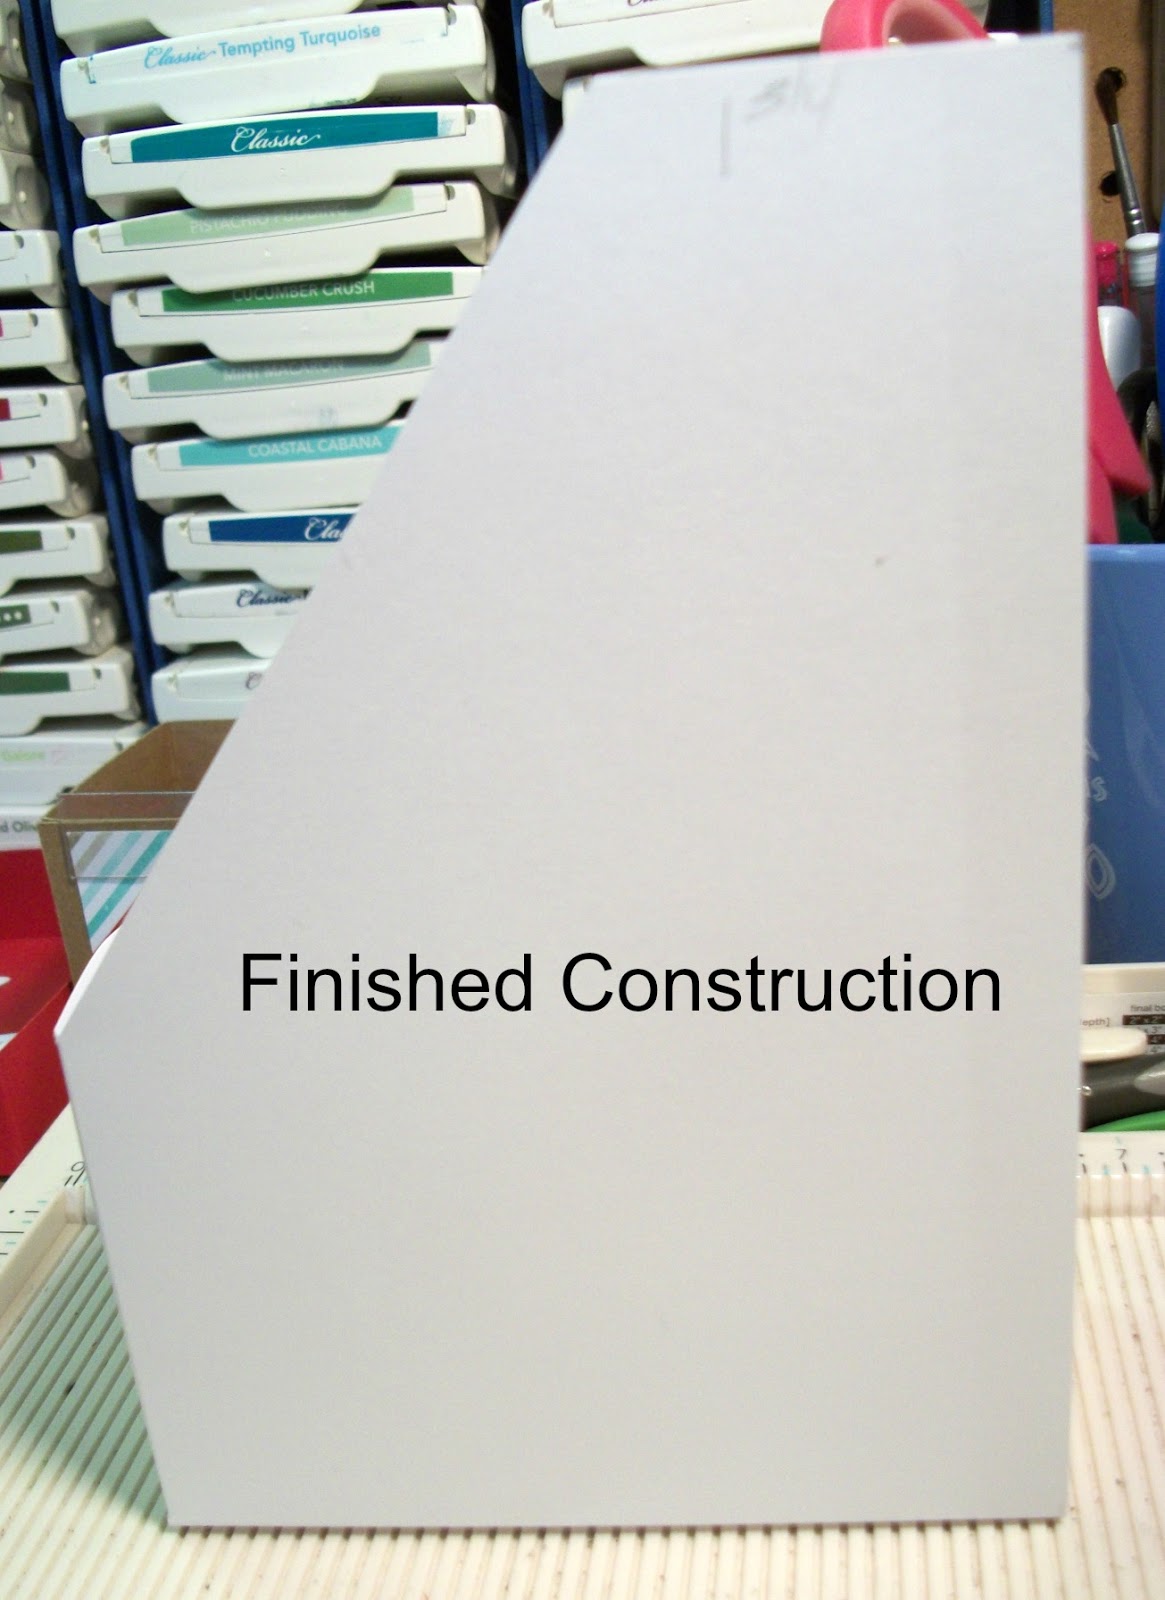
Magazine Style Card Holder


These are just the handiest way to store your finished cards! They are not stored away in a box out of sight, out of mind, and are easily accessible when you need a card, especially if you divide them into categories! Finished boxes measure 4-1/2 x 6-1/2 inches and are 2 inches wide. They look great on a shelf! Here are some other views:


See Detailed Instructions Below


Want the written directions? Here they are:

Instructions:
For this project you will need a piece of 8-1/2 x 11 inch cardstock, plus another piece cut at 3 x 7 inches. Use heavyweight cardstock for stability and durability. I used Stampin’ Up.

1. First, score the 8-1/2 x 11 inch piece on the 11 inch side at 4-1/2 and 6-1/2 inches. Turn on the 8-1/2 inch side and score at 2 inches.

2. Turn the piece back around on the 11 inch side (with score line at the bottom) and place a pencil mark or small score mark at 1-3/4 and 9-1/4 inches.

3. Measure down 3-5/8 inches from the top between the two vertical score lines and draw a pencil line between the two score lines at the 3-5/8 inch mark. From the score lines to the marks you made along the top, draw a pencil line from one point to the other. This is the cut away piece. Helpful Hint: SAVE this piece as a template so next time you can just trace or cut around this piece and you won’t have to go through all the markings again, plus you will be assured all your boxes will be identical if you make multiple boxes.

4. Now, with the top piece cut away, cut up the vertical score lines along the bottom up to the 2 inch horizontal score mark. This will be the bottom of the box.

5. On the 3x7 inch piece, score at ½ inch on 3 sides. Cut up the vertical score lines on the 3-inch side to the horizontal score line. Fold and adhere tabs like you were making a box. This will only be 3-sided and will be the back of the box.

6. Fold the score lines on the bigger box piece. With this piece laying down, adhere the smaller 3-sided back piece to the bigger box piece along the 8-1/2 inch side. Bring the other side up and attach it to that side, also attaching the third side to the back of what is now the box. Fold in and attach the bottom flaps to complete the box.

7. Decorate as desired. I cut a strip of designer paper 2-1/2 inch wide by about 12 inches long and wrapped it around 3 sides of the box, leaving the back blank because it will be against the shelf. It will be a little long, but this allows you to wrap it around the box without first scoring, and then just crease the folds and cut off any excess hanging over. Attach a label of your choice to the front or tie with a bow, etc. 

 Here are some pictures I took during assembly of the prototype so you will have some kind of visual:


This may seem difficult, but it really isn't. Even though I have seen these boxes before, the hard part was coming up with the measurements so I could recreate them. As long as you use a heavyweight cardstock these will be a very durable addition to your craft shelves! I hope you will give it a try. I have 3 done and still plan to make more! 

See you next week! I have a few graduation cards to make, as well as some birthday cards, so I will be sharing one of those. 

Friday, May 6, 2016

Birthday Balloons Card & Gift Box


Inside of Card

If you are like me, you always need birthday cards! I have started to replenish my stash of birthday cards to use for the rest of the year and here is one of those cards. I love the black background of this DSP from Stampin' Up! called "It's My Party." I used a die to cut out the balloons, a punch for the small balloons, and hand cut banners for the greeting. I had a 3-1/2 inch cube take-out style box left- over from Halloween that was perfect for decorating to match the card! All I have to do is add candy, cookies, or a small gift and I'm done! I love it when things come together like that!


Finished card is 4-1/4 x 5-1/2 inches, with borders of colored cardstock and patterned paper each cut 1-4 inch smaller than the previous layer. Colors used are basic black, crushed curry and melon mambo from Stampin' Up! Greetings are from the Remembering Your Birthday and Build a Birthday stamp sets, also from Stampin' Up! Larger balloons were cut with a Cuttlebug die. Smaller balloons were punched from an old punch I've had for years, brand unknown.

I have a couple more cards I am working on to share next week, as well as a box to hold my birthday cards. Stay tuned! (Hint: There is a sneak peek of the box in my cover photo on my Facebook page.)


Friday, April 29, 2016

Congrats Grad!


It's that time of year again when we need graduation cards! Even when I don't think I know anyone who is graduating, I'm always surprised by an announcement in the mail. Kids just grow up so fast! Anyway, here is a card I made this year using school colors. I combined three previous Paper Pumpkin kit stamps and supplies to make this card. The "Congrats" is from the Seriously Amazing kit from August 2014, the stars are from the Wish Big kit from July 2014, and the hat and "Grad" stamps are from the March 2016 kit. It could, however, be reproduced with other dies and stamps from your stash.

Finished card size is 5-1/2 x 4-1/4 inches with black mat cut at 5-1/4 x 4 inches. Congrats layer was already die cut in the kit and measures 5 x 3-3/4 inches. Black patterned paper is from It's My Party DSP stack from Stampin' Up. Since the card is for a girl, I added a little bling with some rhinestones on the hats. I also lined the envelope by cutting a piece of the same DSP to 5 x 5-1/2 inches and inserting it into the envelope. Fold down the DSP for the flap, add adhesive, and then fold down the envelope flap on top of it to adhere. There is no need to glue down the entire liner, just flap to flap.

Next week I am starting a birthday card series so I hope you come back to check that out!

Friday, April 22, 2016

Mother's Day Card #2

Black & White Mother's Day Card
I have always been a fan of black and white, and cards are no exception. Lately I've been seeing a lot of gingham papers being introduced by some companies in their spring lineup. While looking through my stash I came across this black and white gingham and this card was born! It's the usual size ( 4-1/4 x 5-1/2 inches and is top opening). I added a piece of black and white polka dot paper to the righthand corner and a strip of black and white paper between the two designs. The flowers are from the Flower Shop stamp set by Stampin' Up and punched out with the coordinating punch. The "rick-rack" is cut using a Sissix border die set by Stephanie Barnard.  The stamp is from Delightful Dozen, a retired stamp set by Stampin' Up. I added two little black enamel dots to the bottom corner and the card was finished!

Thanks for stopping by! See you again next week!

Friday, April 15, 2016

#Mother's Day Card


The card I'm sharing with you today is not made with patterned paper! It is stenciled using the Papertrey Ink Color Pop Florals, a Make It Market Mini-Kit. I haven't really stenciled much before, but the process is very easy and I enjoyed it a lot, so I just had to share it! The set comes with 3-step stencils plus stamps and dies! You also get some printed flowers to cut out or die cut and card bases to stencil or stamp your flowers on. I chose to work with a blank white card base, mainly because I thought I would just be practicing, but since it turned out so well I used it for my card! I hope you like it. (Sentiment is from Teeny Tiny Wishes by Stampin' Up). Finished card size is 5-1/2 x 4-1/4 inches. Stenciled panel is 4 x 5-1/8 inches which is layered on top of a piece of cardstock cut about 1/16th inch larger on all sides than the stenciled panel.

I was so impressed with this kit that I am sharing the link to Papertrey Ink and also a link to Papertrey's video demonstrating the process. It is a great set and very reasonably priced. They also have a new mini-kit called Color Pop Butterflies coming out soon! I think you'll want to check it out!

Link to video on YouTube
Link to Color Pop Floral Kit
Link to new Color Pop Butterflies Kit

Have a good week!

Lana

Saturday, April 9, 2016

DIY Personal Planner

Front View of Planner.

I have been researching planners for a while now and it is a bit overwhelming! There are lots of planners I love and they either come with high price tags or you have to have a special punch to add anything of your own to them. After a lot of going back and forth, I decided I really liked the Heidi Swapp planners, but you have to have the special hole punch! Since I already had an adjustable 3-hole punch, I decided to try my hand at making my own planner and this is what I came up with. 

I bought a mini Avery 3-ring view binder in white, although they come in other colors. I purchased a Heidi Swapp (American Crafts) 12 x 12 48 sheet paper pad and went to work. I went through my pocket cards, clips, file folders and rubber stamps, and had a great time creating this planner for myself! I took apart a small calendar I had already started using for the year, punched holes, and added it to my planner. I will use the Avery version for next year's planner. I also purchased some small Avery page protectors to use for dividers. They are perfect because you can use any patterned papers you want. The notebook has a clear plastic cover so you can insert any decorative papers to design your planner. I did this for the front, back and side panel. 

Front Inside View

For the inside I added patterned paper to the pocket already provided on the left and to the inside cover of the notebook itself, then added some tags and a sticky note pad. I cut a black patterned file folder I already had to 8-3/4 x 6-1/4," decorated it with a cut out flower from the patterned paper, and added some washi tape to make the dashboard. On the other side of the dashboard I added more paper from the stack, a small calendar I already had on hand, and another tag. I made the pockets by folding some black cardstock and adhering it to the dashboard, and added some more washi tape along the punched edge. The calendar I had already been using had the very same pink color so I used those dividers as well in my planner. 
I used a stamp to create this divider page.

I created more pockets for business cards in the address book section.
I have since discovered that Avery makes page protector sheets to hold business cards. 

I also created a section to keep track of birthdays.

I have a section for notes, using the Avery small notebook paper. 

I decided to add a small paper bag for holding receipts, small items, etc. 

Back View of Planner

Since the notebook I purchased didn't come with a pen holder, I added a clip to the back cover and it holds my pen perfectly. There are other Avery notebooks that do have a pen holder attached. 

I think this is a great way to get a very personalized planner. I can still buy the cute accessories for planners and use them in my planner and I'm not limited to any particular brand. I think this will be a very fun ongoing project for the rest of the year! 

Here is a list of the Avery Products I used and a link to these and other items at Amazon

Avery Mini Durable View Binder #17116
Avery Page Protectors #77004
Avery 5-1/2 x 8-1/2 college ruled Filler Paper #14230
You can also get Binder Pockets in a 5 pack #75307
Avery 1 year Calendar Pages (undated) #14825

I was able to purchase my binder, notebook paper and page protectors at my local Walmart, but I had to order the other items. 


Saturday, April 2, 2016

Alternative Card Using March's Paper Pumpkin Kit


I have a short post this week. I LOVED this month's Paper Pumpkin Kit from Stampin' Up!  I thought the envelope gift card enclosures were pretty enough to be the focal part of a card so I cut the envelope apart, using the largest inside piece for my card, and one of the flaps for an inside piece to decorate my envelope. It kind of looks like a faux lining. The center circles are from a prior Paper Pumpkin Kit. This is one of my favorite color combinations (Bermuda Bay and Cucumber Crush). These cardstocks are not part of the kit, but those are the colors in the patterned paper. The kit comes with white card bases with a soft pattern on them which could be used instead.


I'm no longer a demonstrator, but I'm sure any of them would be happy to help you subscribe to Paper Pumpkin or answer your questions. It's a surprise every month. Link to Paper Pumpkin website

Happy crafting. I'll be back next week with another card or project for you. Have a great weeked!

Friday, March 25, 2016

Bunny Chick Card

Bunny Chick Card

Happy Easter! I thought this was a funny little card made using the Cricut Create a Critter 2 cartridge. Patterned paper is from the Have a Cuppa DSP stack from Stampin' Up. Greeting is a retired stamp from SU. Flower is punched with the Petite Petals Punch from SU. Cuts from the Create a Critter 2 cartridge are as follows:

Chick - p. 41 - Create a Critter 2, cut at 3 inches (2 layers)
Bunny Ears - p. 41 - Create a Critter 2 - cut at 3 inches (2 layers)
Basket - p. 40 - Create a Critter 2 - cut at 2 inches and embossed with a zig-zag embossing folder (Paper Studio) and inked for dimension
Eggs - small egg punch (brand unknown)
"Stitched" piece of cardstock at bottom of card - Bundle of Stitched Shapes by Simon Says Stamp
Green "grass" and orange border below greeting - p. 41 - Create a Critter 2 - layer on shift (egg)

Finished card is 4-1/4 x 5-1/2 inches.

I hope you like this fun take on an Easter bunny/chick! Have a wonderful Easter!


Friday, March 18, 2016

Easter Bunny Mini-Treat Bags

Hippity Hoppity!


Easter Bunny Mini-Treat Bags

These cute little bunny treat bags were cased from Erica Cerwin of Pink Buckaroo Designs. I will link her video below so you can see how it is made. I changed mine up a little bit, but I loved the green color and the grass she created with fringed scissors. I didn’t have the bunny stamp she used so I created my own bunny by using punches. I added some pink shading for the inside of the ears and cheeks, added some googly eyes, a punched out heart for the nose, and some frayed white yarn for the whiskers. I also used a little egg punch to make the eggs hiding in the grass. I also wanted to make a couple little girl bunnies, so I added small glittered pink bows with a rhinestone to the girl bunnies.

I cut a 3-3/4 inch piece of patterned paper for the bottom of the bag and wrapped some baker’s twine around the bag and tied it, added a flag stamped with an Easter greeting, another colored flag behind it, and a colored button with a Baker’s twine bow.

I did stamp a polka dot background on the right upper side of the bag for a little interest, but this is totally optional. I just love polka dots so I thought this added some interest. I also thought about stamping some small flowers in that area, but opted for the polka dots. The stamp I used is a retired stamp from Stampin' Up. 

I used the Mini-Treat Bag Thinlet from Stampin’ Up to create most of the bags, but you can make almost the identical bag by cutting, scoring and folding a half sheet of cardstock to make a very similar mini-treat bag. Now that I have done it both ways, I actually prefer making my own to using the thinlet, but each person has their own preferences. 

To make your own bag, cut a piece of cardstock 8 x 5-1/2 inches. Score it on the long side at 3-3/4” and 7-1/2”. Turn the cardstock and score on the short side at ½ inch. (See the diagram below). Fold on the score lines and adhere together with sticky strip or another strong adhesive. If you like the look of the pinked edge, use pinking shears or other decorative scissors to cut a strip off the top of the bag. You won’t have a two level look like the mini-treat bag thinlet, but it is very similar otherwise. 

The finished bags will each hold one of the Easter Kit-Kat bars, which is what Erica shows in her video and is what I am putting in mine, as well as any other flat type candy bar. You could even add a little cellophane grass if you wanted to.

I really liked the way these turned out and wanted to share my version of the treat bags with you. Whichever version you decide to make, have fun with it! My 3-year-old granddaughter accidentally saw them on my craft table before I had them hidden away and really liked them!

Supplies:                                                                                 
8-1/2 x 11 green cardstock (I used Recollection)                   
Pink ink and dauber                                        
Cardstock scraps for nose and banners                                   
Patterned paper for eggs and bottom strip (Cherry on Top DSP from Stampin' Up)                           
Googly eyes, button and baker's twine                                                                                   
White yarn for whiskers                                                                            
Easter Greeting (mine is from And Many More by Stampin’ Up)
Background stamp (optional)

Tools:
1-3/4 inch circle punch
Small oval punch
Small heart punch
Small egg-shaped punch
Fringe scissors
Mini-Treat Bag Thinlet (Stampin' Up)  (optional)

Link to video by Erica CerwinClick here

If you would like to make your own mini-treat bags, here are the cutting directions:

Cut Cardstock at 8 x 5-1/2”


Score bottom at ½ inch
Score at 3-3/4” and 7-1/2”
A
D
H
E
S
I
V
E

Cut this section away
Fold this section up to form bottom of bag and adhere.
Cut away
*Not to scale
Fold large sections together and add adhesive to the ½ inch strip on the right hand side. Fold up bottom ½ inch to form bottom of bag. You may want to trim a sliver off each side of the bottom flap at an angle for a more finished look. Hint: When cutting away the sections, cut slightly above the score line so the bag bottom will fold together and close with no problem. 

Hippity Hoppity! Easter's on its way! 

Saturday, March 12, 2016

Card Inspiration


I find inspiration for cards everywhere! Of course I love Pinterest and follow a lot of cardmaking blogs and videos, but I also find inspiration in everyday places, from signs to product packaging to clothing. The inspiration for this card came from a wooden Easter decoration I have had for years. I don't even remember where I got it. I didn't get it out the last couple of years, so I guess when I saw it this year it was with slightly "new eyes." One day while I was looking at it, I thought, "Hey, you need to make a card like that!"


Original Inspiration for Card

I didn't follow my inspiration exactly. I never do. I always change things up a little bit, either by choice or necessity. The card is larger than I normally make. Finished size is 5x7 inches. Since I wanted to cut the letters out big enough to decorate them, I needed a larger area to spread them out. I used the Cricut Type Candy Font cartridge to cut the letters. using the Better Than Chocolate Shadow setting, cut at 2 inches. The bunny ears for the letters were cut from the Create a Critter 2 cartridge, accessory setting, p. 41. The little carrot is from the original Create a Critter cartridge, p. 26. The scalloped border is from the Elegant Edges cartridge, p. 48. The little hearts, eggs and flowers were punched with various punches from my stash. I added little candy dots from Stampin' Up to the centers of the flowers.

I am sharing this card today just to inspire you to look around you and find inspiration for your cards. Whenever I draw a blank at creating I just look around me and more often than not find inspiration to get me going again! Good luck and I hope you get inspired to make your own creations!