 |
| Bunny in a Box |
Here is my little Easter Bunny in a Box. It is made with a simple box construction, leaving the back flap unfolded to attach the bunny face, which is made with circle and oval die cuts. I used double-sided patterned paper (heavier weight) so I didn't have to do much decorating on the box itself.
I added some hand cut triangles for carrots, cut some green strips for the greenery, and a stamped Easter greeting (Stampabilities from Hobby Lobby), cutting it out with an oval die, adding a carrot, some little punched out eggs, and a little punched out flower for embellishments. I added some clear Easter grass and inserted a flag stamped, inked, and glued onto a white lollipop stick. (The "Hippity Hoppity" stamp is by Stampin' Up). Complete directions with photos are shown below.
Here are some close up views:
For the bunny face, I used stitched circle and oval dies from the Stitched Shapes Framelits Dies by Stampin' Up. I punched some 1/4 inch circles out of black for the eyes and added little white spots using a white gel pen. I punched out a small pink heart for the nose and added some pink "blush" to the face. I used the 2-3/8" size round die for the bunny head and the 2-3/4" and 1-3/4" oval dies for the ears. I also added a pink ribbon bow to the bunny's neck. The bunny head piece is attached directly to the standing back flap of the box. (This is why you don't want to fold this back flap when you are making the box.)
For the grass around the edges, I cut an 8 x 1-3/4 inch strip of green cardstock and used some shears to cut strips, leaving about a 1/2" uncut strip at the bottom for gluing, and glued it around the inside of the box. I used these same cut strips to add behind the carrots for greens.
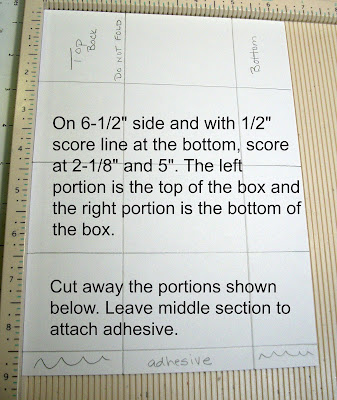
Here are the directions with photos of the box construction:
Fill with grass and treats and you're done! I hope you enjoy making this cute little Easter Bunny in a box!


No comments :
Post a Comment