Friday, April 28, 2017

Bicycle Birthday Card (Using Echo Park "Just Be You")


This card uses the Echo Park Just Be You paper pad and Element Stickers. I love this collection and used it once before in my April 14th blog post (Birthday Wallet Card). The papers in the pad are so versatile and with the matching stickers and ephemera packs you can create a card or scrapbook page in no time at all!

I found that Mint Macaron cardstock from Stampin' Up goes great with the mint colored papers in the Echo Park pad. I also added some SU Strawberry Slush paper pieces to the card.

The Happy Birthday is stamped with a stamp from Remembering Your Birthday, a retired stamp set by Stampin' Up. I cut the banner using the Siissix Thinlets by Rachael Bright.

Card base is in Mint Macaron, 5-1/2 x 4-1/4 inches, top folding. The mint striped paper with the floral image in the left corner is from the Echo Park Just Be You paper pad. I added a small strip of Strawberry Slush paper to the bottom and a portion of a circle cut in the same paper to the left. I added another partial circle in Strawberry Slush behind the banner. I used Strawberry Slush to stamp the birthday greeting and added some small flowers from the sticker sheet, along with the bicycle.

Another very quick card, basically layer, peel and stick!


Thursday, April 20, 2017

Stampin Friends Blog Hop 2017 (Birthday Celebration)


Today's card and treat bag are part of a hop with Stampin' Friends 2017 Hoppers. This month is a Birthday/Celebration theme. Be sure to also check out the other hoppers listed below and see all their great projects!

I made a very colorful birthday card featuring an ice cream cone! I used Stampin' Up colors - bermuda bay, watermelon wonder, and peek-a-boo peach.


The stamp is from Studio G, stamped in watermelon wonder, cut out with a 1-3/4" circle punch and then layered onto a slightly larger scallop circle die from the Stampin' Up Layering Circles Framelits Dies.


I used a retired Stampin' Up stamp set from 2001 called Two Step Stampin Perfect Party for the ice cream cone and background. I love the current Cool Treats stamp set by Stampin' Up, but I remembered I had a similar one from years ago, so I dug it out and made this card! I stamped the cone onto crumbcake cardstock, then cut it out by hand.  I stamped the two scoops of ice cream onto watermelon wonder and peek-a-boo peach cardstock, and cut them out by hand as well. I used one of the stamps from the stamp set to stamp the background on the bermuda bay layer.

The watermelon wonder card base is 4-1/4 x 5-1/2", side folding, I layered bermuda bay cardstock on top that I die cut with the Simon Says Stamp Bunch of Stitched Shapes.  I also die cut some flags using the same Simon Says set to add to the right of the cone. I use this die set a LOT! It's one of my all time favorites.

I didn't have a rectangle shaped stitched die the right size, so I die cut two of the largest stitched squares from the Stampin' Up Stitched Framelits and layered them together, hiding the seam with a piece of watermelon wonder patterened paper.

After attaching the cone, scoops of ice cream and other pieces to the card, I decided it needed something else, so I added a tied yarn bow on the left side and added some enamel dots. I didn't have the right colors, so I colored some white dots with a couple Sharpie markers in similar colors. The "happy birthday" greeting is from the And Many More Stampin' Up  stamp set (now retired).

Here is a matching treat bag I made to go with the card. It uses the same measurements and directions as the Easter Treat Bags from my March 31 post. Finished bag is 3-1/2 x 5 inches. I stamped the same star background onto the bag as I did on the card. The "FOR YOU" is from the Stampin' Up Perfectly Wrapped stamp set and I cut it out using another die from the Simon Says die set.


I have several spring and summer birthdays coming up and I think this card and treat bag will be just the thing! Who doesn't love ice cream, right? Actually, the bright colors of the ice cream remind me more of sherbet!


Friday, April 14, 2017

Birthday Wallet for Teenage Girl

Birthday Wallet

I want to start out by saying this is NOT my original idea. I got it from Gosia MacKinnon who has a video on You Tube on how to make these. I fell in love with the idea and had to recreate it! I am always looking for ideas for teenager gifts and thought this would be a super one. I made this version for a teenage girl. Here is the link to Gosia's video.

I won't repeat the directions here because Gosia has all of them in her video and on her blog. I used hot pink and navy cardstock for my wallet, a color combination I really like and I've noticed it being used more and more in various new papers.

For the papers and accessories, I chose the new Echo Park suite called Just Be You. I used the Decorative Dots embossing folder by Stampin' Up (Sissix) and an old hostess stamp set from Stampin' Up called Happiest  Birthday Wishes.

Inside View When Opened

Inside View With Coordinating Tag

I plan to add money or a gift card to the top opening and I made a tag to insert in the bottom right opening, but you could add another gift card or money, a note, etc. The frame shown on the bottom left is for inserting a photo.

Again, thank you Gosia for this super idea. I loved recreating your project! I plan to tackle a teenage boy's version next.


Friday, April 7, 2017

Easter Bunny in a Box

Bunny in a Box

Here is my little Easter Bunny in a Box. It is made with a simple box construction, leaving the back flap unfolded to attach the bunny face, which is made with circle and oval die cuts. I used double-sided patterned paper (heavier weight) so I didn't have to do much decorating on the box itself.

I added some hand cut triangles for carrots, cut some green strips for the greenery, and a stamped Easter greeting (Stampabilities from Hobby Lobby), cutting it out with an oval die, adding a carrot, some little punched out eggs, and a little punched out flower for embellishments. I added some clear Easter grass and inserted a flag stamped, inked, and glued onto a white lollipop stick. (The "Hippity Hoppity" stamp is by Stampin' Up). Complete directions with photos are shown below.

Here are some close up views:


For the bunny face, I used stitched circle and oval dies from the Stitched Shapes Framelits Dies by Stampin' Up. I punched some 1/4 inch circles out of black for the eyes and added little white spots using a white gel pen. I punched out a small pink heart for the nose and added some pink "blush" to the face. I used the 2-3/8" size round die for the bunny head and the 2-3/4" and 1-3/4" oval dies for the ears. I also added a pink ribbon bow to the bunny's neck. The bunny head piece is attached directly to the standing back flap of the box. (This is why you don't want to fold this back flap when you are making the box.) 

For the grass around the edges, I cut an 8 x 1-3/4 inch strip of green cardstock and used some shears to cut strips, leaving about a 1/2" uncut strip at the bottom for gluing, and glued it around the inside of the box. I used these same cut strips to add behind the carrots for greens.


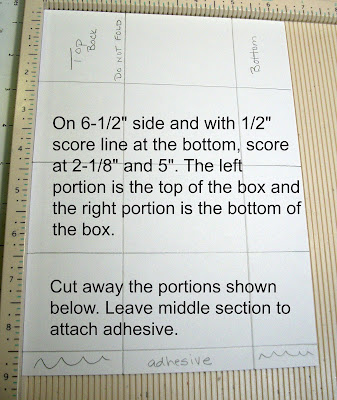
Here are the directions with photos of the box construction:


Fill with grass and treats and you're done! I hope you enjoy making this cute little Easter Bunny in a box!