Friday, May 27, 2016

Fry Box Gift Card Holder


I love the fry box but if you aren't using it as a party favor or 3D project, what can you use it for? Well, you can keep it flat and turn it into a gift card holder! It's great for the french fry or fast food fan in your life. I made two different sizes using the Cricut Tags, Bags, Boxes & More 2 cartridge. I used the flat version of the fry box on p. 69 and not the box cut in sections.

The box/card in the picture on the left below is cut at 4 inches and the larger one on the right is cut at 4-3/4 inches. If you make the 4 inch version it will fit in a standard A2 size card envelope. The 4-3/4 inch version will need a larger A7 envelope.The gift card is inserted behind the "fries" in the "box".


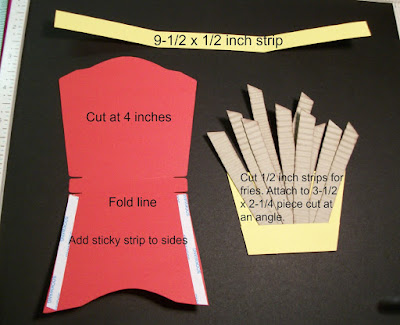
Here are the pieces cut with measurements:


The yellow band acts as a cover-up for the fold lines on the box piece. I did add a top piece to the fries to cover the bottom portion and make it look more finished. This piece measured 2-1/2 x 3-4 inches. To make the fries, just cut 1/2 inch strips of an ivory or light tan cardstock and run it through your crimper or diagonal stripe embossing folder. If you don't have a diagonal stripe folder but have a straight stripe one, just put the strips in at an angle, or make lines on your scoring tool. I inked around the edges of the fry pieces to give them a little more dimension and life.

If you want to change your box up and not have french fries, here are a couple other versions I made using die cut balloons:


The balloons are attached to a piece of cardstock just like I did with the fries and also pulls out of the box. You can slip the gift card inside the box or attach it with a clip to the pull-out piece.

I find myself giving money or gift cards a lot more these days, especially since the kids in my life are all getting older and like to pick out their own gifts. I think these gift card holders make giving a gift card or money a little bit more special.  If you don't have the Cricut cartridge, try one of the many fry box die cuts out there. Depending on your die cut, you may have to do a little trimming to make the sides of the card flush with each other.

Supplies Used:
Cricut Tags, Bags, Boxes & More 2 cartridge
Stampin' Up cardstock in Real Red, Daffodil Delight (french fry boxes)
Stampin' Up cardstock in Calypso Coral and Mint Macaron (variations of box)
Stampin' Up Build a Birthday stamp set (fry box #1)
Stampin' Up Tin of Cards" stamp set (mint macaron card)
The other stamp sets on the boxes are from retired SU sets (Happiest Birthday Wishes and Four You)
Cuttlebug balloon die
Paper Smooches balloons dies
Sissix Thinlets by Rachael Bright (banner on mint macaron card)
Stampin' Up Birthday Bouquet DSP on balloon cards
Miscellaneous rhinestones and baker's twine

Friday, May 20, 2016

Graduation Gift Card Holder

If you are still needing a card for graduation, here is one with a pocket for a gift card or cash. It starts with a piece of 5-1/2 x 12 inch cardstock in order to create the inside pocket to hold your gift. The patterned papers used in this card can actually be found at Walmart. It is by Colorbok called "Hopscotch" and comes in a pad of 50 double-sided papers. I really like this pack for teenage cards and scrapbook pages especially. The stamps are from Paper Pumpkin and the star die cut is from Stampin' Up. Finished card is 4 x 5-1/2 inches. (Directions follow below)


Here are the directions for making this card: (See picture below)

1. Cut a piece of card stock to 5-1/2 x 12 inches.
2. Score on the long side at 4 inches and 8 inches. This will give you 3 sections. On the section farthest to the right, make a diagonal slice from the score line down to about 2-1/2 inches.
3. Cut about 1/8 inch off the right side before folding it onto the middle section. This will allow the card to close better when the panels are folded together and the card is shut.
4. If you would like to line the inside of the pocket like I did, cut a piece of patterned paper to approximately 3-3/4 x 5 inches and attach it to the second panel before adhering the third panel over it.
5. Adhere the bottom and short side of this folded over piece to the middle section using sticky strip or tear and tape. This becomes the pocket for your card to insert a gift card or cash.
6. Since I used black card stock, I attached a piece of white card stock to the left inside of my card for a place to write. This measures 3-3/4 x 5-1/4 inches.
7. To decorate the front of my card, I cut 3 banners in different patterned papers and adhered them to the center front of the card. I then cut 2 circles and layered them onto the banner strips.
8. Die cut a 2-1/2 inch star strip or punch stars from a strip of black card stock.
9. Stamp a greeting and cut a banner approximately 3-3/4 inches to attach over the bottom portion of the circles. Slide strip of stars underneath before attaching.
10. Stamp the inside as desired, add a diagonal strip of patterned paper to the edge as shown, a strip across the bottom, and add your gift!


This is a masculine card and by changing the greeting, you could also use it for a Father's Day card or masculine birthday card.

Thanks for stopping by today!

Friday, May 13, 2016

Magazine Style Card Holder


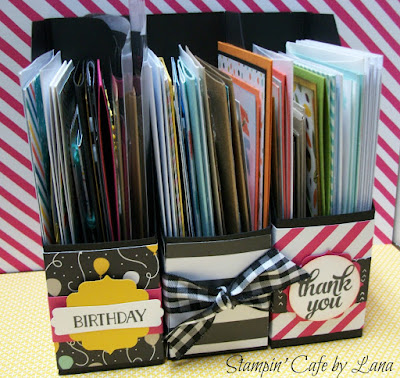
These are just the handiest way to store your finished cards! They are not stored away in a box out of sight, out of mind, and are easily accessible when you need a card, especially if you divide them into categories! Finished boxes measure 4-1/2 x 6-1/2 inches and are 2 inches wide. They look great on a shelf! Here are some other views:


See Detailed Instructions Below


Want the written directions? Here they are:

Instructions:
For this project you will need a piece of 8-1/2 x 11 inch cardstock, plus another piece cut at 3 x 7 inches. Use heavyweight cardstock for stability and durability. I used Stampin’ Up.

1. First, score the 8-1/2 x 11 inch piece on the 11 inch side at 4-1/2 and 6-1/2 inches. Turn on the 8-1/2 inch side and score at 2 inches.

2. Turn the piece back around on the 11 inch side (with score line at the bottom) and place a pencil mark or small score mark at 1-3/4 and 9-1/4 inches.

3. Measure down 3-5/8 inches from the top between the two vertical score lines and draw a pencil line between the two score lines at the 3-5/8 inch mark. From the score lines to the marks you made along the top, draw a pencil line from one point to the other. This is the cut away piece. Helpful Hint: SAVE this piece as a template so next time you can just trace or cut around this piece and you won’t have to go through all the markings again, plus you will be assured all your boxes will be identical if you make multiple boxes.

4. Now, with the top piece cut away, cut up the vertical score lines along the bottom up to the 2 inch horizontal score mark. This will be the bottom of the box.

5. On the 3x7 inch piece, score at ½ inch on 3 sides. Cut up the vertical score lines on the 3-inch side to the horizontal score line. Fold and adhere tabs like you were making a box. This will only be 3-sided and will be the back of the box.

6. Fold the score lines on the bigger box piece. With this piece laying down, adhere the smaller 3-sided back piece to the bigger box piece along the 8-1/2 inch side. Bring the other side up and attach it to that side, also attaching the third side to the back of what is now the box. Fold in and attach the bottom flaps to complete the box.

7. Decorate as desired. I cut a strip of designer paper 2-1/2 inch wide by about 12 inches long and wrapped it around 3 sides of the box, leaving the back blank because it will be against the shelf. It will be a little long, but this allows you to wrap it around the box without first scoring, and then just crease the folds and cut off any excess hanging over. Attach a label of your choice to the front or tie with a bow, etc. 

 Here are some pictures I took during assembly of the prototype so you will have some kind of visual:


This may seem difficult, but it really isn't. Even though I have seen these boxes before, the hard part was coming up with the measurements so I could recreate them. As long as you use a heavyweight cardstock these will be a very durable addition to your craft shelves! I hope you will give it a try. I have 3 done and still plan to make more! 

See you next week! I have a few graduation cards to make, as well as some birthday cards, so I will be sharing one of those. 

Friday, May 6, 2016

Birthday Balloons Card & Gift Box


Inside of Card

If you are like me, you always need birthday cards! I have started to replenish my stash of birthday cards to use for the rest of the year and here is one of those cards. I love the black background of this DSP from Stampin' Up! called "It's My Party." I used a die to cut out the balloons, a punch for the small balloons, and hand cut banners for the greeting. I had a 3-1/2 inch cube take-out style box left- over from Halloween that was perfect for decorating to match the card! All I have to do is add candy, cookies, or a small gift and I'm done! I love it when things come together like that!


Finished card is 4-1/4 x 5-1/2 inches, with borders of colored cardstock and patterned paper each cut 1-4 inch smaller than the previous layer. Colors used are basic black, crushed curry and melon mambo from Stampin' Up! Greetings are from the Remembering Your Birthday and Build a Birthday stamp sets, also from Stampin' Up! Larger balloons were cut with a Cuttlebug die. Smaller balloons were punched from an old punch I've had for years, brand unknown.

I have a couple more cards I am working on to share next week, as well as a box to hold my birthday cards. Stay tuned! (Hint: There is a sneak peek of the box in my cover photo on my Facebook page.)