My passion is making cards and other paper projects and sharing my ideas and projects with you.
Wednesday, November 23, 2016
"Thankful" Card
This "thankful" card for Thanksgiving relies mainly on the patterned paper. I added some die cut fall leaves, stamped a tree image, added my greeting, and layered it on a coordinating colored circle to pop it up. The finished card is 4-1/4 x 5-1/2, top folding. All products are Stampin' Up except the dies used to cut the leaves, which are from Lawn Fawn.
The card base is Old Olive, the next layer is Hello Honey, and the top layer is Stampin' Up's fall DSP from last year called Into the Woods. The tree is stamped with the Sprinkles of Life stamp set from Stampin' Up, and the greeting is from the Endless Thanks stamp set. I added a copper leaf using a Recollections leaf punch. The tree is stamped onto a 2 inch white circle, and then layered on top of a 2-1/2 inch Mossy Meadow circle. I inked the edges of the Hello Honey layer, the patterned paper layer, the white circle, as well as the leaves. The leaves are cut from Small Stitched Leaves dies by Lawn Fawn. To make the shape a little different, I rounded the bottom edges of the card and layers using my Crop-a-Dile.
Happy Thanksgiving!
Friday, November 18, 2016
Snowman Cards - Happy Holidays
After I made the snow fox card last week, I decided I needed to make some snowman cards! These are special because I used the very first stamp set I ever purchased! I purchased this stamp set in 2001, along with some red, green and white cardstock, and made my very first Christmas cards. I have made them every year since!
This card is made with Stampin' Up cardstock in Cucumber Crush and Whisper White. After stamping and coloring the snowman, I cut it out using Stampin' Up's new Stitched Shapes Framelet Dies (which by the way I LOVE!). I used the largest oval die. The snow bank was created using Lawn Fawn's Stitched Hillside Borders dies. I cut the trees out using a triangle punch from some envelope paper in the same Cucumber Crush, adding brown tree trunks cut from brown cardstock. The stamped "Happy Holidays" is from the same Stampin' Up Frosty stamp set from 2001.
I wanted to make one more snowman card, so this time I used some patterned paper from a Paper Studio Christmas pack called A Very Merry Christmas, and I used the same dies. I did add another white layer behind the patterned paper in white using the rectangle die from Simon Says Stamp Bundle of Stitched Shapes. I hand cut some trees from the patterned paper and attached them to the snow banks. The card base is black.
While new stamp sets are great, sometimes it's fun to go back to the old ones! This is a stamp set I will never let go, not just because it is very sentimental for me, but because I still love it!
Friday, November 11, 2016
Snow Fox - Let it Snow!
| Snow Fox |
Last week I told you how much I LOVE foxes and shared a fox card and gift box. In keeping with that theme, this week I am sharing a Snow Fox Christmas Card. I really love how this turned out!
The card is a standard A2 sized card (4-1/4 x 5-1/2 inches), top folding. Card base is white. I layered another white piece on top cut from the Simon Says Stamp Bundle of Stitched Shapes. It measures 4 x 5-1/4 inches. The next layer is from the Foxy Friends DSP by Stampin' Up, cut at 3-3/4 x 5 inches. I lightly inked the edges with Smoky Slate ink.
The snow layers are cut from Stitched Hillside Borders by Simon Says Stamp. They are layered together and cut to the width of the top layer, which is 3-3/4 inches.
The little fox is from the Cricut Create a Critter cartridge, p. 63, cut at 2-1/4 inches. The layers are cut in white and smoky slate. The Santa hat is from the Cricut Paper Doll Dress Up cartridge on p. 72, cut at 2-3/4 inches. I cut the hat twice, once in white and again in red, and then cut and layered the two pieces together. The heart is from a Martha Stewart heart punch. The greeting is an old Stampin' Up stamp from 2004, but you could use any greeting. I know there is a "Let it Snow" stamp in a current Stampin' Up set too.
This card was so much fun to create! This may be one of those cards that's hard to let go!
Friday, November 4, 2016
Little Fox Gift Box and Fox Card
If you have seen all the cute fox stamps and papers out now, you will know what inspired this gift box and card. Foxes are so popular. I was in a department store recently and saw a box made in this fashion and decided I just had to try to recreate it! The face is a flap that lifts up. The finished box is 5 inches wide, 1-1/2 inches deep, and 4 inches tall. It is large enough for some candy, a small gift, small note cards, or even a gift card! The card shown does not fit inside the box, although you could easily make a smaller version that would.
The card is a standard 5-1/2 x 4-1/4 inch, top folding card, and is not meant to go inside the box. I used A Little Foxy DSP from Stampin' Up and cut the fox from the Create a Critter cartridge at 2 inches. The card base is smoky slate, the circles behind the fox are calypso coral and soft sky, and the fox is also in calypso coral and white. The greetings on both the box and the card are from And Many More" by Stampin' Up.
If you would like directions on the box, I took pictures of all the steps and have written directions below.
Start with a piece of cardstock cut at 8 x 11-1/2 inches. I used smoky slate (gray), but I have also used kraft and both work well. Score the 8 inch side at 1-1/2" and 6-1/2". Score the 11 inch side at 4", 5-1/2", 9-1/2", and 9-3/4". The top will be the side with the score lines close together. Trim off the top corners as shown, and cut the score lines in the middle as shown. Then add a strong adhesive, score tape, tear and tape, etc. to the pieces as shown below.
Bring the top half of the box down to attach to the inside flaps on each side, then bring the bottom up and attach the sides. It will look like the picture above. Don't worry about the short flap remaining on top. This is the base for the fold-over face pieces. Pinch in the sides of the box as shown and pin to make it easier to attach the flap pieces.
Cut two flap pieces for the face using the Elegant Edges Cricut cartridge, p. 25, cut at 5 inches on the book setting, in white and orange. You could also use some other die you may have.
With the points facing to the left on your score board, score the orange piece at 1-1/2" and 1-3/4". Score the white piece at 2-3/4" and 3". Leave the white piece at 5 inches and cut the orange piece down to 4 inches. Fold along the score lines and crease with a bone folder. These need to be crisp folds.
Next, attach the white flap to the flap on the box, matching up the score lines on the box. It works best if you use liquid glue and attach the piece to the box while holding the box upright and laying the flap on top of the box. Glue only the top flap on the box and the bottom of the white flap. Do not glue the small area in between the thin score lines. Then working in the same manner, glue the orange flap on top of the white one. This forms the top of the fox's head.
For the body on the front of the box, I used punches and dies. I punched out ovals for the haunches using a 1-3/4" x 7/8" oval punch, a 1/2 inch circle for the nose, and cut a 1/2 inch circle in half for the eyes. I cut the body from an oval die measuring 2-3/4 x 3-1/2", and fashioned a tail from the space left after cutting the oval. I also hand cut the tip of the tail in white. Cut the pieces and assemble as shown.
I attached a small flat magnet under the nose and onto the body. I covered the magnet on the body with a 1/2 inch circle. I added a little "blush" with some light pink ink on a sponge dauber.
For the ears, cut two triangles in orange, and two smaller ones in white, glue together, and attach behind the top of the head with glue or glue dots.
If you want to embellish it further, add a greeting and bow!
I hope you enjoyed this week's project. Let me know if the directions aren't clear enough and I will be more than happy to clarify them! Happy crafting!
Friday, October 28, 2016
Spider Web Halloween Card
![]() |
| Spider Web Halloween Card |
There are several spider web cuts on various Cricut cartridges, including Close to My Heart Artbooking, p. 54; Paper Dolls Dressup, p. 30, Wild Card, p. 37, Create a Critter2, p. 53, and Happy Hauntings, p. 102. Just pick your favorite. I cut the web in half and attached it to the card only in the middle. Helpful Hint: If you don't already know about it, there is a great website to search for different cuts without having to search through your cartridges to find them. It is http://www.mycutsearch.com/
The card is a top folding 4-1/4 x 5-1/2 inch card. The spider is a retired stamp from Stampin' Up, but there are a lot of cute spider stamps out there. I stamped it on a white 1-3/8" circle, layering it on top of an orange 1-1/2" circle, and then onto a black 1-3/4" scallop circle. The greeting is from Teeny Tiny Wishes by Stampin' Up. The card base is Pumpkin Pie, also from Stampin' Up.
Have a safe and fun Halloween!
Friday, October 21, 2016
Night Owl Halloween Card
![]() |
| Night Owl Halloween Card |
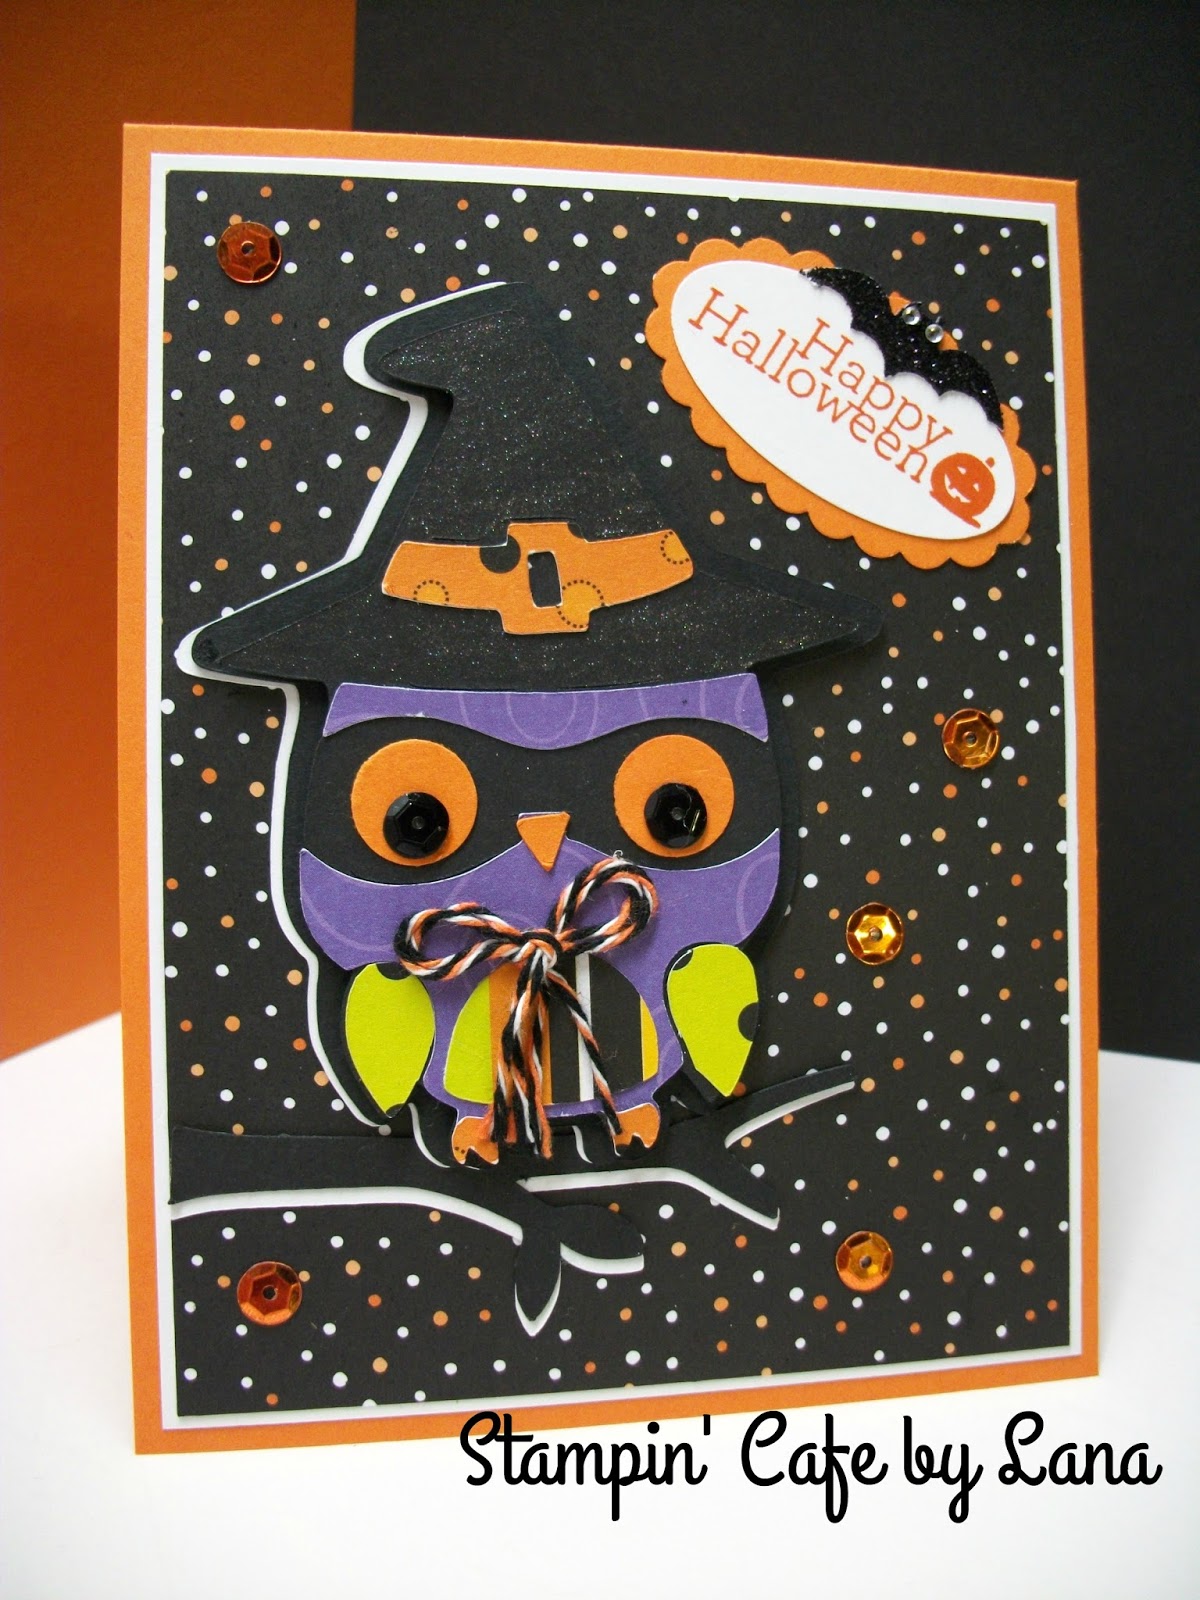
Whooo doesn't love an owl? I know I do. This cute little owl is made with the Create a Critter2 Cricut cartridge, p. 57, cut at 3-1/2 inches. I cut the the layers in various Halloween colored papers and put it all together to create this multi-colored owl for Halloween.
The witch's hat is is cut at 3-1/2 inches also. I cut a white shadow piece, slightly offsetting it behind the owl, to create the shadow. I used Wink of Stella on the hat so it would stand out from the black background better.
The branch is also on p. 57 and is cut on the accessory setting at 4 inches. I also cut one in white to offset below the black brand to create the shadow.
The papers used for the owl are just scraps from my stash, but the card itself is made with Stampin' Up products. The base is 4-1/4 x 5-1/2, top folding, using Pumpkin Pie cardstock. The white layer is cut at 4 x 5-1/4. and the black, orange and white patterned paper is from the Halloween Night DSP, cut at 3-7/8 x 5-1/8. The greeting is also from Stampin' Up, a retired stamp from the Delightful Dozen stamp set. I used a small oval punch and a scalloped oval punch layered together. The little bat is a sticker from Hobby Lobby. The bow is made with Recollections orange, black and white baker's twine from Michaels. I added two black sequins to the eyes and I also scattered some orange sequins around the card to finish it.
I will have one more Halloween card next week, a little simpler, so if you like to keep things simple, then come back for that one!
Friday, October 14, 2016
Halloween Black Cat Treat Bag and Freaky Friends Treat Holders
Do you need treat bags or cute little treat holders for classroom treats or for trick-or-treaters? Here are some I made. The bag above is a 4-1/2 x 7-3/4 flat brown bag you can get at Hobby Lobby. Cuts for the black cat body are made with 2 pumpkin cuts from Create a Critter2 cartridge, p. 54, cut on the shadow setting, at 3" and 2-1/2". The hat is from the same CAC2 cartridge on p. 53, cut at 3 inches. The hat band is cut in orange, also at 3 inches. I added Wink of Stella to both the hat and the band to make it stand out a little from the black cat. I also added dimensionals behind the hat.
How to Put the Cat Together:
Trim off the top stem and leaves of the pumpkins and save two of the leaves for the ears of the cat. Attach behind the smaller pumpkin. Attach the smaller pumpkin with ears (the head) slightly offset to the right onto the larger pumpkin (the cat body).
I punched out a 2 inch circle in black, cutting off the edges (not quite cutting the circle in half), for the cat's haunches, and another 2 inch circle in orange, trimming off just the rim to use for the cat's collar. I did the same thing for the cat's tail, cutting it from a black 2 inch circle.
The flags attached at the upper lefthand corner are hand cut from Stampin' Up's Halloween Night Designer Series Paper. I added a punched out 2 inch orange circle behind the flags. The Halloween greeting is from Delightful Dozen, a retired Stampin' Up set, punched with a retired label punch.
These bags will hold full size candy bars like Kit Kats, etc.
If you want a simpler and smaller treat holder, here are some I made using directions from Julie Davison, Stampin' Up Demonstrator. She has a video on You-Tube. Click here to see her video.
These are made with a 2 x 9 inch piece of cardstock, scored at 4" and 5", and the ends are scalloped using the Scallop Tag Topper punch from Stampin' Up. The black band that holds it together is cut at 1-1/2 x 6-1/2 inches and is scored at 2", 3", 5" and 6", Secure the band with tear and tape and insert over the top of your scored and folded large tag piece. I used a little bit of glue to hold the back of the band onto the tag to give it more stability.
I used the retired Freaky Friends stamp set from Stampin' Up in various colors, punched them out with whatever circle punch fit around the image, and then punched out a larger circle to add behind it, using various scraps of patterned paper. I then attached the circles to the front of the holders using dimensionals. I added some little sparkly bats I got at Hobby Lobby and tied the tops with some black and white baker's twine. These little treat holders will hold the individually wrapped fun size candies or candy bars.I think they would make cute treats for co-workers too! If you would like to see a photo of all these treat holders lined up, they are featured on my Facebook cover page. Come by and visit sometime!
Friday, October 7, 2016
Fall Apple Tree Card
This week's post is a fall apple tree card. You can't think of fall without thinking of apples! This is a top-folding 4-1/4 x 5-1/2 card in Crumb Cake, layered with Real Red and Olive Green, all Stampin' Up colors. The Olive Green layer is embossed using the Cuttlebug Divine Swirls embossing folder. The swirls represent the fall wind.
I cut the tree in brown from the Create a Critter2 cartridge, p. 57, at 3-3/4 inches. The apples and leaves are punched with the Tree Builder punch by Stampin' Up, stamped with the Sprinkles of Life stamp set, hand colored and inked. The bushel basket is also from the Sprinkles of Life stamp set. I just cut it down a little bit to be more proportionate to the tree and inked the edges. I popped up the tree and the bushel basket with dimensional dots. The greeting is from the Endless Thanks stamp set from Stampin' Up and is punched out with the small oval punch and then layered onto a scallop punch in red.
The weather has finally turned cooler and I can think more about fall and all the good things that come with it! Have a good week and I'll be back next week to start my Halloween projects!
Products Used:
Cuttlebug Divine Swirls Embossing Folder
Cricut Create a Critter2 cartridge
Stampin' Up Tree Builder Punch
Stampin' Up Sprinkles of Life Stamp Set
Stampin' Up Endless Thanks Stamp Set
Stampin' Up Cardstock in Crumb Cake, Real Red, Old Olive, Chocolate Chip, and Whisper White
Stampin' Up inks in Pumpkin Pie, Crumb Cake, Early Espresso and Real Red
Friday, September 30, 2016
Fall Coffee Card
Today's card is a celebration of National Coffee Day yesterday and National Cardmaking Day tomorrow, the best of both worlds! This card also represents the name of my blog, "Stampin' Cafe by Lana"! I love coffee and cardmaking and the two just go together!
This card is a 4-1/4 x 5-1/2 inch, top folding card. The base is in Early Espresso and the orange layer is Pumpkin Pie, both from Stampin' Up. The background is stamped with retired Stampin' Up pumpkin and leaf stamps, but you could use anything you have that is fall themed. I chose pumpkins because my favorite fall drink is a pumpkin latte!
The cup is cut in Early Espresso using the Love You a Latte Cricut cartridge, <Cafecup2> at 5 inches. I cut a 1-1/4 inch wide strip of a patterned paper and wrapped it around the cup, securing it in the back with adhesive. The round "caffeine addict" stamp and the "Coffee is always a good idea" stamps come from Sugar Pea Designs.
I plan to enjoy a pumpkin latte this weekend! I'll be back next week with another fall themed card. Thanks for taking the time to visit today.
This card is a 4-1/4 x 5-1/2 inch, top folding card. The base is in Early Espresso and the orange layer is Pumpkin Pie, both from Stampin' Up. The background is stamped with retired Stampin' Up pumpkin and leaf stamps, but you could use anything you have that is fall themed. I chose pumpkins because my favorite fall drink is a pumpkin latte!
The cup is cut in Early Espresso using the Love You a Latte Cricut cartridge, <Cafecup2> at 5 inches. I cut a 1-1/4 inch wide strip of a patterned paper and wrapped it around the cup, securing it in the back with adhesive. The round "caffeine addict" stamp and the "Coffee is always a good idea" stamps come from Sugar Pea Designs.
I plan to enjoy a pumpkin latte this weekend! I'll be back next week with another fall themed card. Thanks for taking the time to visit today.
Friday, September 23, 2016
Super Hero Cards "P.J. Masks"
![]() |
| "Cat Boy" Super Hero Card |
![]() |
| "Gecko" Super Hero Card |
![]() |
| "Owl Girl" Super Hero Card |
I will try to give you as much detailed direction as I can so you can recreate these characters. There is a lot of piecing and trimming involved, but with a little time and patience, you can make these cute little characters for a P.J. Masks fan in your life! If you would rather purchase a PDF of these directions, I have separate digital PDF files for each character/card at a nominal cost at my Etsy Shop - Stampin' Cafe by Lana. This makes it easier for you to download it instantly and not have to contact me and wait for a response.
Cat Boy/Catboy Super Hero:
1. Cut a Paper Doll body from ivory cardstock, at 4 inches, p. 29, Paper Doll Dress Up cartridge.
2. Cut the Superboy costume at 4 inches, p. 56
3. Cut mask, boots, belt and emblem at 4 inches, p. 56 (cuts are proportionate to doll size)
4. Cut gloves at 4 inches, p. 57
5. Cut head from Create a Critter cartridge, cat2 on p. 38, at 1-3/4 inches.. Trim as needed to fit head of paper doll.
6. The light blue accent pieces on head, sleeves and boots will need to be hand cut. You can cut the boots out again in the contrasting color and cut off the boot tips to make the contrasting boot tips.
7. Cut a tail using a 2 inch circle punch and attach to back of doll.
8. To make eyes, punch 2 circles with a 1/4 inch circle punch. I used one of the inside cut-outs from the mask to make the eyeballs, cut in half, and made black dots with a marker for the pupils.
9. Nose is a 1/4 inch circle punch.
10. Cut out background building at 4 inches, p. 56. Trim to fit the card. Add yellow pieces behind window openings for lights.
11. I used a star embossing folder from Stampin Up to emboss the card base.
12. Black strip was added at the bottom to resemble a street.
13. Greeting is from a retired Stampin' Up Sale-a-Bration stamp set called "Hello."
Gecko/Gekko Super Hero:
1. For this one I cut the paper doll body out of green cardstock at 4 inches, p. 29
2. Cut the costume at 4 inches, p. 56.
3. Cut mask on p. 56, once in green and once in white.
4. Cut boots and V-neck for costume, p. 57. Cut the V-neck twice in a lighter color green. The second cut will be for the head piece.
5. Hand cut knee patches and toe pieces, or cut boots out a second time in the lighter green and rim off the toe portion.
6. For the face, punch out a 1-3/4 inch circle, cut in half. Nose is a 1/4 inch circle punch.
7. For the eyes, take the white cut-out pieces from the white mask and insert those into the green mask for the eyes. Take the green cut-outs from the green mask, cut in half, and add to the white pieces for eyeballs. Use a black marker to make dots for pupils.
8. Use what is left of the building you cut out previously for this card, adding black behind the windows, or use yellow for lights.
9. The green geometric paper used on the card is envelope paper from Stampin' Up in Emerald Green. I also used Emerald Green for the character.
10. Greeting is from a retired Stampin' Up set called "Itty Bitty Banners."
Owl Girl/Owlette Super Hero:
1. For this one I did NOT cut out a paper doll body. I cut the Supergirl costume at 4 inches, p. 57.
2, Cut owl on p. 25 of Create a Critter cartridge at 2-1/2 inches. Trim to form more pointed ears and round the bottom to form the head.
3. Add a 1-3/8 inch circle, cut in half, to form the face. Add a 1/4 inch punched out circle for the nose.
4. Add a 1-3/8" circle in the same pink color behind head/ears to form rest of head.
5. Cut mask and emblem, p. 56. Cut mask a second time in white.
6. Punch out a flower in a coordinating pink color of a different shade (I used Rose Red for the body and Melon Mambo for the wings) to form the wings. Cut in half, trim as needed, and attach to back of body and behind arms.
7. Attach mask to face, Insert white cut-outs from white mask to make eyes. Use one of the cut-out pieces from the pink eye mask, cut in half, to form the eyeballs. Use a black marker to make the pupils.
8. Punch out a small white heart to attach to the emblem on her chest.
9. Fold legs back to resemble a flying motion.
10. Cut buildings on p. 56 at 2-1/2 inches and trim to fit card front. Attach white pieces behind windows if desired.
11. The heart paper is Pop of Pink DSP by Stampin' Up.
12. Greeting is from the Hello stamp set, a retired SAB set from Stampin' Up.
13. I added a piece of the same pink color (Melon Mambo) to the bottom of the card below the buildings and the greeting, and attached small pink punched out hearts to the upper righthand corner.
Well, there you have it. I realize this is a long post, but I hope I have enough detail for you to make your own super hero characters. There was a lot of trial and error involved, so if I can save you some of the error, that is a good thing!
Have a good week. I will be back next week with a new fall card for you!
Friday, September 16, 2016
Scarecrow "Hello" Card
To celebrate the upcoming fall season, I made this sweet little scarecrow card! I had so much fun bringing him to life and adding him to this card.
The card base is 4-1/4 x 5-1/2 inches, top folding, in Mossy Meadow. I then added a layer in Crumb Cake that I ran through my Darice "Foilage" embossing folder. I made the piece 1/2 inch shorter than the green cardstock so the green would show below giving the illusion of the ground. The leaves are die cuts from Lawn Fawn, "Small Stitched Leaves", cut in various fall colors.
The scarecrow is made from the farmer on p. 68 of Cricut's Everyday Paper Dolls with the changes noted below. The entire scarecrow is made with Everyday Paper Dolls and the Create a Critter 2 Cricut cartridges. I will list all the cuts below so you can easily recreate your own scarecrow.
Scarecrow "Recipe":
All the following cuts are from Everyday Paper Dolls:
Paperdoll body from ivory cardstock cut at 4 inches, p. 28, cutting off feet and hands (Ouch!)
Overalls in denim blue cut at 4 inches, p. 68 on blackout setting
Shirt cut from plaid paper at 4 inches, p. 68, on blackout <shift> setting
Hat cut from kraft cardstock at 4 inches, p. 68, on headwear <shift> setting
Rake cut from brown cardstock at 4 inches, p. 68, on Accessories 1 <shift> setting
(Note: When you cut the paperdoll body at 4 inches, cut everything else at that size and they will be proportionate to body size. If you want to make your scarecrow smaller or larger, just keep the settings all the same size for all the pices.)
Create a Critter 2 cartridge:
"Straw" hands, feet and hair cut from light yellow cardstock at 3 inches, p. 56, cut on Accessory <shift> setting (Note: These are cut at a different size than the rest of the scarecrow because it is from a different cartridge and 4 inches ended up being too large.)
For the face:
Eyes - 2 circles cut in black using a 1/4 inch circle punch
Nose - triangle shape snipped off a corner of orange cardstock
Hair - cut from the same cut as the hands and feet (see above)
Band on hat - hand cut in orange cardstock
Leaf on hat - from leaf dies as above
Small flower on hat - small flower punch
Blackbird is cut from the bird on p. 36 of the Create a Critter2 cartridge, cut at 1 inch. I cut it twice, once in black and once in orange. I snipped off the beak on the black one and layered it on top of the orange bird to create the orange beak.
Yellow flower on the hat is a small flower punch (two layered together) from a Martha Stewart punch. Patches on overalls are hand cut squares in orange, with added faux stitching in black ink.
Leaves are all from the same leaf dies as mentioned above. I inked the edges in coordinating fall ink colors.
I used a fine tip black journaling pen to outline some of the detail on the overalls and hat, and added stitch lines to the eyes and patches on his overalls.
The "hello" greeting is from Endless Birthday Wishes by Stampin' Up, and is stamped on one of the larger leaves from the leaf die cuts.
Helpful Hint: If you mess up the face like I did on my first attempt, you can cut off the head from the body and attach a 1-3/8" circle for the head instead. That way you don't have to start over with all your cuts!
I hope you like this week's card and that you make a little scrarecrow of your own!
Friday, September 9, 2016
A Little Happy - Candy Corn Card
When I see candy corn and candy pumpkins appear on the store shelves, I'm happy! I LOVE fall! It's my favorite season, along with everything that goes with it! I love the cooler weather, the colorful leaves, the pumpkins, Halloween, Thanksgiving, and everything pumpkin and spice! So what better to start off fall than a jar of candy corn?! It just makes me happy!
The only candy corn stamp I have is an old one from Stampin' Up with the smily face on it, but if candy corn makes me happy, then why not have a happy candy corn, right? I used an older jar stamp from Stampin' Up, although they have some cute new ones now. I stamped the jar, then stamped the candy corn inside, and colored in the candy with markers. I cut out the jar by hand and added some black and orange baker's twine to the lid. I popped it up from the rest of the card with dimensional dots.
The colors I used are tangerine tango and daffodil delight, with a little flag in a black patterned paper. I used the Bundle of Stitched Shapes (SSSD111412) dies to cut out the card front and the orange and white striped banner. The stamps are two combined from the Perfectly Wrapped stamp set from Stampin' Up. Card base is 4-1/4 x 5-1/2 inches in white, side fold.
Fall is almost here! Go forth and eat candy corn!
Friday, September 2, 2016
Camera Embossed Card
![]() |
| Camera Embossed Card |
I recently made a trip to Tuesday Morning and found this cute camera embossing folder by Darice. I embossed the black card front and just added some precut pieces from a SN@P simple stories pack that I got on clearance at Hobby Lobby. It is Disney themed but works well with other applications, like this card!
I will probably use this for a birthday card and I thought I could print out a sentiment for the inside like, "Hope your day is picture perfect!" Or, it could just as easily be a congratulations or encouragement card.
I plan to get back on schedule next week and start some fall cards! I hope you'll come back and check them out!
Friday, August 26, 2016
Life is a Beach - Smiling Octopus
![]() |
| Life is a Beach - Octopus Card |
This is the final card in my Life is a Beach series using the Cricut cartridge by the same name. I used the Maritime Designer Series Paper from Stampin' Up (2014-2015) and the octopus is found on p. 54 of the Life is a Beach cartridge, cut at 2 inches. I layered a white cut-out behind the blue in the same size just by offsetting it a little bit.
Card base is navy, cut at 4-1/4 x 11 inches and folded in half. Patterned paper is cut at 4-1/8 x 5-1/4 inches. I cut the circles behind the octopus at 2-1/2" (navy blue), 2-3/4" (red), and 3 inches (white). I inked the edges of the white circle in navy. I cut some star fish out of red using the cut from p. 65 and tied a piece of thick white twine around the card front. I thought this gave it a little nautical touch.
This was a very simple card to make. I like using patterned paper because you can get ideas just from the paper and the pattern dictates the card design, and I love the color combination of this paper. It made my other choices easy. Sometimes you just need something simple!
Finished card is 4-1/4 x 5-1/2 inches, top folding. I didn't add a greeting yet so my options are open for whatever kind of card I need. I think I'll see if I have a "smile" stamp. That would be a good one!
Summer is ending and so is this series. Come back next week to see what I have planned for my next series. Enjoy the rest of your summer!
Subscribe to:
Posts
(
Atom
)