This is Card #3 in my Valentine's Day card series. This is a blast from the past. While cleaning out my craft area earlier this month, I came across this 4x6 Fresh Prints DSP stack from 2014. It uses Real Red, Crumb Cake and Coastal Cabana colors. Coastal Cabana was one of my favorite colors and I was very sad to see it leave the Stampin' Up color lineup, so I am bringing it back for my Valentine Card! I love the color red with it!
This card is similar to the basket of apples card I posted last year. (See it here.) This time, instead of cutting the basket freehand, I found that if I cut a cupcake bottom using my Cricut Create a Critter 2 cartridge (p. 33, cut at 7-3/4 inches), I could use it for a basket. I inked the edges to give it a little dimension and popped it up on the card using dimensional dots. I added some strips of paper to the bottom of the basket to resemble the band of a basket, and then just started punching and embossing hearts to put in the basket. (If you don't have heart punches, there are also heart shapes on the Create a Critter and Create a Critter 2 cartridges.) With the basket popped up from the card, I was able to add my hearts behind the basket edge and build from there. The pretty heart shaped doily is from a pack I got at the Dollar Spot at Target (LOVE that place!)
Here is a more closeup view of the hearts in the basket:
I masked off the parts of the You're So Sweet stamp that I didn't want inked (from the You're So Sweet stamp set), then stamped in on white cardstock, and cut it out with a 1-3/4 inch punch. I layered it on a pink circle cut with the 2 inch circle punch, and then layered that onto a red 2-3/8 inch scalloped circle. I added a cute little red ribbon and 2 more punched out hearts.
Card base is A2 size (4-1/4 x 5-1/2 inches) in crumb cake, layered with red and then a piece of DSP from the Fresh Prints DSP stack I mentioned previously.
Note: There is also a cupcake on p. 36 of the #1 Create a Critter cartridge but it doesn't have the scalloped top.
My passion is making cards and other paper projects and sharing my ideas and projects with you.
Friday, January 29, 2016
Saturday, January 23, 2016
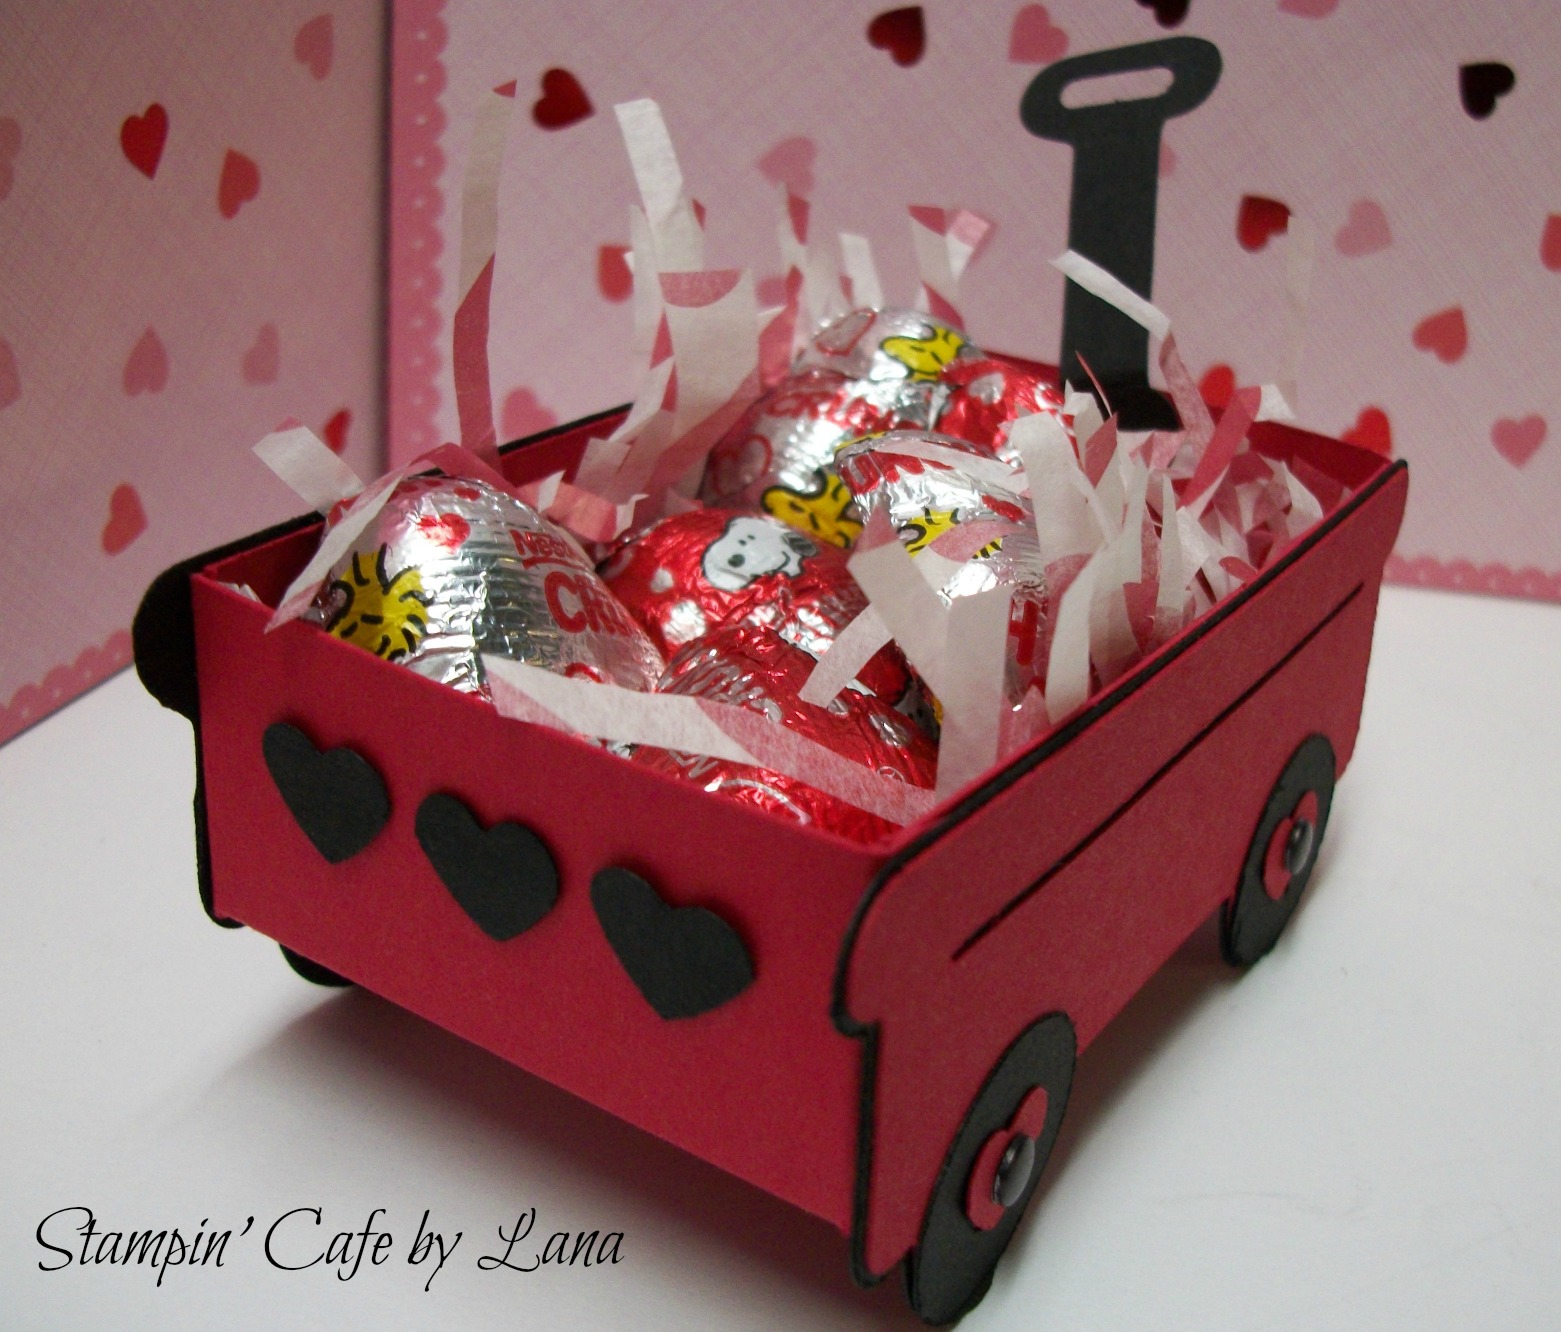
Valentine Wagon and Card
Then I decided to make a 3D version of the wagon. Here is the result!
| Box Base for Wagon (See Helpful Hints Below) |
| Page 73, Cricut Create a Critter Cartridge. Cut at 1-1/2 inches |
The wagon is found on page 73 of the Create a Critter Cricut cartridge. I have gotten more mileage out of this cartridge than any other I have. I just LOVE it! I cut the wagon pieces out twice for both sides of the wagon and made a box base to attach them to. (See photo above with cutting and scoring directions for box of wagon.) The Cricut wagon (all pieces) are cut at 1-1/2 inches. That is the height of the wagon sides. I did cut a third wagon shadow in black at 1-3/4 inches because I wanted a little larger handle to attach to the wagon.
After cutting the wagon shadow out of black, trim off the handles. The rest of the assembly of the wagon is just layering the pieces. First, the black shadow layer, then the red wagon layer, then the black wheels. I used punched out hearts for the wheel centers and then added black brads or "candy dots" in the center of each wheel. After the side pieces are assembled, assemble the box and attach the wagon pieces to the box base, making sure the sides of the wagon are level with the top of the box so the wheels will be below the box base. This makes the wagon free standing.
Helpful Hint: If you don't want the tabs on the box to show inside your wagon, just attach the tabs on the outside of the box base rather than on the inside like you would normally do for box assembly.
I attached the black handle (cut from the black shadow layer) to the front of the wagon on the inside with a small red brad and hid the prongs on the inside of the wagon with a punched out black heart. To make the handle look more life like, I used a small punch to cut out the inside of the handle (a retired punch from Stampin' Up). I then slightly bent the handle forward over the top of the wagon edge. I attached three black hearts to the back of the wagon. I think it would also be cute to write a child's name on the side of the wagon or use cut out letters, stickers, etc. Finished wagon size is 2 x 3-3/4 inches and stands 1-1/2 inches high.
I shredded and scrunched up some valentine tissue paper to add to the inside of the wagon and added some valentine candy. It will hold 6 Nestle Crunch hearts very nicely. It would also be cute with the little colored conversation hearts!
Have fun with this little red wagon!
Saturday, January 16, 2016
Love You a Bunch Card
This is Card #1 in my series of Valentine's Day cards. This one is a simple A2 sized card (4-1/4 x 5-1/2 inches when folded). I cut a layer 4 x 5-1/.4 inches and dry embossed it with a dotted embossing folder. I inked the edges lightly with red ink. The image is from the Sprinkles of Life stamp set from Stampin' Up. It is stamped on white, cut with a 1-3/4 inch circle punch, then layered on a piece of real red cardstock punched with a 2 inch circle punch, and then that is layered on a piece of pink cardstock cut with a 2-3/8 inch scalloped circle punch. The hearts are punched with a small heart punch in pink and red and then layered together and glued above the stamped image. I used a piece of the red cardstock that I cut the hearts out of and layered it behind the stamped and layered image. I stamped "love you" with the Crazy About You stamp set from Stampin' Up and the "a bunch" from the Sprinkles of Life stamp set. Both sentiments are then cut in a banner shape before attaching to the card with glue dots. The layered image is attached to the card with dimensional dots.
I hope you like this simple card and will come back in the following weeks for more Valentine card ideas! There is one I am particularly excited about and can't wait to share it with you! Thanks for stopping by today and happy cardmaking!
Sunday, January 10, 2016
Chalkboard Clipboard/Card Holder
Of course you can use it as a chalkboard too, but I also found another use - I can take the sheets from my perpetual birthday calendar and attach them to the board! I love that it is a stand alone board. Check your Dollar Tree and see if they have these chalkboards. The frames are always available, but I just stumbled upon the chalkboards. (Note: The Perpetual Calendar sheets are in an earlier post from July 31, 2015.)
Here are photos of the back of the board and one with the perpetual calendar sheet attached.
Thanks for stopping by today! Let me know if you try this project!
Tuesday, January 5, 2016
Sale-A-Bration 2016
Starting today, January 5th, until March 31, 2016, for every $50.00 of product purchased from either the 2015-2016 Annual Catalog or the 2016 Occasions Catalog, you can choose one item in the Sale-A-Bration brochure for FREE! If you would like a PDF of the Sale-A-Bration brochure click the link above. I would love to be your demonstrator. If you have any questions, please leave a comment below or contact me via Facebook using the link in the column on the right. Now is a great time to get those things on your wish list! Thanks for stopping by today!
Saturday, January 2, 2016
Birthday Tower
Happy New Year!!
Yesterday was my grandson's 15th birthday. He was a New Year's baby in 2001. I made this birthday tower for him as a gift. I have seen similar can cakes and candy cakes on Pinterest, but I combined the two into one "cake." It actually turned out more like a tower than a cake.
I started with a 10-12 inch round platter I purchased from Dollar Tree. It needs to be sturdy and not flimsy. I attached six short cans of root bear to the platter with duct tape underneath the cans. I inserted a can of Pringles in the center to have a base to attach the other elements to. Around the Pringles can, I added four boxes of theater style candy boxes, one on each side. I used an extra large rubber band to hold the boxes to the Pringles can. From there I started inserting candy bars and small packages of cookies until the rubber band was tight. On top of the Pringles can I attached a tub of miniature cookies. Again, I used rolled up duct tape. I added curled ribbon (purchased from Dollar Tree) to the sides and attached a birthday hat also purchased at Dollar Tree to the top of the cookie tub using glue dots. I cut numbers with my Cricut and attached those to the hat. I then started inserting folded up dollar bills around the tower. Since my grandson is 15 I used 15 one dollar bills. I also inserted a gift card and attached a baby picture of him with a small clothespin. I tied a wide ribbon around the center to hide the rubber band and added a few miniature Reese's peanut butter cups around the bottom of the platter to fill in between the cans.
This really went together a lot faster than I anticipated. I had it finished in about 30 minutes. I think the longest process was collecting all the items for the tower. You can certainly customize yours with whatever candy, soda and cookies you would like. He liked it, so if he is any indication, I think it would be a great gift for a teenager.
Here are some other close-up photos:
My supply list:
10-12 inch sturdy platter
6-pack soda cans
1 can Pringles
1 tub miniature cookies
4 boxes theater style candy
8 or more full size candy bars
4-6 packages cookies
handful miniature Reese's cups or similar small candies
curling ribbon
party hat
money and/or gift card
duct tape
glue dots
Yesterday was my grandson's 15th birthday. He was a New Year's baby in 2001. I made this birthday tower for him as a gift. I have seen similar can cakes and candy cakes on Pinterest, but I combined the two into one "cake." It actually turned out more like a tower than a cake.
I started with a 10-12 inch round platter I purchased from Dollar Tree. It needs to be sturdy and not flimsy. I attached six short cans of root bear to the platter with duct tape underneath the cans. I inserted a can of Pringles in the center to have a base to attach the other elements to. Around the Pringles can, I added four boxes of theater style candy boxes, one on each side. I used an extra large rubber band to hold the boxes to the Pringles can. From there I started inserting candy bars and small packages of cookies until the rubber band was tight. On top of the Pringles can I attached a tub of miniature cookies. Again, I used rolled up duct tape. I added curled ribbon (purchased from Dollar Tree) to the sides and attached a birthday hat also purchased at Dollar Tree to the top of the cookie tub using glue dots. I cut numbers with my Cricut and attached those to the hat. I then started inserting folded up dollar bills around the tower. Since my grandson is 15 I used 15 one dollar bills. I also inserted a gift card and attached a baby picture of him with a small clothespin. I tied a wide ribbon around the center to hide the rubber band and added a few miniature Reese's peanut butter cups around the bottom of the platter to fill in between the cans.
This really went together a lot faster than I anticipated. I had it finished in about 30 minutes. I think the longest process was collecting all the items for the tower. You can certainly customize yours with whatever candy, soda and cookies you would like. He liked it, so if he is any indication, I think it would be a great gift for a teenager.
Here are some other close-up photos:
My supply list:
10-12 inch sturdy platter
6-pack soda cans
1 can Pringles
1 tub miniature cookies
4 boxes theater style candy
8 or more full size candy bars
4-6 packages cookies
handful miniature Reese's cups or similar small candies
curling ribbon
party hat
money and/or gift card
duct tape
glue dots
Friday, December 18, 2015
Cocoa Packet Card
Here is a very quick card to put together for a last minute
little gift!
- Cut the card base at 5-1/2 x 8-1/2 inches, score and fold at 4-1/4 inches. Finished card size is 4-1/4 x 5-1/2 inches.
- Place the top front of the card in your trimmer at the 2-1/4 inch mark and cut down diagonally to the 2-1/4 inch mark on the right hand side to form the pocket edge.
- Place sticky strip or score tape along the 2-1/4 inch side on the right and across the bottom of the folded card. Now you have your finished pocket.
- To make sure the pocket stays together, punch a small hole towards the top of the right hand side of the pocket and thread through some baker’s twine and tie a bow.
- Decorate the front of the card as you wish using your favorite DSP. I used the Merry Moments 6x6 inch DSP stack. Colors used are crumb cake, old olive and cherry cobbler.
- For the stamped images, I used the July Paper Pumpkin Kit “Thanks a Latte.” I cut out the cup after stamping it on patterned paper. I adhered the cup to a punched out 2-inch circle, then layered it on a 2-3/8 scallop circle and then onto a 2-1/2 inch punched circle. That was then added to the card front with dimensionals.
- The cup of cheer stamped image is punched with a 1-3/8 inch circle punch, then layered on 1-1/2 and 1-3/4 inch punched circles.
- Add a packet of cocoa and a small candy cane and it’s done! You could also use this card design to hold a gift card instead of a cocoa packet and turn it into a gift card for a coffee shop!
This will be my last post until after the
New Year. I will return in January with new creations! Merry Christmas and Happy New Year!
Thursday, December 10, 2015
Punch Art Christmas Gift Tags
Elf Tag:
Head is punched with a 2 inch circle punch and layered over a 2-3/8 scallop circle punch cut in half to form the collar. Hat is a hand-cut triangle with the top of the hat folded over. I added a 1/4 inch strip of white for the brim of the hat and a 1/2 inch punched out circle for the top of the hat. Eyes are wiggly eyes. Nose is cut with a 1/4 inch circle punch and popped up with a glue dot. Give the cheeks some "blush" with soft pink ink and add part of a circle punch for the smile. Punch a hole in the top to attach the ribbon.
Santa Tag:
Santa is made very similar to the elf. The face is punched with a 2-inch circle punch. Beard is a 2-3/8 scallop circle punch with about a third of it cut off. Hat is hand-cut again in a triangle shape, folded down, and a 1/2 inch circle punch added to the top of the hat. I used the scallop border punch to make the trim of the hat. Nose is punched in red with a 1/2 inch circle punch. Again, eyes are small wiggly eyes. Punch a hole in the top to attach the twine or ribbon.
Reindeer Tag:
Reindeer head is cut from a 2-inch circle. Tuft of hair in the middle is a 1-1/4 scallop circle cut in half. Antlers are cut from the Tree Builder punch. Eyes are small wiggly eyes. Nose is punched with a 1/2 inch circle punch and mouth is hand drawn. I cut the top of the circle off for the head so I could attach the hair tuft and antlers easier. Punch a hole in the top for the cording or ribbon.
Snowman Tag:
Again, I used a 2-inch circle punch for the head, 1/2 inch circle punch for the eyes, the decorative label punch for the hat, and hand-cut a piece of black for the rim of the hat. The nose is hand-cut and the smile is hand drawn. Bow tie is cut using a 1-1/4 inch circle punch and cutting pieces out of two sides. Use the remaining center for the bow tie. I then added a 1/4 inch circle punch for the center of the bow tie. I cut a small strip of red glimmer paper for the hat. Punch a hole in the top for ribbon or cording.
Santa Suit Tag:
This is just a tag punched with the scallop tag topper punch. I added a strip of white down the center and added a piece of white cut with the scalloped edge punch for the bottom of the suit. the belt is a strip of black cardstock with a square cut for the belt buckle. I used a retired small 1/4 inch square punch to cut out the center of the buckle. Buttons are 1/4 inch circles punched out of black. Attach cording or ribbon to top.
Penguin Tag:
This tag is a little more intricate. The tag is cut with a stitched circle tag from Lawn Fawn. I love the stitched effect around the edges. Penguin body is a circle punched with the 1-1/2 inch circle punch. Head is punched with the 1-3/8 inch circle punch. White front of body is cut with the small oval punch. Arms are also cut with the oval punch but shaped by hand-cutting. White part of face is punched with a 1 inch heart punch (Martha Stewart). Stocking cap is punched with the 1-3/8 circle punch and cut in half to form the hat. Earmuffs are 1/2 inch circles. Scarf is made with the word window punch and feet are made with the retired modern label punch. Add some ribbon for hanging or attaching to package.
Thursday, December 3, 2015
Punch Art Santa Card
This fun Santa card is made using punches, with the exception of the body and a few hand cut pieces. I cut a 2-1/2 inch wide by 3-3/4 inch high triangle with my Cricut and added all the other body parts as follows:
Polka dot DSP is from the Merry Moments paper stack. I used real red and old olive cardstock for bard base. Layers were punched with scallop edge punch (no longer available from Stampin' Up). Enamel dots are Home for Christmas Enamel Dots. Overall finished size of card is 4-1/4 x 5-1/2 inches. "ho, ho, ho" is stamped on 1 inch circles stamped with individual letters, then layered on top of red and olive green 1 inch circles.
Ho, Ho, Ho, Merry Christmas!!!
- 1-2 inch white circle punch for top of hat.
- 1/4 inch strip of white cardstock cut for hat rim (hand cut)
- Head/beard - 1-3/4 inch scallop circle punch. Ink edges of scallop circle in black, Add some rosy cheeks with a sponge dauber,
- Eyebrows - 1/2 inch circle punch cut in half and edges inked in black
- Eyes - 1/4 inch circles punched in black. Highlights added to eyes with white gel pen.
- Mustache - 1 inch circle punch cut in half and inked around edges in black
- Nose - 1/4 inch circle punched using red glimmer paper.
- Arms - word window punch for each arm.
- Hands - 1/2 inch circle punch cut in half
- Bottom of Santa's coat - 1/4 inch strip of white paper cut to fit.
- Legs - word window punch in black
- Boots - 1/2 inch circle punch cut in half.
Polka dot DSP is from the Merry Moments paper stack. I used real red and old olive cardstock for bard base. Layers were punched with scallop edge punch (no longer available from Stampin' Up). Enamel dots are Home for Christmas Enamel Dots. Overall finished size of card is 4-1/4 x 5-1/2 inches. "ho, ho, ho" is stamped on 1 inch circles stamped with individual letters, then layered on top of red and olive green 1 inch circles.
Ho, Ho, Ho, Merry Christmas!!!
Friday, November 27, 2015
Poinsettia Punch Art Tag
This poinsettia punch art tag was made using a 2 inch circle punch and the 1-3/4 inch circle punch! Similar to the post a few weeks ago where I made apples and leaves with the circle punch, this is made the same way. Click here to see that post. First punch your circle. Then insert the circle back into the punch from the top until you see a leaf or petal shape, then punch. (See picture below) Turn the circle around and punch another petal from the other side of the circle. Repeat until you have enough petals to form a full poinsettia. I used the 2 inch punch for the outside flower petals and the 1-3/4 inch punch for the inner petals. Repeat the process for the green leaves behind. Hint: If you have trouble inserting or positioning the circle into your punch, attach a thin strip of paper to hold onto it so you can insert it into your punch.
To make the veins in the petals, I used a spider web embossing folder and arranged the leaves on the folder before running through the Big Shot. You could use any embossing folder with some shape that resembles veins in the petals. For the green leaves, I just put the leaves on my score board and scored down the enter of each leaf. Use your bone folder to curl the petals and leaves a little bit for more dimension. For the center of the poinsettia, I punched a yellow flower with the petite petals punch and added a rhinestone in the center. Each petal and leaf were inked around the edges with coordinating red or garden green inks.
The rest of the tag is made with banners cut from the Merry Moments DSP stack and red card stock, adding some white doilies behind. The sentiment is from the Lots of Joy stamp set. I added silver cording trim tied to the top of the bag.
Thursday, November 19, 2015
Christmas Envelope/Wallet
CHRISTMAS ENVELOPE/WALLET
With Christmas shopping about to get into full swing, I wanted
a place to keep my Christmas list, sizes, gift ideas and receipts. I made this
envelope/wallet for that purpose. It is a redo of a similar one I did back in
August (click here to see that post). All the measurements and directions are
in that post. You take a 6 x 9 mailing envelope, cut a thin slice off the
sealed end, fold the envelope in half, and start applying pieces of patterned
paper, pockets, etc. It is a super fun project to make and I think it will also
come in handy for my Christmas shopping! I used the Merry Moments DSP stack
from Stampin’ Up and some other leftover Christmas products from prior years.
This is a good project to use up some of that leftover Christmas stuff! I used
Velcro dots to close the flap. Stamp set used is Lots of Joy from the Stampin’
Up main catalog. Enamel dots are the Merry Moments candy dots from the holiday
catalog. I hope you will give this one a try!
Thanksgiving Table Favors
If you are looking for an easy favor for your Thanksgiving table, give these a try. I cut strips of cardstock into 2 x 8-1/2 inch strips and cut each end with the tag topper punch. Then I scored each tag at 3-5/8" and 4-/5/8", folded on the score lines, and attached the two tag ends together with glue dots. One side will stand straighter and one side will be a little bit slanted. The slanted side is the one you want to attach your greeting to. I punched 2-1/2 inch circles from the Into the Woods DSP, inked the edges, added some die cut leaves, added a label punched with the label bracket punch, and then added a die cut greeting. If you don't have a die cut greeting, you could stamp an image of your choice. I added a gold sequin and tied the top with some fall colored thick baker's twine. Inside I slipped a Russell Stover caramel candy. They are approximately 1-1/4 x 2-1/2 inches, so any candy that approximate size would work. I didn't glue mine in because they fit snuggly enough, but you could attach the candy with glue dots. I had 10 done in about an hour, done in assembly line fashion, so a pretty quick project. The part that took the longest was the die cutting, so if you skipped that and just did stamping, they would be even quicker! Finished standing height of favor is 3-3/4 inches, so they won't take up a lot of room on your table. (Note: Die cut leaves are from Simon Says Stamp and "grateful" is from Taylored Expressions. All other products used are Stampin' Up. With the exception of the baker's twine, all colors and items are current Stampin' Up product.)
Monday, November 16, 2015
Christmas Gift Tags
This was my project this past weekend. I made my own Christmas tags using the Oh, What Fun stamp set from Stampin' Up! I think these tags will be great additions to my packages this year! There is also a tag kit you can get to make the tags, but I just used scraps I already had. It's a great way to use up your Christmas stash! http://www.stampinup.com/ECWeb/SearchResults.aspx
Sunday, November 15, 2015
Make a December Daily with Project Life from Stampin' Up!
Want to make an album documenting the holiday season? Project Life has the solution! The Kraft 6"x8" album is only $10.00 and the Hello December 2015 Project Life Card Collection is also $10.00. You can add from there as you like. There is a Hello December Accessory Pack, Hello December stamp set, and of course the photo pocket pages. Such a fun way to create memories this holiday season, from tree trimming to cookie baking, school programs, etc. Capture it all in one fun album! You can save 15% when you purchase the stamp set, card collection, acesssory pack and stamp set as a bundle.
Supply List:
Subscribe to:
Posts
(
Atom
)