Thursday, August 27, 2015

Flower Medallion Punch to Make Poinsettias

I used the flower medallion punch from Stampin' Up to make these "poinsettias" on my first Christmas cards of the season. I had to try some prototypes early. I always change my mind on what I want to make by the time the season actually gets here, but wanted to try this idea of using the flower medallion punch. The flower on the left was stamped in Real Red on white cardstock, punched, and layered on a stamped  Garden Green and punched flower for the leaves. I clustered some small yellow flowers in the center. The flower on the right was stamped and punched in layers on Real Red cardstock with green as the bottom layer for the leaves. I used gold glitter paper to punch a small circle for the center.

Cardstock is Garden Green and Real Red with Real Red DSP from the Brights Collection for the card on the left and Real Red and Old Olive DSP for the card on the right. Left card has ribbon as the accent and card on the right has an embossed strip of white cardstock. Greetings are both from SU - Endless Wishes (2014) and Teeny Tiny Wishes.

Give it a try and see which version you like better. I love this diagonal striped DSP! I think it gives the cards a modern look, but still using traditional green and red colors. Both cards are standard 4-1/4 x 5-1/2 inches, with layers each cut 1/4 inch smaller.

Thursday, August 20, 2015

Paper Pumpkin Stamp Storage

Paper Pumpkin Stamp Storage

I have been in a quandary for a long time about how to store my Paper Pumpkin stamps. I didn't like the boxes all stacked up and would lose track of them. Out of mind, out of sight kind of thing. I also tried the clear stamp cases, but when you only have a few stamps in each set, it's kind of a waste of space, and I didn't like combining the stamps from different kits into one plastic case. I recently saw a video where Jennifer McGuire put her clear stamps in cellophane sleeves, added white cardstock inserts, and then labeled the stamp sets. I decided to adapt this idea to my Perpetual Calendar Box in an earlier post. This is the result. I made the box the same way, just increased the depth to 2-1/2 inches to accommodate more stamp sets. (You could make the box a little narrower but I just left it the same as the Perpetual Calendar box.)
BOX DIMENSIONS FOR THIS BOX:
2 PIECES OF CARDSTOCK - ONE IS 11 X 7 INCHES AND ONE IS 7 X 6 INCHES.
ON THE 11 X 7 PIECE, SCORE ON 11 INCH SIDE AT 1/2, 3, 8 AND 10-1/2 INCHES
ON THE 7 X 6 PIECE, SCORE ON 7 INCH SIDE AT 1/2 AND 3 INCHES, TURN 90 DEGREES AND SCORE ON 6 INCH SIDE AT 1/2 AND 5-1/2 INCHES.
REST OF CONSTRUCTION OF BOX IS THE SAME AS PERPETUAL CALENDAR BOX IN POST BELOW.

Right now I have enough room in the box that I can add a few cards leftover from the kits. I used 4x6 cellophane bags and all the stamps fit in this size. although one was kind of a tight fit. So far I'm finding this is a great way to grab a stamp set and make a really quick card! It fits on my workbench and they are not out of sight. I took some of the Paper Pumpkin advertising from the kits and decorated my box with them. The colors I used were Tempting Turquoise and Calypso Coral.

If you've been wondering how to store your Paper Pumpkin stamps, maybe this would work for you too!

Thursday, August 13, 2015

Minion Birthday Cards


While “Minion” cards are certainly not new, I have been seeing some on Pinterest and wanted to make a few of my own. They are so much fun to make and turn out really cute. I just love their little faces! I’ve included a picture of the products and punches I used to create my Minions, along with directions below. The sentiment is from Endless Birthday Wishes #140273. The written instructions are for the one-eyed Minion.  My Minion with the goggles (two-eyes) was my first one and I thought was a little “chubby” so I changed the dimensions for the one-eyed Minion.  Have fun creating your own Minions! Idea - I made a sentiment on my computer for the inside of card that said: "Hope your day is just like you - "one in a minion!"


Instructions:
Card base is 4-1/4 x 5-1/2 inches
Basic Black layer is 4 x 5-1/4 inches
Daffodil Delight layer is 3-3/4 x 5 inches
Blue layer (Paper Studio) is 3-1/2 x 4-3/4 inches (embossed with SU Decorate Dots embossing folder)

Punches:
2 inch circle punch
1 inch circle punch
½ inch circle punch
¼ inch circle punch
7/8 inch scallop punch
Word Window punch

Minion Pieces:
·        1-7/8 x 2-1/2 inch yellow piece – Stick each end into your 2-inch circle punch from the inside and cut rounded ends.

·        1-1/2 x 1-1/4 inch blue piece for overalls, plus two ¼ inch wide strips for straps (cut longer than needed, attach to front bib of overalls, and fold extra around to back),  ½ inch square for pocket. Add faux stitching on overalls with a white gel pen. I added a tiny 4-petal flower to overalls pocket. After blue piece is attached to yellow minion, trim to match the bottom of yellow piece.

·        2-1/2 x 5/8 inch strip for goggles strap (fold extra around to back)

·        Eyes: 1 inch circle in gray, ½ inch circle in white, ¼ inch circle in black.

·        Arms and feet:  Arms are created with the word window punch. I created the hands and feet by cutting out of scallops punched with the 7/8 scallop punch.

·        Add small thin black strips for hair. 

Friday, August 7, 2015

Envelope Card or Mini-Album


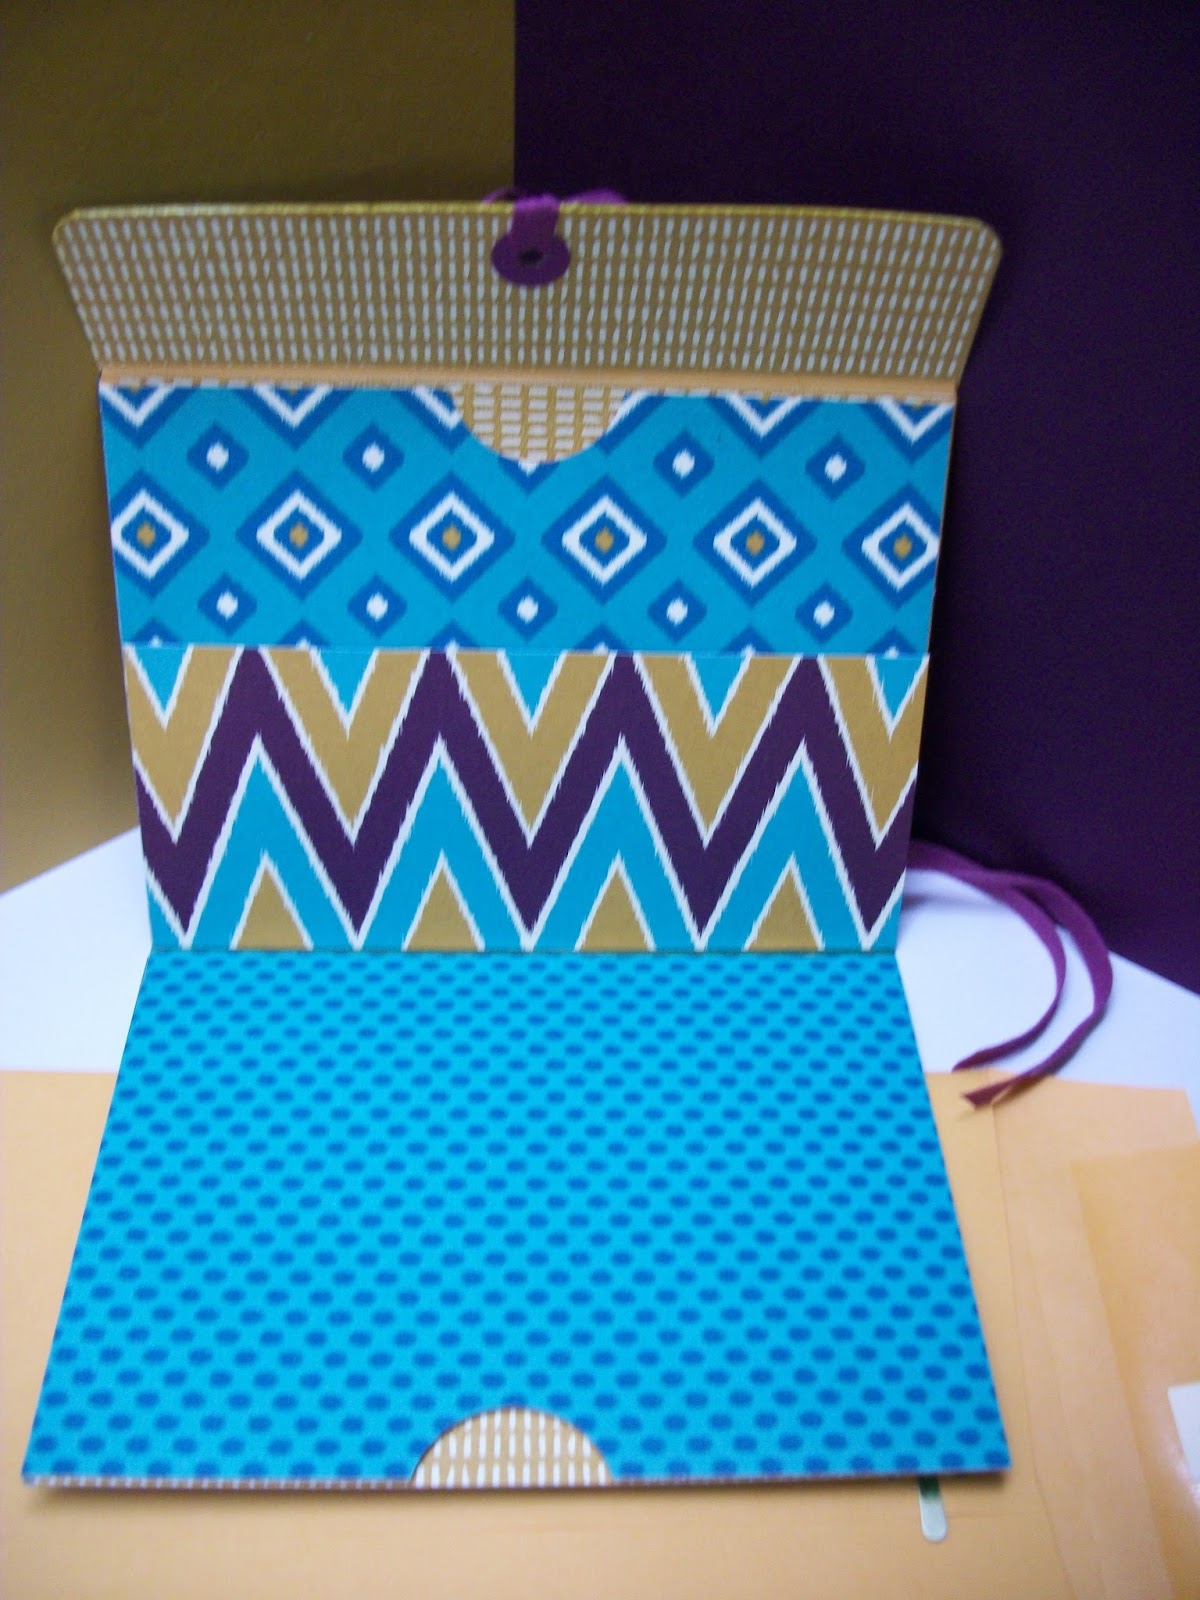
This fun project is made from a 6 x 9 inch clasp envelope! You just fold it in half, cut off the closed end, and decorate with pieces of coordinating patterned paper. It's a great way to use up scraps! The possibilities are endless. You could add gift cards, photos, note cards, or use it as a receipt holder in your purse! I got the idea from "roxyfur" on You Tube (Dollar Tree Envelope to Adorable Card Holder). Mine, however, is a little bit different. 

Here are the written instructions for my version:

Envelope Card
Supplies Needed:
1 6 x 9 inch Kraft clasp-close envelope
4 pieces designer paper cut 4-3/8 x 6 inches (for panels)
2 pieces designer paper cut 2 x 5-7/8ths inches (for inside pockets)
1 piece of designer paper cut at 1-1/2 x 6 inches (for outside flap)
1 piece designer paper cut at 1-3/8 x 6 inches (for inside flap)
1 piece of designer paper cut at 2-1/2 x 6 inches (for inside pocket)
Various width 6 inch strips (for decoration)

Instructions:
1.    Cut 1/8th inch off the closed end of the clasp envelope.
2.    Fold down the flap on top but do not close shut.
3.    Fold envelope in half making a 4-1/2 x 6 inch “wallet.”
4.    Attach the 4 panel pieces to the inside and outside of wallet. This is a good way to use coordinating papers, mix and match.  Tip: When attaching the inside top piece be sure you don’t glue it too close to the top and glue the opening shut. There is a slight taper of the envelope here, but rather than cut the paper to fit, just don’t glue it too close to the top.
5.    Using a 1-1/4 circle punch or similar cut a half circle in the tops of both inside pockets. (This will make it easier to access the pockets.)
6.    Attach the 2 inch x 5-7/8th inch strips to the inside of each pocket. (If you don’t mind the kraft envelope showing you can skip this step.)
7.    Attach the 2-1/2 x 6 inch piece of paper to the inside right pocket in the center, making sure to only adhere the edges. This will make an additional small pocket on the inside of the wallet.
8.    Attach the flap pieces to the flap of the envelope on each side. Rather than cutting the strips to match the taper of the flap, just glue each side on and then use a corner rounder to round the corners. Punch a hole in the center of the flap, adding hole reinforcers if desired, and string ribbon through the hole to tie the wallet closed. (Alternatively you could use Velcro or magnets.)
9.    Decorate the outside of your envelope/wallet anyway you desire. Add coordinating strips of cardstock, stamped images, etc. 

More Pictures:


Friday, July 31, 2015

Perpetual Birthday Calendar and Box


NOTE: The stamp set referred to in this post has been retired by Stampin' Up and is no longer available. You may be able to still find it on Ebay. However, I updated this post with a new perpetual calendar and storage box with preprinted monthly pages that you can decorate any way you wish. This is the link to the new post: Updated Perpetual Calendar                                          

Stampin' Up sells a great Perpetual Birthday Calendar stamp set and kit. However, I thought this box would work better in my situation. I created the box and used the Perpetual Birthday Calendar stamp set on p. 12 of the 2015-2016 Catalog (#137167) to stamp and decorate each month’s insert. I added 1 inch punched out circles to the top of each sheet as dividers so I can add a card or two behind each month’s insert. All I have left to do is add the names and birthdays! Instructions for the box are below. I also have a PDF available for the calendar inserts that you can just print, cut and stamp.

The stamps are also great for backgrounds on cards and scrapbook pages! It is one of my favorite sets! Here are links to the stamp set and the Stampin' Up Perpetual Calendar Kit:

Built for Free Using: My Stampin Blog

Box Instructions: (Finished Box is 5x7 inches, 1-1/2 inches deep)
You need to cut two pieces to make the box to hold the perpetual birthday calendar sheets.
1. One piece 9 x 7 inches.
2. One piece 6 x 6.5 inches.
Scoring and Assembly (See photos that follow):
1. On the 9 x 7 inch piece, with the 9 inch side across the top of your scoreboard, score at 0.5, 2, 7 and 8.5 inches. Cut diagonal pieces off each side of the top. I put the ruler on 0 for the right middle score line and placed the ruler at 3 inches on the second score line in a downward direction, marked and cut. Use the cut-off piece to guide your cutting the diagonal piece off the other side so they will match.
2. On the 6 x 6.5 inch piece, with the 6.5 inch side at the top, score at 0.5 and 2 inches. With the 6 inch piece across the top and the score lines on top, score at 0.5 and 5.5 inches. Cut out the pieces as shown in the diagram, leaving a sort of T-shape.
3. With the half inch score line at the top of the second piece, attach it to the first piece, lining up the score lines. This makes one long piece. Then fold in the side tabs of the second piece and attach to the first piece to form the sides of the box.
4. Bring up the front section and attach it to the long side tabs, forming your completed box. I used Tombow mono-multi to give me some wiggle room, but you can use sticky strip or other double-sided tape of your choice.
5. Cut DSP to fit the front and sides of box and add ribbon or other decoration to your box.
Piece #1 - 9 x 7 inches. Cut top corners as shown. 
Piece #2 - 6 x 6-1/2 inches - Cut pieces off at score lines as shown. 

Attach the two pieces together


Fold on score lines to form box. 

Bring up front and attach as shown


Card Inserts: (finished size 4-1/2 x 7 inches)
Print numbered sheets with lines on your computer, then cut to size and stamp. I have a PDF available at my Etsy Shop. See link to my shop on the right.

Whether you go with the kit from Stampin' Up or my version, I think you'll find a perpetual birthday calendar is a great thing to have! You don't have to remember to transfer birthdays from one year's calendar to the next. You always have the dates when you need them and it's easy to add new ones! Enjoy creating and thanks for visiting!

Friday, July 24, 2015

Denim "Jeans" Card


I have another idea for a guy’s card. I recently watched a video by Melanie Muenchinger on how to do a denim technique. http://www.bing.com/videos/search?q=quick+denim+technique+direct+to+paper&FORM=VIRE2#view=detail&mid=98DBD9BB081C4DD89D8798DBD9BB081C4DD89D87. I thought I would take it a step further and make a card that actually looked like a pair of jeans! I did find, however, that the newer Stampin’ Up ink pads don’t work. You need the older type pads. All you do is take any blue ink pad and drag it down across some white cardstock until you get the shade you want. I used Pacific Point. I layered the pieces so I would have functional pockets to put the money in.

Here are the instructions:

I would recommend doing the denim technique on a full sheet of white cardstock and then cutting the pieces as shown in the photo. I left it white to show the dimensions. You will need the following pieces for the “jeans:”
4 x 5-1/4” piece for layer 1
4 x 4-1/2” piece for layer 2
4 x ½” for waistband
3-1/2 x ½” for zipper flap
¾” x ½” for tab to attach button to (I actually had a jeans snap in my button bin so I used that.)

For the pockets, use a 2-inch circle punch and cut a small semi-circle piece from each side of the 4 x 4-1/2 inch piece (layer 2).
After the pieces are all cut, make faux stitch marks on all the pieces.
Attach the waistband with dimensionals to the top of layer 1.
Attach layer 2 with the pockets to layer 1 with dimensionals, making sure you don’t obstruct the pockets so you can insert the cash.
Attach the zipper flap without dimensionals to layer 2.
Attach the small tab to the waistband without dimensionals and attach your button.
Attach small silver punched circles to the edges of the pockets to resemble grommets or use small silver brads.

I then attached the finished “Jeans” to a piece of black cardstock cut at 4-1/4 x 5-1/2 and then attached that to the actual card. (Cut white cardstock at 5-3/4 x 9 and score at 4-1/2). Finished card size is 4-1/2 x 5-3/4 inches. If you don’t want to layer the jeans, you can attach it directly to your card and have a card that is an actual A2 size or 4-1/4 x 5-1/2 inches.

Stamp and attach the greeting of your choice, fold the cash and insert in pockets. Done!

Note: I think this would also make a cute gal’s card by using rhinestones, etc. and bling up the jeans!

Friday, July 17, 2015

"Cool" Summer Cards


Here are a couple cards I made with a summer theme. The popsicle card was actually “cased” from a shirt my granddaughter was wearing the other day. It was so darn cute I had to try to recreate it. I hand cut the popsicle. The popsicle stick is from the word window punch, and the remaining face pieces are either punched or cut from various Cricut cartridges. Unfortunately the background paper is retired, but you could use any cute ice cream themed paper.  It was a really fun card to make. I can’t wait to see if she likes it!

The second watermelon card is certainly not original. I have seen watermelon cards all over Pinterest, but I had to make one for myself. Everything used to make this card is current product from Stampin’ Up. I used watermelon wonder, cool cucumber and daffodil delight colors. The watermelon is super easy, just punch some circles, cut them in half, and layer together. The “seeds” are hearts cut in half and reshaped a little bit. The sentiment  is part of a stamp from the “You’re So Sweet” stamp set from Stampin’ Up! (p. 57 of the new catalog)

Hope you are having a fun summer! Enjoy!

Friday, July 10, 2015

June Paper Pumpkin Kit


June's Paper Pumpkin Kit had two different cards you could make. In the first picture, the card on the left is made according to the instructions. The card on the right is a card I made using the supplies included, plus some scraps of Bermuda Bay DSP from the Brights DSP stack. The bottom card is a version of the second card from the kit. Sometimes just seeing what's in the kit inspires you to create something else. If not, you can always make it like the instructions show you and you end up with some very cute projects. The kit this month makes 8 cards of 2 different designs along with 8 envelopes and liners. EVERYTHING is included, stamps, cardstock, embellishments, ink spot(s) and most of the time even adhesive! When you order your first kit they even include a clear stamp block!

There are many ways to try Paper Pumpkin. You can purchase a one month subscription for $19.95, 3 months, 6 months or a year. You can cancel at any time or skip a month by notifying them by the 10th of the month before the kits are sent out. It's a simple click of a button on the website, no questions asked! If you would like to give Paper Pumpkin kits a try, the links are below. I think you'll be impressed by the quality of the kits. You always have leftovers to use for other projects and who doesn't like a pleasant surprise in the mail every month?! It's almost time for the July kits to be mailed out. I'm excited!
Built for Free Using: My Stampin Blog

Thursday, July 2, 2015

Happy 4th!

Very simple to make 4th of July card! It's a basic 4 x 5-1/2 card using Whisper White Cardstock, layered with the Real Red diagonal stripe DSP from the new Brights Collection Designer Series Paper Stack. I used Night of Navy for the corner piece cut at 2 x 2-1/2 and added punched out stars in whisper white. I used the scrap strip from punching out the stars to make the banner and inlaid Real Red cardstock stars on top. The "Happy" is from the Crazy About You stamp set and I cut the "TH" from the Birthday stamp. I used an old retired number 4 stamp. You can use whatever you have on hand. I stamped a tiny red star and cut the entire sentiment out with the new 1-1/2 inch circle punch and added a Night of Navy circle behind it cut with the 1-3/4-inch circle punch. HAPPY 4TH of JULY!!

Saturday, June 27, 2015

How to Know What Punches You Have


I LOVE my punches. I also love to find images to stamp that fit inside the punch for cards and other projects. I saw someone do this and I thought it was a great idea. I don't remember where or I would give them credit. Anyway, I went through all my punches and punched the image on 3x4 inch pieces of heaveweight kraft cardstock. In the original idea she slipped these cards inside plastic baseball card sleeves, but I really don't think this is necessary if you use a nice heavyweight cardstock. I wrote the name of the punch at the bottom of each card and punched holes in the top left corners and attached them together with a notebook ring. I actually found a pack of 8 at Dollar Tree for $1.00. They had 3 different sizes to choose from.

I can now go through my punched images and place them either on top of my stamped image or over an image in the catalog and find out immediately whether the image will fit inside the punch. No more guessing and digging around in your punches to see what you have or whether it will fit the image! I thought this was a great tip and I wanted to share it with anyone who hadn't seen the original idea! Happy punching!

Friday, June 19, 2015

Black and Yellow Crazy About You Card

Black and yellow are one of my favorite color combinations. This card is made with one of the flower stamps from the Crazy About You stamp set from Stampin' Up. The thanks is from Endless Thanks. Doodle line on right side is from Hello Life. Yellow cardstock and ink is Daffodil Delight. It's just a basic 4-1/4 x 5-1/2 inch card/ Very fast to put together with the exception of cutting out the leaves by hand. Flower was cut using the Flower Medallion punch from SU. Black and white is a scrap from the previous Valentine card stack, but you could use any black and white paper you may have on hand.


Friday, June 12, 2015

Summer Scrapbook Page

Cardstock: Bermuda Bay, Watermelon Wonder, Cucumber Crush, Cherries on Top DSP, and
polka dot paper from Brights Collection DSP Stack

I know I haven’t posted any scrapbook pages here yet, but quite frankly it’s because they are so time consuming for me! I can spend hours on one page! I might have a problem! Anyway, I wanted to share this scrapbook page that I made for my upcoming Stampin’ Up workshop. I had a lot of cards made but I also wanted to show a scrapbook page because not everyone makes cards. The new Cherries on Top 6x6 DSP is perfect for birthday pages, birthday party invitations, and everything summer! The coordinating cardstock and Sprinkles on Top stamp set complete the whole group. There is room for two pictures on this page along with possibly a circle cut-out picture on the right side. The stamps I used are from two different sets. Don’t be afraid to mix your stamps. It makes for a more unique look. I hope this page inspires your creativity for your own summer pages. Enjoy! 


Celebrate from Enless Birthday Wishes; the little things from Hello Life

Cone hand cut. Ice cream made with 2-1/2 inch circle punch. Sprinkles added with cut-out circles from hole punch.

Banner made using Banner Punch

Circles cut with 2-1/2 inch and 2 inch circle punches.
If you want any of these supplies, they can all be found at my on-line store @ Stampin' Up! Thanks for stopping by today! 

Saturday, June 6, 2015

Bohemian DSP Card with Flower Medallion


Here is a card we will be making at my upcoming workshop on June 20th. I am having a Stampin' Up new catalog launch. If you live in the central Kansas area I would love to have you come! There will be free make and takes, a free catalog, discounted shipping, and prize drawings. You can contact me for details or go to my Facebook page.

If you don't have a demonstrator you work with already or cannot come to the workshop and would still like a catalog, click the "Purchase Catalog" link at the top of this page and I will send you one, along with a bookmark featuring the new colors, and an individual card kit for the Bohemian card shown at the top of this post. This is my cost for mailing the catalog. However, if you place an order from my online store by July 31st and select me as your demonstrator, I will refund your purchase price for the catalog. I would be thrilled to have you as a new customer!

Supplies used to create this card:
Built for Free Using: My Stampin Blog

Friday, May 29, 2015

Father's Day Gift Card Wallet


Here is a wallet card I made for Father's Day. It is large enough to put cash in it, coupons for dad, gift cards, etc. Finished card is 4-3/4 x 3-3/4 inches. Here are the instructions:

1. Cut two pieces of brown cardstock at 9-1/4 x 3-3/4 and 9-1/4 x 3 inches. Score each piece at the halfway point and fold together before adhering. After the cardstock has been "limbered up" a bit, adhere the two pieces together at the bottom and both sides. Note: It takes a little careful handling to fold the two pieces together if your cardstock is heavy so it doesn't crack or crease. Use a bone folder.

2.  Cut and adhere decorative paper pieces to the outside and inside of card. You will need two pieces cut at 4-1/2 x 3-5/8 for the outside of wallet and two cut at 4-1/2 x 2-3/4 for inside of wallet. Note: Since the cardstock I used had a white core, I sponged the edges of the paper with brown ink before adhering to wallet.

3. Attach a piece of ivory or other colored cardstock to right inside of wallet for your message and for a place to sign the card. This piece measures 4 x 2-1/2 inches.

4. Stamp message and cut out with a 1-3/4 inch circle punch and layer on top of a brown piece cut with a 2 inch circle punch.

5. Make a bellyband to hold the wallet card closed by cutting a piece of brown cardstock 3/4 x 10 inches, fold around card and glue band together. I attached two small brad heads or "candy dots" to the righthand side.

Supplies Used: Stampin' Up cardstock is Early Espresso, Early Espresso ink from Stampin' Up, 1-3/4 inch circle punch and 2-inch circle punch from Stampin' Up, Father's Day greeting from a prior Paper Pumpkin kit, candy dots (neutral) from Stampin' Up, and patterned cardstock is from a Colorbok cardstock stack called "Neutral Basics."